Not sure if this is really an issue or not but this middle stepper driver will not go in all the way on my SKR-Pro V1.2 I purchased from V1engineering.
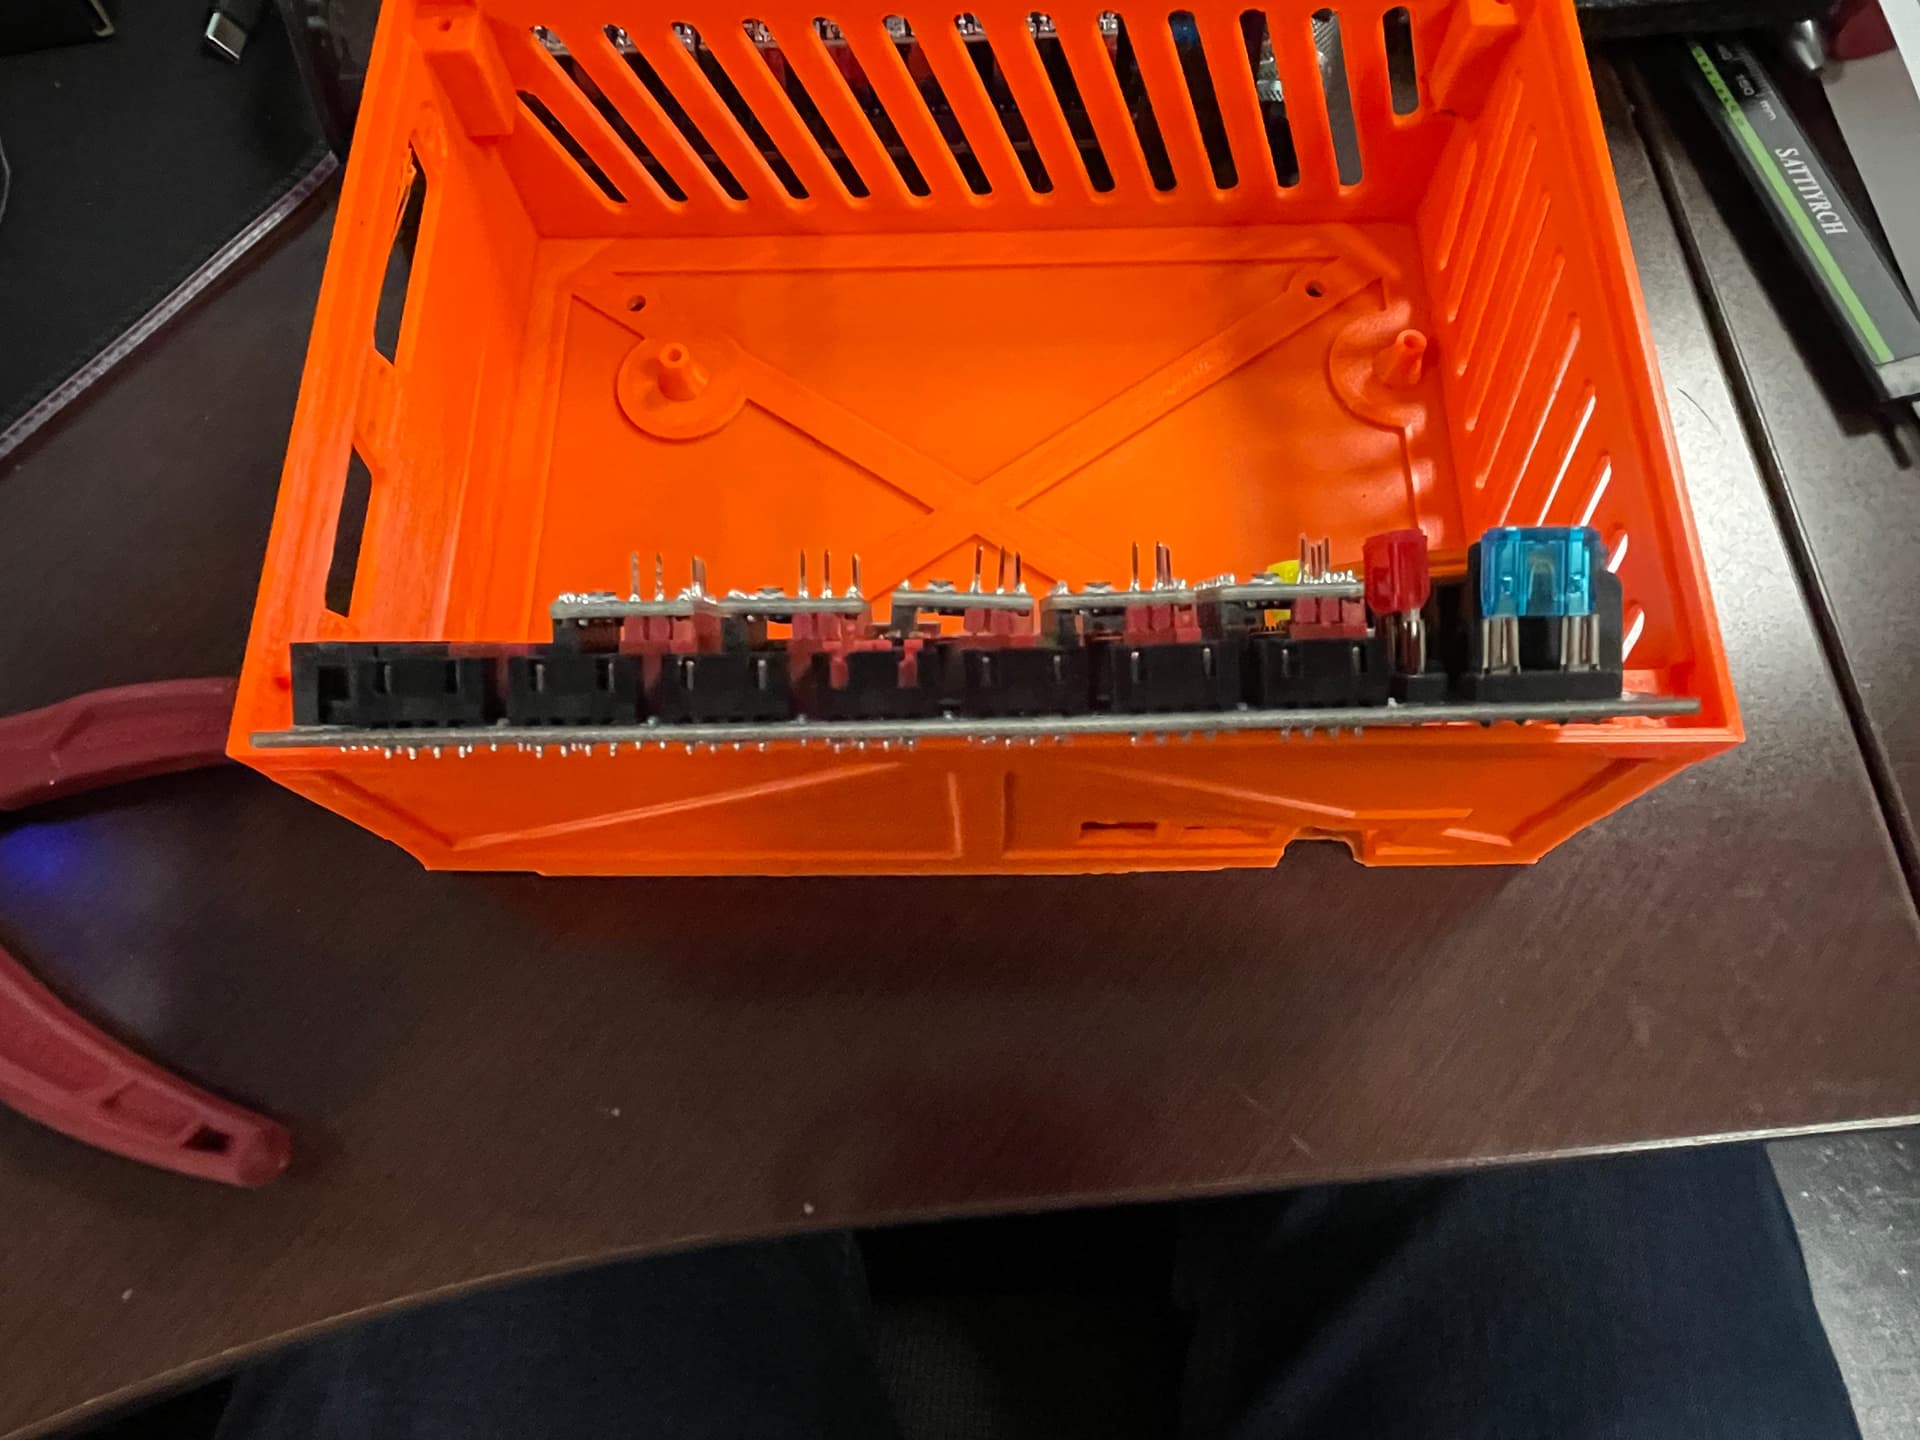
It should not be an issue but why is it happening? Is the bent/cut pin hitting or something else?
I tried it with another stepper driver but it still won’t go in all the way. With a jumper the pin will only go down so far in the top left black “connector”. The rest of them are ok.
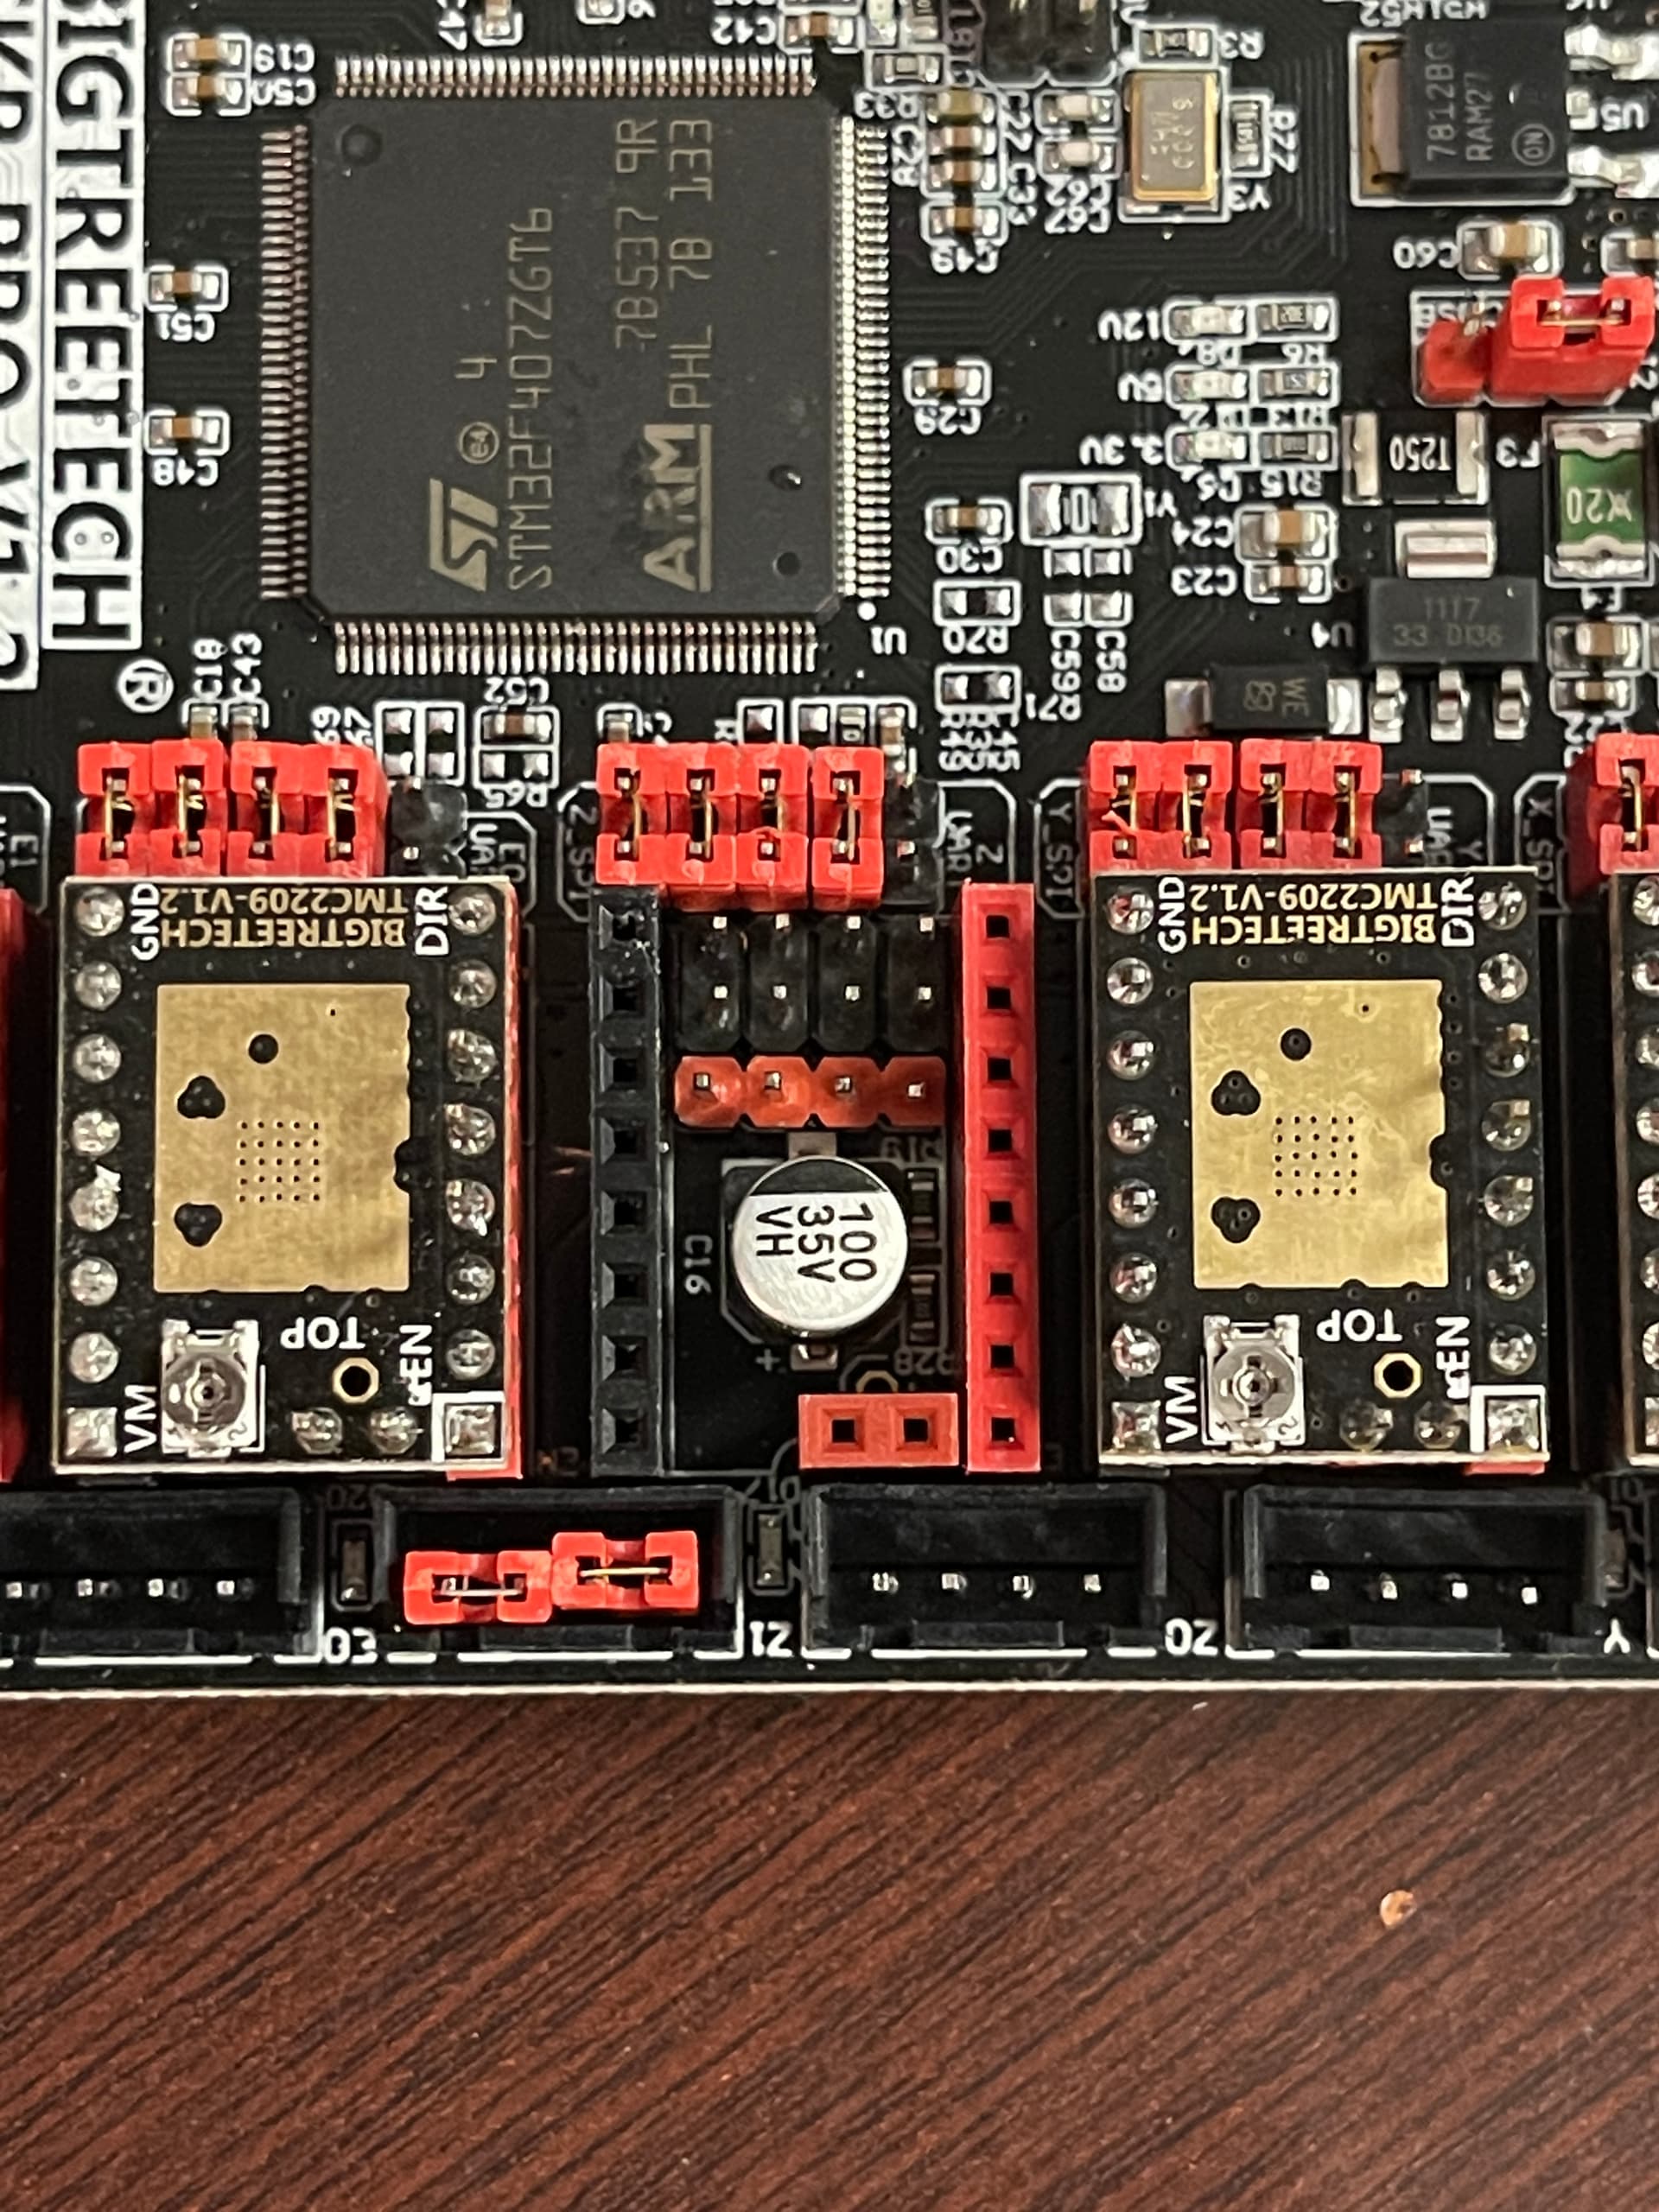
Two things. First is it could be fine and good to go. If it does not work you can carefully pull off the black socket and look for anything odd, and put the socket back on.
I should have just left it alone I guess. That pin pulled out with the black plug. Doesn’t look like a very good soldering job. The first 2 pins pulled up a little as well, but the last pin is off totally.
Did you test it first?
Can you fix it?
Well I read over the part about if it does not work. After pulling the other JST plastic shields I didn’t think it would be all that hard to pull it off.
After lunch I can try fixing it. Any chance I could just use E2 instead?
You can swap the pin numbers in the firmware to use the other port, if you can’t easily fix it.
If I sent you a bad board though I will swap with you if this sort of fix is not an option for you, I will give it a try. It’s just faster for you if you can easily solder it in.
1 Like
I hate to have you replace the board but I think that might be the best option.
If you want I can cover part of it since I pulled the plastic connector off.
I need to order another PULLEY 16 TOOTH GT2 10MM. I had 4 but one disappeared in my pile of 3D printing crap.
Let me know and I in can send over some money to cover the cost of replacing the board and one more pulley.
Send me your order number, no worries about pulling that off. I would have done it anyway, just make sure it ends up in the box in case I can repair it.
1 Like
Instead of using a 5 gallon bucket and pump to cool my spindle I’m thinking about going this route.
Not sure if there are other options for cooling the spindle in this same similar setup.
I placed my water cooled spindle on the scale. 12.5 lbs. The MPCNC seems to hold it without any trouble.
I am planning to use PC watercooling for mine. I do like the configuration of that one you linked though, since it has the pump/res as one unit and seems to come with everything you may need (for sure you’ll need more tubing though, since what’s included looks too short for a primo). Here is what I was planning to use (along with a fan, hose, and 1/4 fittings I already have):
A 240 radiator isn’t much extra cost, so I’ll probably go bigger as long as I have a decent place to mount it all.
[edit: Just found this… with the 120mm rad makes for a very affordable setup:
Pump/res combo:
https://www.amazon.com/gp/product/B07QV8T4F8/ref=ox_sc_saved_title_1?smid=A2760MNFACRLA8&psc=1
Also, figured I should mention some folks are using a single start lead screw so their water cooled spindles don’t fall down if power gets cut off (this can destroy valuable parts/materials). Even my relatively light Bosch Colt is enough to make my 4-start lead screw drop pretty fast when I shutoff the z stepper. I’ve even seen some folks use “friction adding” devices to rub on the lead screw to prevent dropping, lol. I think the single start screw is a better idea, but it does require modifying firmware settings (or at least configuring for different steps/mm with fluidnc terminal etc).
Single start leadscrew+nut:
https://www.amazon.com/400mm(15-75-Inches)Tr8x2-Thread-Printer-Machine/dp/B08JLWHG9H/ref=sr_1_3?crid=1WJBPJEF4854O&keywords=single%2Bstart%2Blead%2Bscrew&qid=1651677936&sprefix=single%2Bstart%2Blead%2Bscrew%2Caps%2C143&sr=8-3&th=1
IMHO, most MPCNC should have those on the z axis, since it gives more precision and force, vs the 4-start which are better suited for 3d printing where quick z-hops etc are a good thing and the loadings are very low. CNC benefits from the mechanical advantage of a single start; you get 4x the holding/lifting power with the same motor. We don’t need 4-start to speed up z… even single start can move it too fast.
]
Thanks for the links. I decided to go with this one:
https://www.amazon.com/dp/B01GZPMA38?ref_=cm_sw_r_cp_ud_dp_JMG9BSXC3BJE46V1V6KT
Doesn’t the MPCNC already have the T8 lead screw or is this something different?
Oh Fancy!
Notice the 3D printed case changed from orange to red? I just couldn’t do orange when the entire MPCNC Primo was red/black. 
4 Likes
The stock lead screw for MPCNC’s is what you would call a “Tr8x8”. The first 8 is the diameter in mm, the second is the thread pitch in mm (how many mm of rise/fall per revolution… NOT the distance between each “line” on the screw). You can also use Tr8x4 and Tr8x2 on MPCNC. These are both also 8mm diameter, but with 4mm and 2mm thread pitches.
Note that most (all?) Tr8xX screws have 2mm wide threads if you measure the distance between each grooves. These lead screws differ pitch by using different numbers of thread “starts”. That’s why you might hear someone call a Tr8x8, “a 4-start screw”, since that rolls of the tongue easier. If you look carefully it has 4 parallel threads, vs a common machine screw which has 1-start. Likewise Tr8x4 are also called a “2-start”, and Tr8x2 is “1-start”.
Finding a 1 or 2 start Tr8 on amazon can be a frustrating affair. You’ll see 2 and 4-starts called Tr8x2, photos that don’t match descriptions, etc. So before ordering one, it’s a good idea to scan the reviews over and sift through the “screw doesn’t fit description” claims. The 1-start screw/nut combo I bought (linked above) is very clear in their descriptions, and they have correct photos as well. Some anti-backlash 1-start nuts I recently ordered though… was kind of a crap shoot since the photos showed 4-start, but reviews and description say 1-start (they arrived as 1-start lol).
Is this SKR Pro V1.2 programmed for dual end stops? Wire Common and NO or NC?
Is this firmware for MIN and MAX end stops?
Depends on when you bought it. Use “M119” in the terminal to see if it has an X2 and Y2.
Common and NC. DO NOT HIT THE POWER WITH EITHER WIRE, triple check when pluging it in.
MPCNC, Min. LR Dual max.
1 Like
It moves. Where are you mounting the cooling system?
2 Likes