I know what a wire is of course, what’s a tree?
I’m assuming he’s talking about running wires from each driver to a single wire/pin. I don’t know if anything special is required to do that without breaking things.
Wrong question ![]()
And I should have said Diode OR.
You can use a diode on each TMC driver’s status pin to combine each of the TMC’s individual error status, into one input. That’s a “diode OR”, a “wire OR” means connect the wires all together, which is NOT what you want to do here.
Jason’s setup with a single X doesn’t really need any of that.
I might also test out StallGuard on the X axis when I next get a chance to run some cuts - this plywood made of cement trees is having me pause, resquare and restart plenty enough to get it dialled in ![]()
I seem to remember reading in the V1 docs somewhere that it isn’t used purposefully, perhaps it has already been tested and found not helpful? (could be hallucinating memories again, happing a lot atm) FluidNC docs do say this
It is not recommended for machines like routers that can have high and variable loads on the axes.
And also this, which is likely to be a problem in my CNC oven shed (emphasis mine)
I have found that over time, under changing loads or at different temperatures, stallguard tuning can change. This can result in rougher stops, premature stops or failure to stop at all.
From my perspective I’m interested in very high thresholds, if the stepper sits there and audibly grinds, then stop the cutting job. Hopefully that is easier to tune in then saying if it misses a step here and there cancel
2 Likes
I’ll have to play with this some more. I’m not particularly optimistic after some initial testing.
I updated my firmware to FluidNC v3.9.7.
The StallGuard tuning page wants you to connect via USB but I don’t currently have access to connect a computer to it. I don’t think the WebUI is displaying all the stallguard debug messages. I do see the messages, but it doesn’t show the “X Axis Stallguard 0/1” portion in the messages like shown on the tuning page.
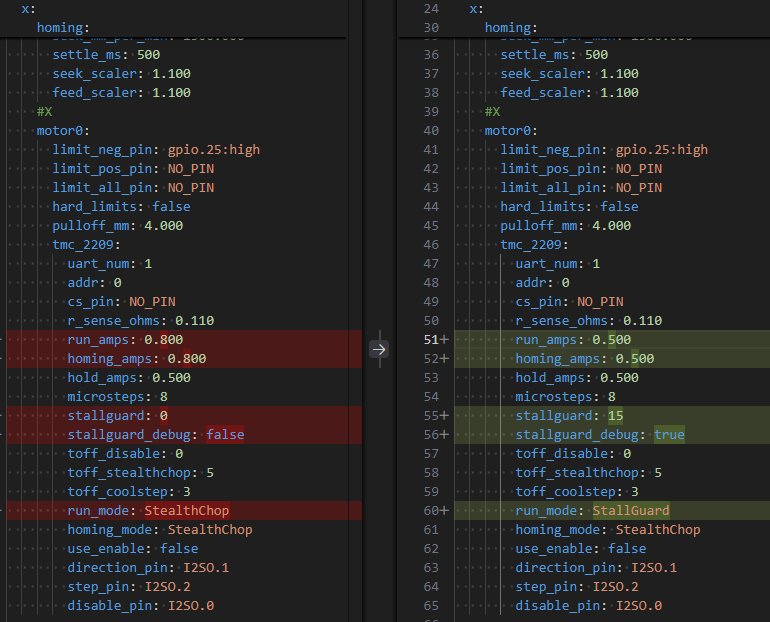
I created a new configsg.yaml file based on my normal one and set it to be the active config.
$Config/Filename=configsg.yaml
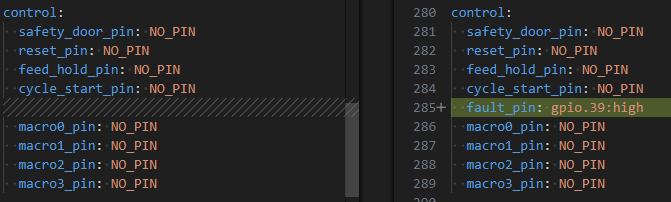
I originally had the fault_pin setup but I was getting an alarm because it was triggered on startup. I might change this to trigger a macro that just outputs that it was triggered.
I lowered the X axis motor amp settings to 0.300 to make it easier to skip steps.
I was testing it by jogging but even with a higher threshold, it was still triggering because it was at 6000 mm/min. I lowered to 1000 and it stopped.
I created a few macros to make this easier to do from my phone:
Add 1 to the StallGuard Value for X:
#</axes/x/motor0/tmc_2209/stallguard>=[#</axes/x/motor0/tmc_2209/stallguard>+1]
Subtract 1 from the StallGuard Value for X:
#</axes/x/motor0/tmc_2209/stallguard>=[#</axes/x/motor0/tmc_2209/stallguard>-1]
Print Message of current settings:
(PRINT, StallGuard X: Value: %d#</axes/x/motor0/tmc_2209/stallguard> Debug Enabled: %d#</axes/x/motor0/tmc_2209/stallguard_debug>)
Enable Stallguard Debug:
$/axes/x/motor0/tmc_2209/stallguard_debug=true
Disable Stallguard Debug:
$/axes/x/motor0/tmc_2209/stallguard_debug=false
Save Stallguard Config
$CD=configsg.yaml
I don’t know, we’ll see. It even notes on the tuning page:
Setting it up can be a long and frustrating process.
So it was functioning, but triggering way too soon? What settings did you have best luck with? I can change mine and test as well. I can USB a computer
There were too many variables going on for me to say. I started at 10 or 15 and was using my macros to adjust the value. I only had a short time to mess with it tonight. When I was using a high feedrate, I’d get multiple of the debug messages. When I lowered it, I was only getting a single one. I also noticed that connecting it to the gpio gnd pin wasn’t lighting up the LED. However, when I switched it to the signal side, it was typically lit, but then would flicker when it skipped steps. It only flickered during movement. If it was idle and I forced skipped steps, it didn’t.
Need to read up, is the stall pin active high or active low? Pull-up or pulldown?
I’m not sure. This was after I removed it as the fault_pin defined in the config. I originally had it set to gpio.39:low. My understanding is the input pins on the Jackpot, including 39, have an external 10k pullup. I still get a little lost in some of these electronics details.
Input notes from the Jackpot page:
7x Inputs
- All switch inputs are active low, the LED goes on when ground is connected to the pin.
- They have a 10k pullup external to the ESP32. The signal pin (S) should be connected to the ground pin (G) to activate the switch.
- The 5V Rail is optional and is used for external switches that require 5V.
- The input pins can be pins in the config file to use Normally Open or Normally Closed inputs.
The notes I see on the diag pin on the TMC2209:
Diagnostic and StallGuard output. High level upon stall detection or driver error. Reset error condition by ENN=high.
TMC2209 - BIGTREETECH WIKI
That does make me concerned that on startup, it might be high while it’s being initialized, which would mean you couldn’t use it as a fault pin. Maybe you could do something weird like tie the pin to a macro which does a check to see if it’s initialized or something before raising an alarm. I’m not sure what kind of delay that would add.
I started reading some of this, but that’s for another day.
TMC2209 Datasheet
Started down a rabbit hole looking in the FluidNC source code. I’m really questioning using this outside of homing. Everything I’ve read still points at only using this for homing.
In TMC2209Driver.cpp. Note the TODO.
case TrinamicMode ::StallGuard:  //TODO: check all configurations for stallguard
{
    log_debug(axisName() << " Stallguard");
    tmc2209->en_spreadCycle(false);
    tmc2209->pwm_autoscale(true);
    tmc2209->TCOOLTHRS(calc_tstep(150));
    tmc2209->SGTHRS(_stallguard);
    break;
}
That calc_tstep function (in Trinamic.cpp) which sets the stallguard window is based on the homing feedrate which is way slower than you use while running a job.
    // calculate a tstep from a rate
    // tstep = fclk / (time between 1/256 steps)
    // This is used to set the stallguard window from the homing speed.
    // The percent is the offset on the window
    uint32_t TrinamicBase::calc_tstep(int percent) {
        auto axisConfig     = Axes::_axis[axis_index()];
        auto homing         = axisConfig->_homing;
        auto homingFeedrate = homing ? homing->_feedRate : 200.0;

        double tstep = homingFeedrate / 60.0 * Axes::_axis[axis_index()]->_stepsPerMm * (256.0 / _microsteps);
        tstep        = fclk / tstep * percent / 100.0;

        return static_cast<uint32_t>(tstep);
    }
The trouble is, if your threshold is too high, it wil skip steps without tripping the limit.
It really does need to be tuned and the threshold is very dependent on speed. If you’re moving slow, you need a lower threshold. That makes it pretty tricky for CNC failure detection. I know in my printer, I increased the homing speeds to make sensorless homing reliable. I have also read it can vary with temperatures, but I haven’t seen that and I’m not sure which component the temperatures matter.
I think the larger problem is how a CNC that is cutting something skips a step. It is not graceful, a skipped step is either from really poor cam, or a mistake like a knot or hitting a screw.
Poor cam can not be corrected by adding more power.
Hitting an unknown amd adding power is most likely to break a cutter.
I guess I am not convinced it is useful for us. I didn’t waste IO on adding those pins because of it. I would love to be proved wrong since we could have it included for basically free on a new revision.
Closed loop stepper though, they feel more finely tuned and I think they are useful for increasing rapids.
1 Like
I think the potential utility comes in combination the great repeatability offered by dual endstops - if steps are skipped you can cancel, correct the error (remove the screw you’ve just tried to cut through, or correct your CAM) and run the job again to likely get a usable, if probably cosmetically sub par part.
I have been doing this a lot manually (been making stuff where I don’t really care about the cosmetics as a way to do ‘test cuts’ whilst still producing useful stuff), if the machine could auto stop it’d save me a mad scramble for the feed hold/reset (I generally try to go for a “soft reset” first before estop unless I can see I’m about to start a fire) . I’m not looking for it to potentially do anything more than that.
Not sure what you mean in reference to adding power?
Agreed but being able to stop the job when there is a problem in the cam giving you the option to correct it by slower movement or shallower depth of cut before the material is wasted would be cool.
It’s great if you are like me and want to test the limits of the machine. I had X miss steps because I was going to fast and the other time because the endmill got too hot and slipped.
I almost gave up on this a few times. I’m still not sure that we’ll be able to set the threshold to make this viable, but here’s a working proof of concept.
I’m getting good info now without needing to hook up a computer. I reduced the auto-reporting interval and enabled debug messages (which you’ll want to set back to “Info” when done):
$Report/Interval=100
$Message/Level=Debug
I have a wire running from the diag pin on the X stepper driver to the signal pin on gpio 39.
For config, I set stallguard to 15 and turned on the debug. I reduced the amp settings to make skipping steps easier.
I set the fault_pin to gpio.39:high. Originally I had this set to low, which was wrong and caused it to alarm on startup since it can’t be active then.
I also turned on line_numbers. I created a test gcode file (sgtest.gcode) with line numbers. Ideally, when recovering from a job, knowing the line number would be very helpful. This test gcode has G1 moves every 10 mm from 0 to 200 and back.

sgtest.gcode (559 Bytes)
configsg.zip (1.5 KB)
Here you can see that I run the gcode, force it to skip a step, it alarms and stops the job, and I can see that the last line number is 35. That line number is this: N35 G0 X100 which is halfway back returning to 0. That’s about right.

3 Likes
I don’t know about everyone else Ryan, but I only want it to stop if it runs into a problem instead of continuing a cut. Not correct the missed steps, not add power to get through the cut, just stop whatever it is doing and wait for me to correct it and manually restart. At least for me though, breaking a cutter much better than ruining a $150 sheet
2 Likes
Thanks Jason, give me some time to do some testing, I’m already on the right FluidNC version at least
1 Like
Yea, the hope here is just to stop the job when steps are skipped to allow for recovery. Whether we’ll be able to set an appropriate threshold is still up in the air.
I was previously on a 3.9.2 pre-release before upgrading. I think the stallguard stuff was all the same there but I think there were changes around the fault_pin.
2 Likes
That is pretty dope. Jason is the next Mike, hacking around in FluidNC. ![]()