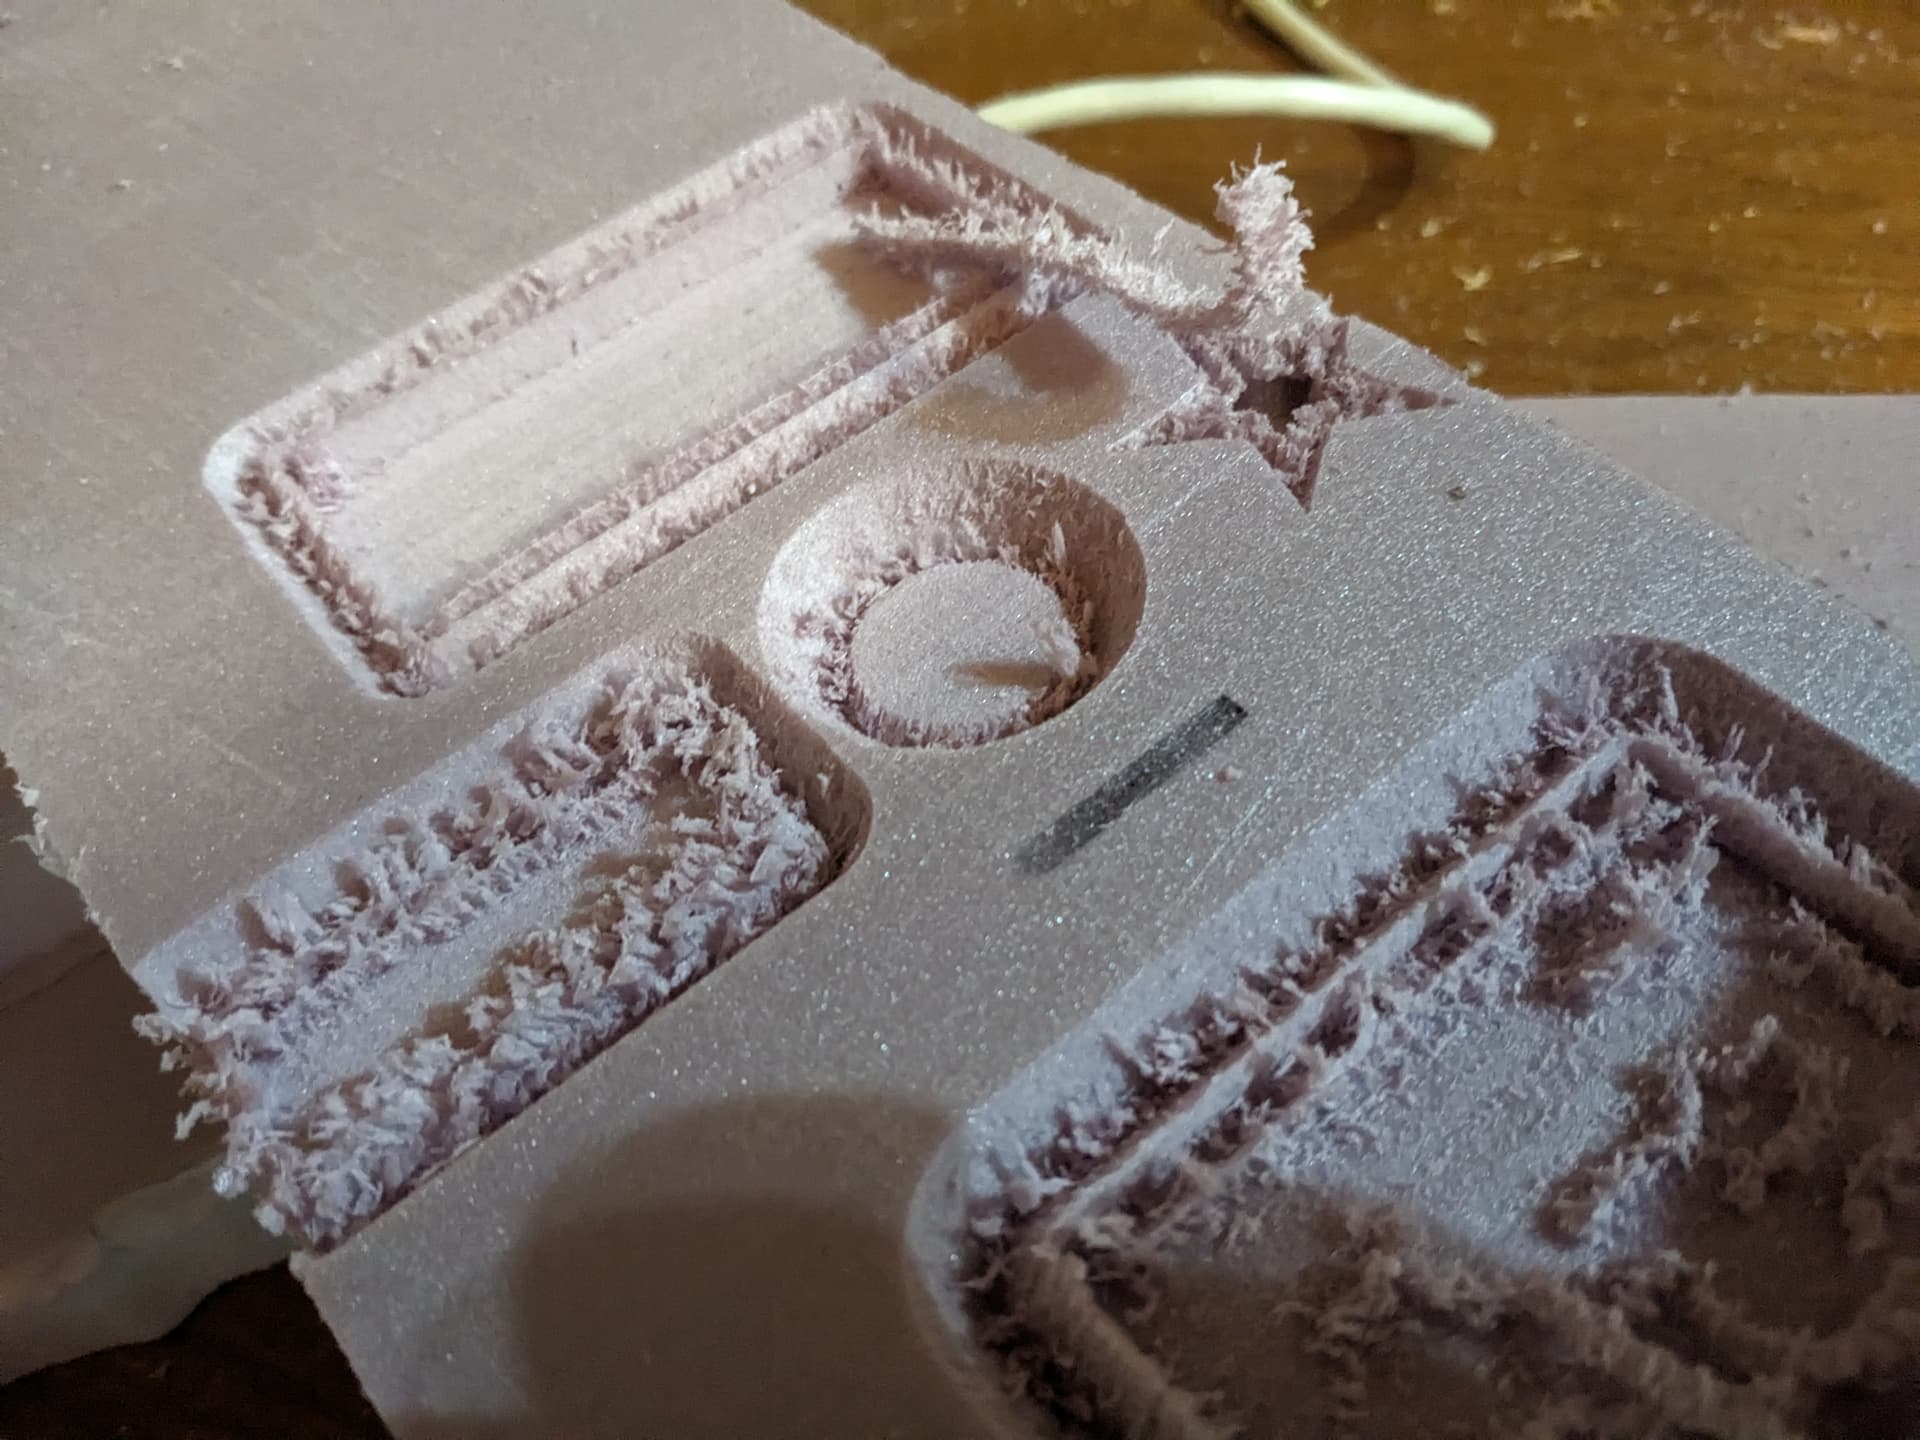
I’m trying to make a nice clean foam carve and there are 2 issues. I get fuzzies when I run the 1/2" 90 deg v bit in single pass for anything up to 1/2" wide. I’m not sure if it is too fast or too slow or too deep. Running makita at speed 1 and feed is at 1800 mm/min. I’ve tried 1500 and 2400 as well, but results are similar.
So question 1: using a 60 or 90 V bit to carve inside a shape, what is a reasonable plunge depth per pass with pink foam? full depth for a 1/2" 90 degree bit leaves fuzzies behind even after running a second time and not cutting anything. Is there a “right” way to carve the extruded foam sheet cleanly? Climb milling is bad I have found.
the next question is related to the first because it is the same material. When cutting wide shapes with a carve operation, the bit will plunge all the way to max depth, but never cut out the shape entirely because the bit is too narrow. Is there a way to pocket inside the carve? My workaround for when the vcarve can’t go deep enough or wide enough to carve out the shape is to do a hole shape with pocket + chamfer, but the pocket + chamfer extends outside the shape boundary with the center of the chamfer being on the line. How does one do a carve + pocket in estlcam?
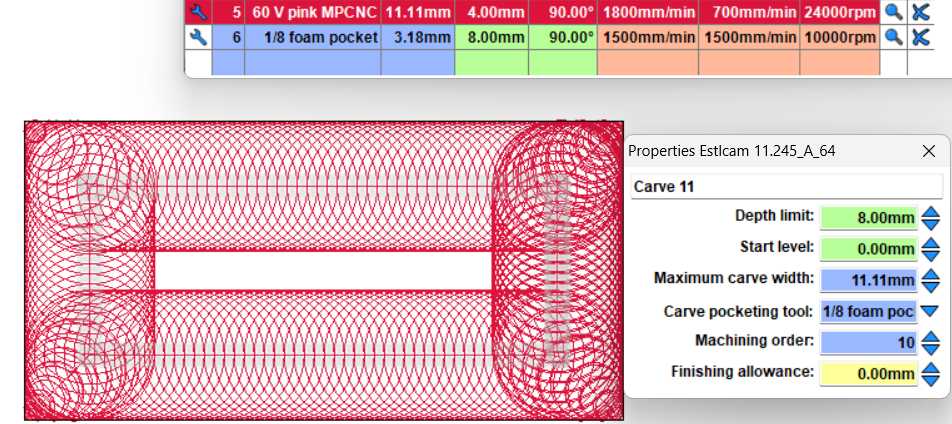
to answer the “this guy is an idiot comment” that everyone is too nice to put in there because estlcam has a pocket option in the carve, it doesn’t appear to be doing anything:
there is a big space in the middle of this and it isn’t pocketing.
the 60 degree bit can go up to 7/16" wide. the 1/8" single flute upcut mill can do 3.175 mm wide and I’ve set a desired floor of 8 mm. How does one flatten the bottom of the shape at the desired floor level and get half of the v bit to chamfer on the outside of the cut only (inside of the shape) ? I want the cuts to stay inside the lines. I’ve learned that you don’t use a finish pass offset for the hole pocket + chamfer operation if you want the chamfer to line up with the outer edge of the actual cut material because the offset will move in from the cut line and the chamfer seems to always follow the line.
Thanks for any advice or instruction. The MPCNC is getting some use and I’d like to get this dialed in.
It is not intuitive and it threw me too when I was first doing it. The secret is you have to set maximum carve width to a big number. The max carve width limits how far away from the line it will go, which for clearing a pocket needs to be at least half the pocket width, or else it just carves a trench around the feature the width of your bit (11 mm in your case).
In general, if the width limit is reached before the depth limit (which can be a narrow feature or a low value for max carve width), then the bottom of the carve will be a sharp V shape. If the depth limit is reached before the maximum width (shallow depth or large max width), then the bottom of the carve will be flat and it will be pocketed (meaning a pocketing strategy is used to produce the flat bottom area).
If pocketing is happening, then the carve pocketing tool will be used for the large areas of the flat bottom that are reachable by the carve pocketing tool. If the carve pocketing tool is a large diameter or if the flat bottom pocketed area has some narrow valleys, then some areas of the flat bottom might not be reachable by the carve pocketing tool and the v-bit will still be used to pocket those areas.
Perfect. Thank you! Max carve width is not the width of the v bit then. I think that is the issue. I’ll iterate once again and see if it will work.
Edit: I widened the cut and now it tries to pocket. This is great, but leads to a follow on question. If the job has 15 letters that pocket, is there a way to segregate all of the pocket tool operations so there is only one tool change instead of 15?
If you set machining order, then it will pocket and then carve each letter, leading to a lot of tool changes. But if you don’t set machining order, it will pocket all the letters with the pocketing tool and then carve all the letters, for only one tool change.
My memory was hazy on that one but I just tried it and confirmed that that is the behavior.
in the machining order menu, the carves can be selected in order of cut, but it doesn’t have an option to select or to segregate pocket vs carve as one mass separation, which is what the desired end result is.
Correct, I don’t know of a way to explicitly specify all the pocketing first and all carves afterward, but if you specify automatic (or reset to make them all automatic “A”) then the automatic ones will be carved by pocketing all of them first and then carving all of them.
At the risk of saying something the experts all know, this would be a really good example of when a post-processor would help.
Estlcam puts a comment in the GCode when it starts a new cut. You could write a fairly simple script that reads the file, and every time it finds a comment that looks like the start of a carve, it copies all the subsequent lines to a ‘carve’ file, and when it finds the start of a pocket, it switches to a second file. Then you could run one file, change tool and run the other file.
That probably sounds pretty daunting if you’ve never written any code but if you’ve dabbled a bit in the past, you can look up a code sample for reading and writing text files, and it should be fairly simple.
Thanks, that is a pretty simple idea and I’ll look into doing that.
It is easier still to use the previous suggestion, and simply split the file at the tool change, but the traveling salesman is a real problem on this one so if there was a way to rearrange the cut sequence after splitting the file that would save a ton of time. If I could manually assign the route, it will save a ton of time, but then I have to split the pocketing manually… this is a good problem to have. The machine is working and it will cut what I want now, it just takes a bit longer than seems ideal.