Build PLOG. MPCNC Primo, 24x30" area

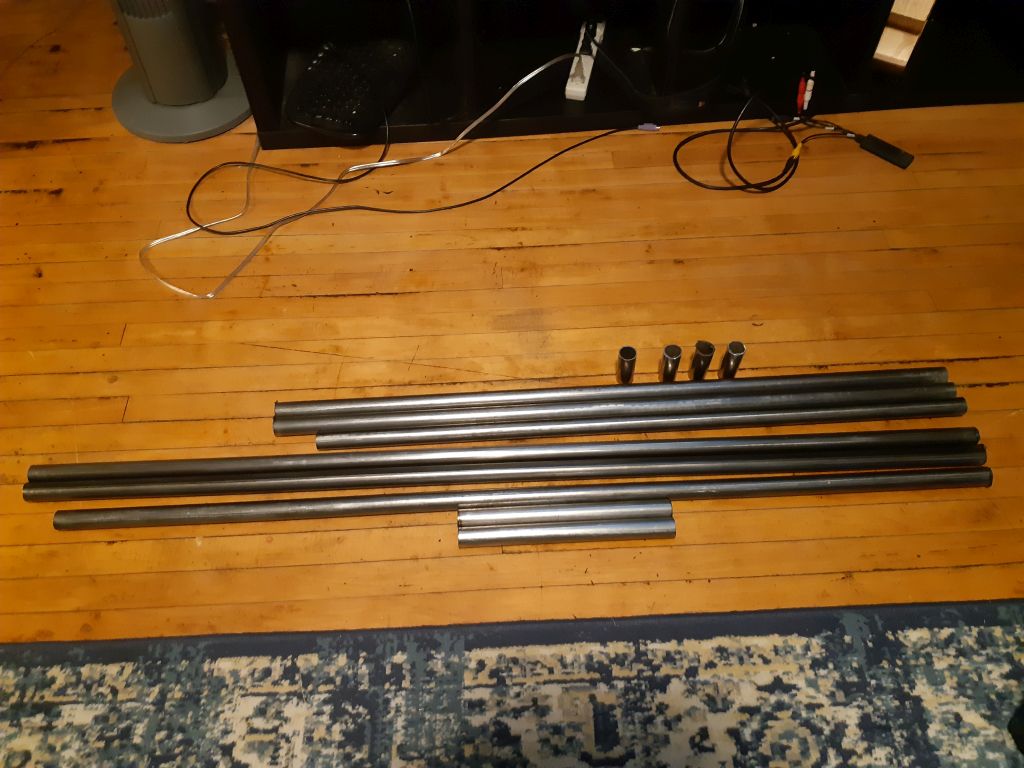
Starting this topic as a place to keep track of my build as it goes. I got the steel today, and have to cut it to length. I work as systems administrator for a company that sells structural steel, so I picked up 40’ of 1" .065 wall tube for a bit over mill wholesale. Unfortunately the stuff is too light to cut on the saw, so I’ll have to do that myself.

I had done about 90% of the design work for a similar project. Much more utilitarian in appearance,and still plenty of unknowns in how well it was going to work when I found the MPCNC on Thingiverse and decided that it’s probably a better bet. Honestly, after looking I was starting to think LR2, but in the end, I believe that the MPCNC Primo is going to be the best machine for the things that I want to do with it. It is most similar to what I was looking at designing anyway in terms of capability.

I have several kg of filament, but it’s all PETg, which is what I use for almost everything nowadays. I still have my older 3D printer which does PLA really well, but is hopeless with PETg for some reason that I never did properly diagnose. I have a couple of partial spools of PLA left, but not enough.

So I have decided that I’ll purchase the printed parts, hopefully this is supporting V1. A few other things that I don’t have and are proving hard to find will be on the order as well. 10mm GT2 16t pulleys are difficult to source, and the 10mm smooth idlers are shockingly expensive from my regular suppliers, so I’ll add those to the order to help get over the shipping hurdle. Still shipping to Canada so it’s not free, but I’ll take what I can get. I was going to order today, but a flat tire turned out to be expensive (hole in sidewall, not a simple puncture repair) and suddenly I’m out a few hundred dollars for 2 new tires, because they can’t match the ones I have. It’ll have to be Monday.

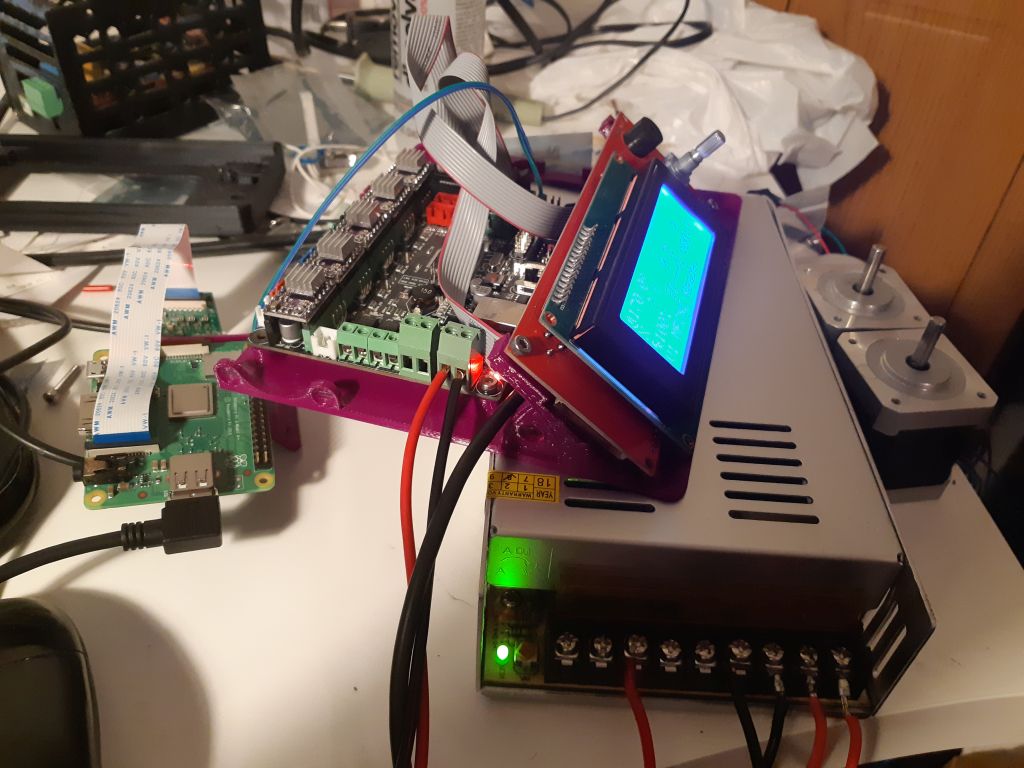
I have a few electronics solutions. I had thought about using a Duet Wifi as a controller, but given that there seems to be much better support for Marlin, I’ll go with a Gen L that I have lying around and install RAMPS. I don’t have the 12864 full graphic controller, I have a 2004 discount controller, but I believe that this will be good enough. It will allow my the SD card to run headless, and I can use one of the many 24V PSUs that I have. I do need one more stepper driver, so I was going to replace the A4988 drivers with DRV8825 ones. A little more current handling will be a good thing.

Aside from that, I have a large box of 5/16"x1.5" bolts, nylock and conventional 5/16" nuts, 608 skate bearings, 5mm screws. I think they’re pan-head, might be socket cap, 5mm nylock nuts and regular nuts, a variety of wood screws T8 threaded rod, couplers, nuts.

I’m split on ordering new motors. I still have a couple of brand new, never used high torque steppers, and a few more that have been run a while, including one that the wire harness got a little overheated. It probably doesn’t matter if the motors exactly match X to Y to Z axis, though it’s probably best if both X motors and both Y motors are as close a match as possible. I don’t want to re-use the motors that I swapped out from my 3D printer, so I’ll be ordering a couple new motors as well.

So this is day 1 of my build. I’m not rushing, and I expect that there will be some transit time for parts being ordered. I may end up printing parts like legs in PETg if I get impatient, if for no other reason than to start marking off bolt locations nice and square.

I have a couple of Dremel tools, One is a 4000, which may be adequate. I have a knock-off as well that is reasonably powerful, and I will probably use that, at least initially. If it proves inadequate, then I’ll get the DW660, which was my plan but, unexpected expenses mean I have to economize somewhere. Honestly, I should just buy the PLA, or make do with PETg printed parts. I do feel that it’s important to support people who do the groundwork for these things though.

So wish me luck while I teach myself the software end of things, and I hope to be making chips with this thing in time to make Christmas presents.

4 Likes

Hey there, I wish I came across this thread before starting one. I am in the midst of completing my build 24x24 cutting area. I had a hard time as well sourcing locally and picked up a burly upgrade kit, z homing tool and some end stops. I’m in Ontario Canada.
Anyway, good luck.
I just posted so I get updates from this thread.

So I have my steel cut. The edges still need to be deburred, and there’s about 1.5mm in variance between the 4 feet, which I’ll take out with a grinder when I do the deburring. I chose the straightest sections (or tried to) when I was cutting. There was a little bit of a bow in one of the pieces of 20’ stock, but I’m pretty sure that the place where it was is in one of the offcuts. I’ll be re-checking for straight once I deburr and I can roll the steel on a nice flat surface. I still have a couple of 5’ chunks so I can re-cut any problematic pieces.

My chopsaw turned out to be useless. I had a brand new blade for it which just smeared the steel hopelessly. I had to do the cuts with a cutting disk on an angle grinder. This was easier for the longer pieces, but the legs were a little harder, hence the slight range of lengths. Once I put a new disk on the grinder, I’ll even them out. I will need something that can hold the pieces all at once so that I can grind them evenly. I was going to 3D print something, but… grinding the steel will make it hot. Really hot, like maybe melt plastic hot. Then I’ve got a big mess. I might have better luck with some 1" holes drilled into some scrap 2X4. I should have done that when I was cutting them. There’s a tip. A 1" spade bit is cheap. 2X4 is cheap. I’m going to make a mitre box for 1" steel tube. In the end I’ll be able to cut it with a hacksaw.

I have a vise for my drill press, so at least making the holes in the Z rails should go smoothly.

I received the rest of my hardware. I have 5/16" X 1.5" bolts (100) and nylock nuts. The 5mm pan head screws were as expected, but they were out of stock on the nylock nuts. I have a bunch of 5mm nuts that fit, but they use a 7mm wrench. I’m pretty sure that the blind nuts are printed for an 8mm wrench. I’d be okay with red loctite in place of nylock nuts, I think, but if the nuts aren’t going to be held because of the size, that’s a lot more of a problem. So I think that I’m still searching for nylock nuts. I have at least 50 608 skate bearings and some other miscellaneous hardware. I’m still waiting on my DRV8825s. I think that once I get my printed parts, and other things from V1, I ought to be good to build.

I have a solid wood kitchen table in my basement. The top is 2" thick solid hardwood. I bought it cheap, and my ex ruined the table finish. I did refinish it, but I don’t need a table that size anymore. It would be kind of a waste to drill holes in it, but it’s flat enough, and I could build a spoilboard setup that would go on top without wrecking it. Or at least I think that I can. It will certainly do until I can build a torsion box, possibly with vacuum hold-down… But that’s not going to be part of the initial build.

Since the next while will involve waiting for stuff, I might try printing feet and legs with what I have, and getting started on prepping the table. I like the idea of being able to replace the spoilboard without having to remove the MPCNC from it, so it’s almost certain that I’m going to have a removable centre section for the spoilboard in between the feet. The trick will be a way to keep it flat and level. Sawdust and debris can easily make enough height difference in one section to be a problem if it works its way under the spoilboard, so I’ll need a way to avoid that.

1 Like

Well, I just ruined a drill bit putting holes in the steel for the nut traps. :stuck_out_tongue_winking_eye: It was a cheap bit set, but should have used a bit of oil. No matter, I made the holes and they’re in the right place.

I’m printing a set of experimental nut traps. They’re in 2 pieces, and will sandwich the nut between them. They still only fill half the tube. If they work I’ll leave them alone, if not, I’ll make a set that fill the Z rails more completely. Well, it’s an experiment.

The plan is to finish deburring the steel today, and grinding the legs level. It’s 17:00, and I haven’t really got my day started…

1 Like

Okay, pulled the trigger on ordering parts from V1.

I’m curious as to the colour scheme that I’ll receive for printed parts. I tested my nut traps, and they’re okay, but I can do better.

While I wait for shipping (I think I’m going to regret not choosing express shipping) I will probably try roughing out the table. I might print a set of leg parts to set the rails and square it up… or not. If I set it up, I’m not likely to take it apart for the printed parts that I ordered. I ill set up the table though, and set up an enclosure for the MKS Gen L controller. I installed the DRV8825s today, jumpered for 16x microstepping. I debated the 32X, and still might change my mind. It’s not like I want really high speeds from the machine. Quiet steppers is a lot less of an issue when dealing with a CNC mill.

Here’s a question, if anyone has a suggestion:

I am thinking about setting up a laser as well as a spindle. How do you switch the firmware? Do you need to switch the firmware? I m pretty sure that you would if you wanted to install an extruder, but that’s a ball of wax that I don’t want to get into. this wouldn’t be hard if I used the Duet. Change the SD card, and you have a completely different firmware configuration. I am going to use the Gen L, and to change most of this stuff, it’s a re-compile and re-flash. I’d rather not to that too often, though.

I have been waffling on the 12864 graphic controller, but I have 3 of the 2004 controllers (one in use on my old printer) and as far as the main functions go, it ought to be adequate. It will allow me to bring gcode jobs to the machine on SD card, and do some basic functions. Just gotta set it up

1 Like

Well, there’s a mistake that will cost me a week. PayPal send an eCheck instead of an instant transfer like I was expecting. I guess it’s been a while since I’ve used my credit card on PayPal. Phooey.

Flashed the firmware onto my MKS Gen L board, and installed 5 shiny new DRV8825 stepper drivers. Turned it on, and WOAH. They were set for almost 4A current. Turned that down to about 1.2-1.3A, and plugged in a pair of motors for testing. X and Y rotate opposite each other, which I expected, but they went too fast. Oh yeah, I reset it to 16X microstepping, and the firmware expects 32X. I could reset steps/mm, but I was kind of wanting to reset to 32X microstepping anyway, so I just put the jumpers back on. I did change the firmware over to use the 2004 discount controller. Had to remove the custom splash to do it. Pity. I’m thinking that the 12864 full graphic controller might be where I want to go anyway, but I can do that later. I asked to see if I can add it to my existing order.

Printed a little holder for the mainboard and controller, but I’m not satisfied with it. I wanted to get some better ideas from Thingiverse,but that doesn’t appear to be working today. All I get there is “Something’s wrong.”

I installed V1pi on a Pi3 Model A that I have a camera on. Sweet.!
Electronics test|666x500

I’m powering the Pi from the 5V servo pins on the MKS Gen L, so it won’t require a separate power supply, and will come on when the MPCNC electronics are powered on. I tested that I was able to connect to it and query the Marlin firmware. Bonus, Octoprint just found the camera and lets me see it.

I found the drag chains that I was going ot use on my 3D printer, but didn’t. They’ll get used for the CNC.

So the next project will be to figure out how I’m going to mount the electronics, and the camera. This might entail preparing my table as well. The table I’d planned on has rounded ends, and the feet would be just off of it at my planned build size. I might shorten it by 6" which would do the trick.

I spent my morning filing down the legs, so they’re all the same height. I 3D printed a clamp to hold them in pairs so I could directly compare lengths, then filed the tube square and then to length.

2 Likes

I’ve been looking at what I can do while I wait for PayPal to acknowledge the money they already have from my bank account (grumble grumble) and then wait for shipping, and it pretty much comes down to figuring out what I’m going to do for cable management and electronics housings.

I’m pretty set on the V1Pi for network access. The Pi model A board that I bought seems perfectly suited to do this on a single machine basis. I’ve never used Octoprint for my printers before, but the software seems simple enough, and I like the camera access.

For mounting positions, I’ve been thinking of mounting things on one of the legs. The X0, Y0 leg seems like it might be in the way, but also seems a logical choice for a camera position, as it will get the best unimpeded view of the tool from there. (Which is also why it seems like it might be in the way.) I will also need to source the drag chains at the box as well.

My first designs had the Pi and the controller in the same box, with an external camera mount, but I’m starting to rethink that. I’m now considering mounting the control box in the Xmax, Y0 corner, and running 5V power (to the Pi) and USB (From the Pi) to the X0, Y0 corner, and making a little compact box to sit on top of the corner piece for the Pi. I’m not convinced that I can extend the camera ribbon cable that far. The ribbon cables for the control box aren’t that long either.

Given that the motor and endstop cable length isn’t critical, and that the router power cord need not come anywhere near the control box though I plan on installing a switch like this one similar to what is on my table saw, lathe, jointer… At the very least it would shut down the tool. I guess a separate switch for the electronics.

I made a tactical error planning this. My table size is 48.25" by 36.25" as per the calculator. (921X1226mm) making sourcing the tabletop just a little inconvenient. It looks like I might be trying to shave a quarter inch off of all 4 rails and both gantry pieces. A small cut like that is a royal pain, but it’s too much to file down. I don’t really like the idea of the angle grinder to take that much off, but that might end up being the solution. I calculated based on a 25" by 37" work area with the DeWalt, which will give me enough room to do my kitchen cabinet doors with an inch to spare (Allowing for cutout room) Losing that quarter inch will restrict me to 1/8" tools, but that’s all that I am buying to start.

Most likely my first project will be a torsion box for the MPCNC anyway. Then the cabinet doors. Boring stuff first. (Even more boring. Draw a crown.)

1 Like

Two things. First looking at my Primo, I see no reason you can’t just have 1/8" more tubing sticking out on all the sides to bring the feet in 1/4". This would save you from trying to shave off the pipes.
Also if you are planning on using MDF for your table top, the MDF from my local Home Depot is 49" x 97" giving me an extra 1" in each direction. I don’t know how common “over-sized” MDF is…all Home Depots or just my region.

Well, my plan was to be using melamine for the table, but I could use MDF. Yes, MDF “full sheets” are 49X97 here too, I’ll have to see what the half sheets are. Not that buying a full sheet is out of the question, I’ll be using plenty once I get the Primo running, I’m sure.

I suppose leaving 1/8" overhang isn’t the end of the world… But I don’t like it.

1 Like

+---------------+
|.:.:.:.:.:.:.:.|
|.:.:.:.:.:.:.:.|
|.:.:.:.:.;.:.:.|
|.:.:.:.:.:.:.:.|
+---------------+
:japanese_ogre:

Now I’m getting frustrated.

Paypal has had my money for 10 days, but the payment is still pending. If the shipping takes this long, I’m going to lose it. (No blame here on V1 at all.)

(expletive deleted)!!

My 3D printer just self destructed. Cable management failed, and it ran the hot end over the wire harness. (Cable management in this case being a zip tie holding the wire harness to the top frame to keep it out of the way. It seems that the Duet really doesn’t like having 24V from the motor drive being shorted into the 3V3 bus. I have my older printer still, though I apparently disassembled the hot end for some reason that probably made perfect sense at the time. I have vague recollections of something with the nozzle. My spare Duet took a walk. It was in a bag on the passenger seat of my car when someone decided that they needed my dashcam more than I did, and the bag was just convenient to grab, I guess.

1 Like

I’m sure it doesn’t help. But I think they hold onto the check because you could call your bank and have it cancelled even after it was “cashed”. So they hold onto it until after your bank has passed the threshold for canceling a check. I have no real evidence of this though. This reinforces the lesson of “design for least surprise”. It kind of makes sense why they might be doing that, but it isn’t obvious to the user, and it causes frustration after you’ve passed the point of no return. That would make anyone frustrating. It’s good design to make things the least surprising, even at the expense of other attributes. Because it is frustrating to have this fall on you after the fact.

Another point (I’m sorry, this probably isn’t helping you :smiley: ) is that users try hard to do it the right way. I know you were paying attention, and you were trying to do it “right”. So the designers of this system (banks, or paypal) have some responsibility. You tried to do it right, and you didn’t get what you want. Even though you chose the option to go with, it is their fault (at least partially) for not directing you to the option you wanted.
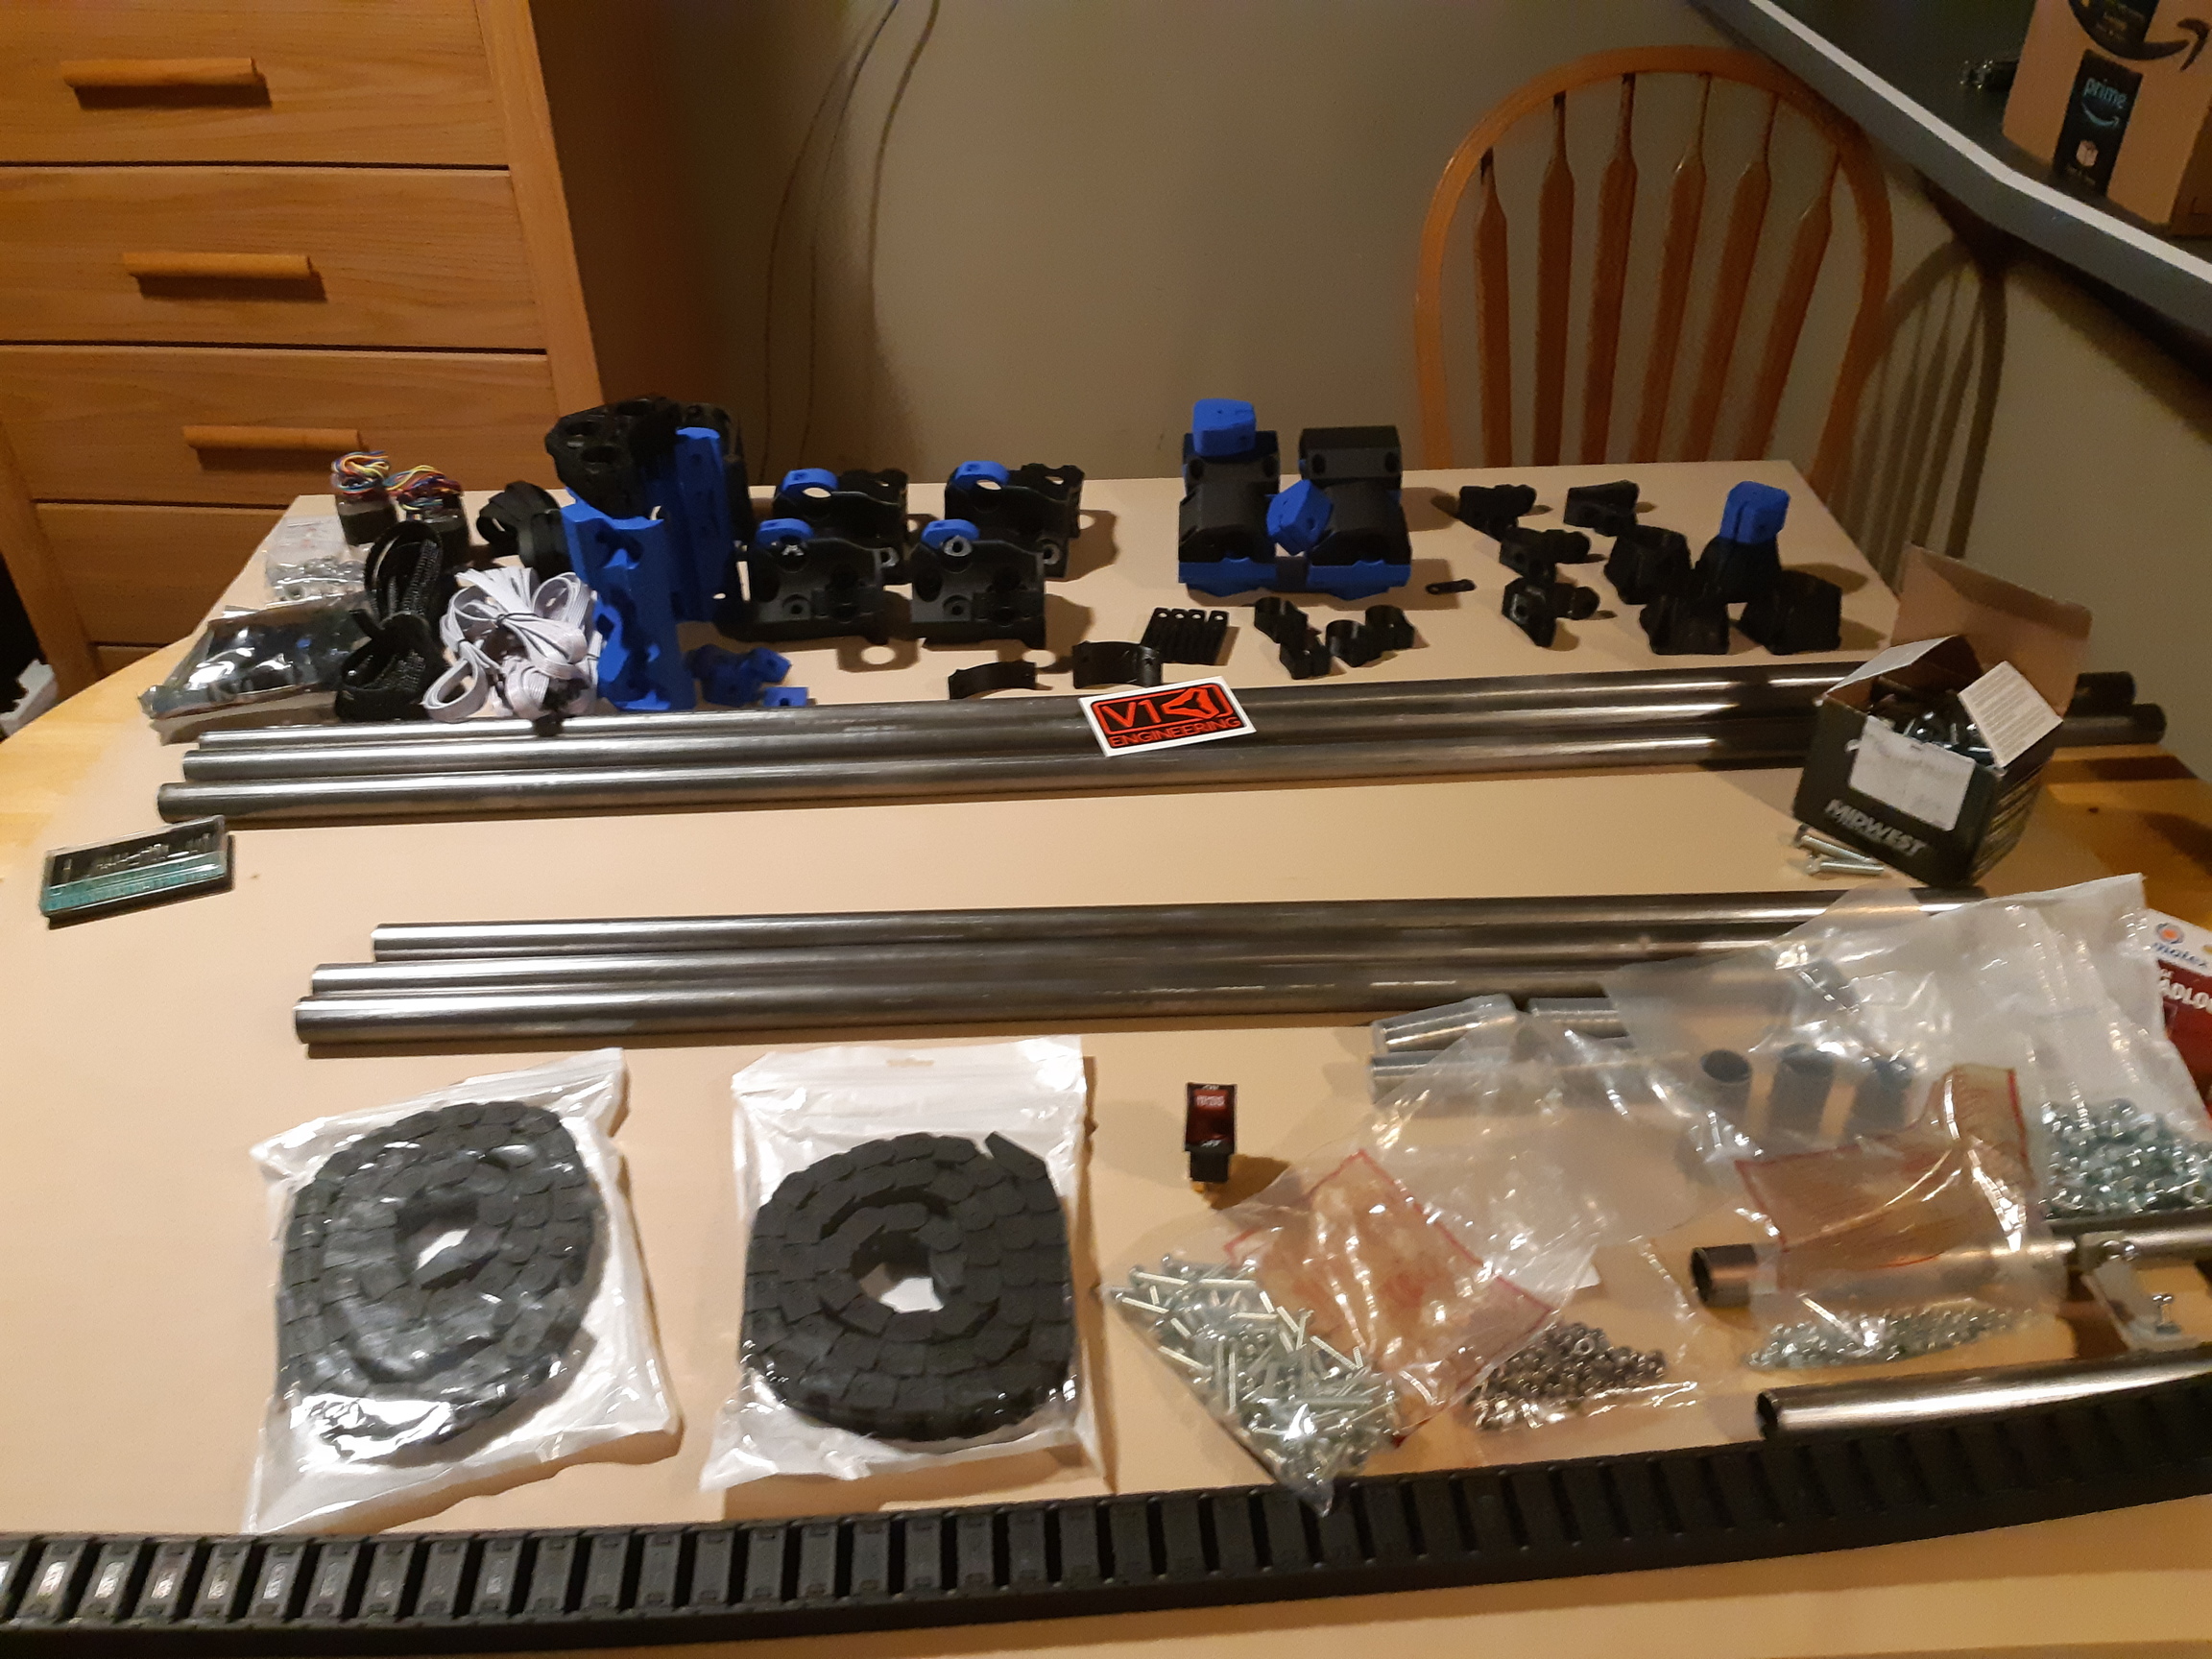
Again. There’s really nothing I can do to help you. I just think it’s interesting to feel your pain and think about what I can learn as a designer of UI from this.

Good luck man, I am here to cheer you on.

Paypal makes me want to scream.

So first, my payment should clear by September 3. (Still says that on the Paypal App.) Money was out of the bank account by Sep 2… But details says “up 5 business days.” Ugh.

Nope, Sep 4 (5 business days) and still no. Yeah, So digging further, and “Up to 6 banking days.” in the “Why is my payment pending” FAQ. Ugh. Okay, Sep 7 is Labour Day, so nothing going to happen then. Sep 8 then.

Nope. Random searching “You may have to wait until midnight.” No specification of time zone, so midnight could be almost any hour.

Today I found some reference that seemed to be for receiving payments that said PayPal might hold on to your funds for as much as 21 banking days. Panic, I do NOT want to wait that long. Chat with an agent. So now they say “up to 7 banking days, and you have to talk to your bank.” I did talk to my bank. They received the request for the money Sept 1, and sent it at the end of the day. They’re done with the whole deal.

My personal policy is that the “fun” account has the funds that it has, and I never borrow from the other accounts for hobby projects. If the money isn’t in that account, then it’s not there. I had considered cancelling the previous order and placing a new one, but that would require me to transfer in extra funds that shouldn’t be in that account, until such time as PayPal gets its poop in a group . I can only imagine how long it would take before my money could be refunded and back in the bank account. I did something similar before for a small amount and it took weeks.

Okay… Done ranting, but if it’s 8-10 business days tomorrow (Today will be the 7th banking day) I’m going to lose it on someone. This is NOT a good reason to delay a hobby project.

1 Like

I really try not to get angry with the customer service droids. I’m not usually one to even complain. It was my blunder to pay by echeck, but somehow within an hour of my complaining, the payment has been cleared. Now it may well be that it was going to happen then anyway, but I wonder.

Now I’ve gotta wait for Ryan to have time to box it up and then the agonizing wait for the post, and customs, and the post, then the delivery person who sneaks up and puts the “Sorry you weren’t home” notice in the mailbox, then wait for the box to be at the post office so that I can go pick it up.

2 Likes

Ah good. I’m sure Ryan will ship it with enough momentum to make it there in record time.

Printed parts, pulleys and bits just left Sacramento.

I just picked up a 49X97 sheet of 3/4" MDF. 1/2 price at Home Despot because it had some damage along one edge. I have a reasonably clean piece 49" by 40" and some more that will be stringers for the torsion box that will go under it. I also got a 5/8" piece which will make the bottom and a raised spoilboard. 40"X by 49"Y. This gives a couple extra inches in the X for the table top, but not a whole lot in the Y. This should end up as a torsion box about 6" thick. Once I have the torsion box assembled, I’ll prime the outside of it to keep it safe from spills and so forth.

I have a pair of 10X15 drag chains, and ordered a 15X30 openable chain from Amazon. That will hold things like the router power cord as well as the Z axis motor wires and probably a wire with an alligator clip on it for the Z touch plate. I bought a safety switch (Difficult to accidentally turn on, quick to turn off in a panic) which will control router power. I remembered after ordering that I should have bought 2, since my tablesaw is still using a regular light switch. (My father’s old one, still 10X better than the one that I had when he gave it to me, but it has some unorthodox modifications that I have been meaning to fix.)

Also coming from Amazon are some parts to fix my old 3D printer, which I disassembled a year ago, and never put back together because my new one was all I was using, but now I need it again. The new one is heavily optimised for PETg, the old one does PLA and ABS, and for whatever reason does not now nor has it ever done a successful print in PETg. I kept it to do PLA and ABS prints, and then as I ran out of filament, and only bought new PETg, it got used less and less. Now I have about 1/4 of a spool of yellow PLA and maybe as much each in red and white ABS. There’s some clear ABS too, but that’s hopelessly tangled, so I haven’t used it for anything except ABS slurry for the print bed in a very long time.

Anyway, that should be up and running “soon.” It’s actually a pretty good printer, with a few quirks. It will give me something to work on while I wait for the post office.

Anyway, table build coming soon. I haven’t actually decided on legs though.

2 Likes

Well, my V1 package has cleared customs (Will cost me another $27.88 for tax and whatnot.) so now to be on the lookout for the Canada Post guy to sneak up to my door with the “Sorry you weren’t home” tag. I wish that I could just pay the charges online before it gets here, like the couriers do so that it would just be taken care of.

I’ve been working on my 3D printers.

My new one needs a new control board. It’s dead. I shipped it off overseas to someone who says he can repair it, or at least will try. I have a replacement on order. It will be interesting seeing how much of the firmware setup I can remember to set it up again. I have a backup, but I’ve made a few relatively large changes to the hardware since that was taken, and at least 3 updates to the firmware. (I work in IT, and I’m always telling people to keep current backups. I really should take my own advise.)

My old one… Well, I’m still figuring out what it needs. Some proprietary stuff in it is no longer viable, so I’m trying to retrofit a generic J-head to it. That will make the existing Z probe useless, but I think that I have a solution. It will also make the part cooling fan useless, but I never liked that one anyway, and I need to design something new regardless.

For the print bed, I bought a hundred pack of 1/4-20 T nuts, and some thumbwheels (I might just 3D print some thumbwheels for 1/4" bolts though, Will definitely be cheaper, and should still be strong enough a hold-down clamps.) I figure that I can use regular clamps to hold the spoilboard down on top of some foam, then use the CNC to make a grid of holes for the T nuts to fit into. Then hammer the T nuts in, flip it over and screw it down. Asuming of course that I don’t get impatient and decide that a little wobble in the grid lines from doing it by hand is acceptable as I impatiently wait on the post office

I think my 3D printers will be keeping me busy in the meantime though.

1 Like

I printed most of my parts in PET-G. when I ran out I switched to PLA.


Stuff!

Black and blue printed parts, looks great.

So I think I have everything I need to get started. My tee nuts havent arrived for the spoilboard yet, but that is a pretty small matter.

2 Likes