Any ETA on when the Octopus Pro will be a standard store offering ?
Thanks much.
Any ETA on when the Octopus Pro will be a standard store offering ?
Thanks much.
No, I have not tested one yet and I think there is a revision in the works from them.
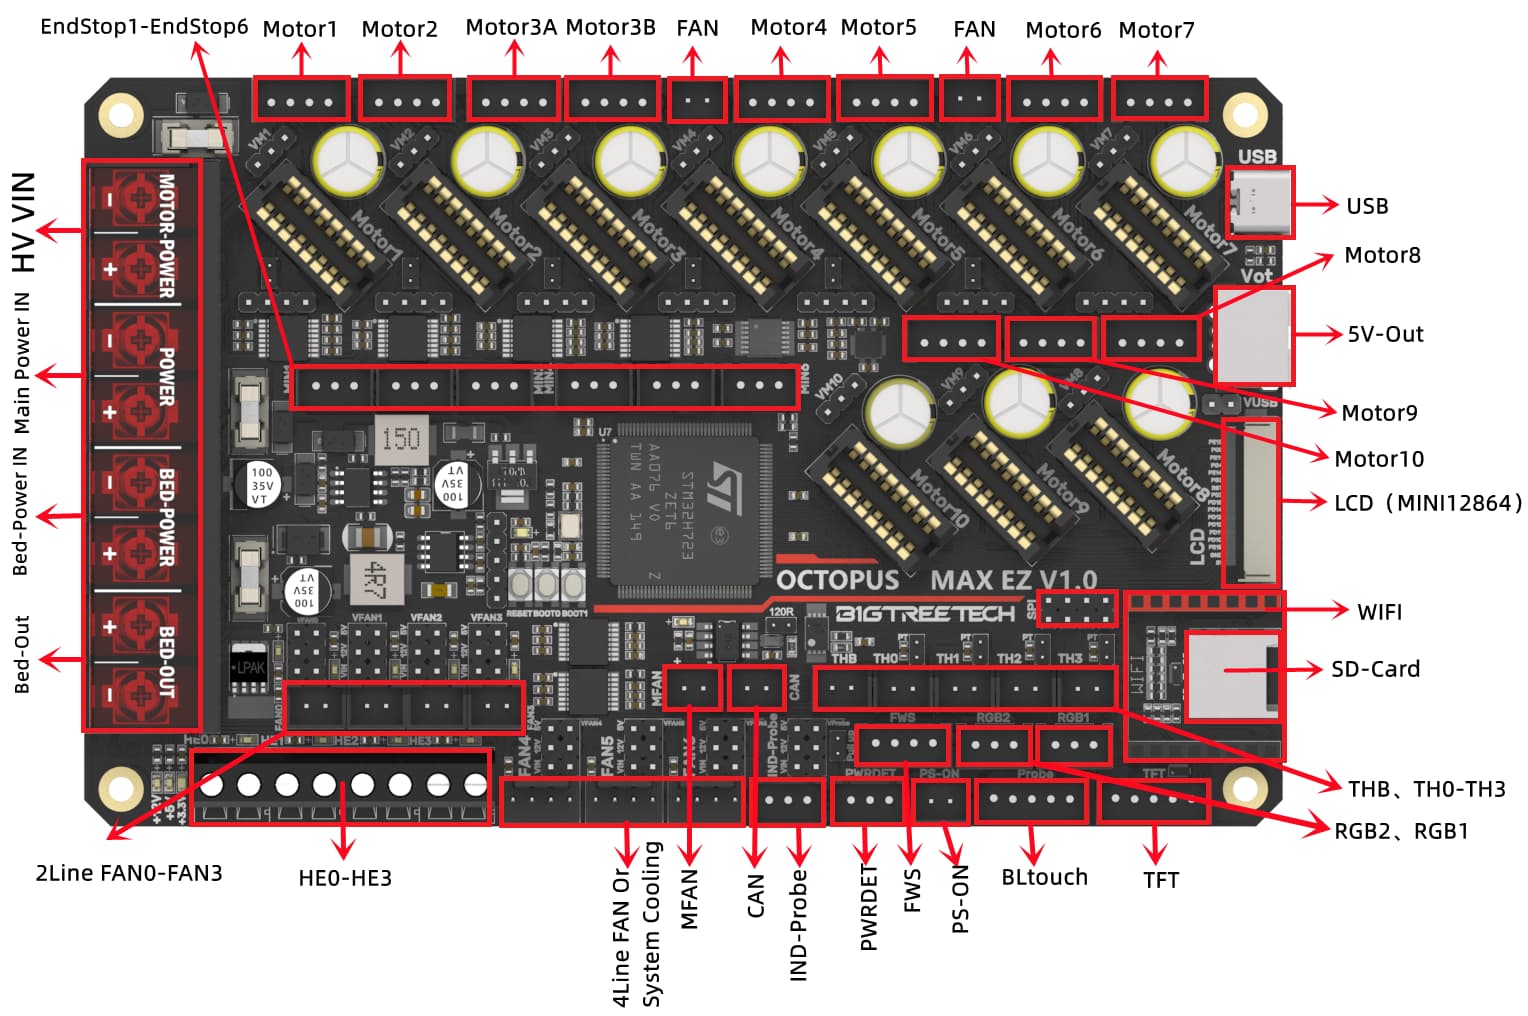
It looks like the “BTT Octopus Max EZ” (using the “cardslot/blade” form factor drivers) is the replacement for the “Octopus Pro” giving the OP a very short lifespan.
I’m not sure the EZ factor will replace it. They cost more for almost no benefit.
The major deltas appear to be the following. As to if they will all be used …
Octopus Pro:
【Main Control Chip】The main control board uses 32-bit ARM-level Cortex-M4 series STM32H723ZE/ STM32F429ZE / STM32F446ZE chip with a frequency of up to 168MHz and the flash is 1MB.
【Support 60V Input】Supports up to 8 3D printer motherboards with a maximum 60V stepper motor. The motor drive power supply supports up to 60V input (only for the motor drive power supply).
【6 Controllable Fans】Up to 6 controllable fans, two normally open fans, and both support power supply voltage, 12V, 5V options.
【Update Firmware: Klipper/Marlin/RRF】Supports firmware update via DFU mode. This is where the firmware is sent to the board directly from the PC and does not require a bootloader however this method is not recommended for novice users as discussed later in this document.
【Level conversion IC】Supports proximity sensor, jumper optional pull-up resistor, supports more models, supports BL Touch.
Octopus Max EZ:
Update:
I have not looked to deep into the differences.
The octo pro regular has all three selectable voltages.
The processor is all up to what they can get. Last time I asked the F4 was going to be the standard when the back stock sells out.
In terms of CNC use. The only reason I want it is fixed endstop ports, and esp32 (that will bring our cost / price down). The rest on both is far far far more then we will ever need.
What, no RGB bling ??? ![]()
Any thoughts on a 4th rotary axis ?
Update: Saw your post on rotary axis software costs. Not very attractive.
~$60 USD Octopus v1.1 supports RGB bling (see 2.5 RGB LED wiring in User Guide), direct power for Pi, and 5/12/24V Fans even if board power is 24V. Different Fan voltages has been nice for the reason you mentioned, especially after I killed my SKR 1.2 while trying to wire up power adapter for the fan.
10 drivers instead of 8 is helpful if you are using Dual-X-Carriage (AKA “IDEX”) and you also want to do 5 axes.
You only need 8 motors total but the way Marlin is set up you have to waste two sockets for extruders if you are trying to set up IDEX, so the rotary axes I and J go on the 9th and 10th axes.
So, you know, for the hundreds of people that are doing dual-wield together with 5 axes, they won’t have to hack the pins file anymore.
The Open CNC Shield has also got that, it’s pretty nice.
Just saw your IDEX tool changer thread. Way cool !!!
Have you tried duplicate and mirror modes for batch work with your IDEX rig ?
I have not tried it. I don’t think it’s nearly as useful as tool switching, but in theory it should work fine. The Z height of the tools would need to be adjusted physically instead of a software offset.
did you get your house all set from the damage?
How do you keep both head from colliding ?
Did you put a limit switch in between the 2 heads to prevent accidental bumper cars ?
It would be cool if the gantry could be wider than the bed so one head could park completely off the roadway giving the other head access to the entire workspace similar to some bedslinger IDEX printers.
He kind of does. But he is also allowing himself to use the ends he can reach with at least one router.
Yes, the plan was for 17" reachable by both tools and 24" reachable by each tool on its own (and the overlap is 17).
Since only one tool is used at a time, the other tool is parked and collisions are not a problem. Setting up the software limits (basically like soft stops for each tool) the tools can’t crash unless I forget to park.
My patio is still a mess. Still negotiating with the wife regarding the replacement…
I have found some time, and I am trying to get my lowerider up and running. I am using octopus pro, with tmc2209 drivers, and when I hook up the steppers and M122 shows that all the drivers are ok, but I can only move the z2 stepper. When I run a m119, it shows that all endstops are triggered except for the z probe. I tried to hook up an endstop and even with the x endstop open it still wont move the x stepper. It seems to be something in the software, I have a feeling it is something with the endstop code, do these need to be changed in config.h?
#define X_MIN_ENDSTOP_INVERTING false // Set to true to invert the logic of the endstop.
#define Y_MIN_ENDSTOP_INVERTING false // Set to true to invert the logic of the endstop.
#define Z_MIN_ENDSTOP_INVERTING true // Set to true to invert the logic of the endstop.
#define I_MIN_ENDSTOP_INVERTING false // Set to true to invert the logic of the endstop.
#define J_MIN_ENDSTOP_INVERTING false // Set to true to invert the logic of the endstop.
#define K_MIN_ENDSTOP_INVERTING false // Set to true to invert the logic of the endstop.
#define X_MAX_ENDSTOP_INVERTING false // Set to true to invert the logic of the endstop.
#define Y_MAX_ENDSTOP_INVERTING false // Set to true to invert the logic of the endstop.
#define Z_MAX_ENDSTOP_INVERTING false // Set to true to invert the logic of the endstop.
#define I_MAX_ENDSTOP_INVERTING false // Set to true to invert the logic of the endstop.
#define J_MAX_ENDSTOP_INVERTING false // Set to true to invert the logic of the endstop.
#define K_MAX_ENDSTOP_INVERTING false // Set to true to invert the logic of the endstop.
#define Z_MIN_PROBE_ENDSTOP_INVERTING true // Set to true to invert the logic of the probe.
I have tried to change the x_min and y_min to true which leaves them open on default when I run m119, but it did not fix my movement problem.