Another Octoprint plugin: line tracer

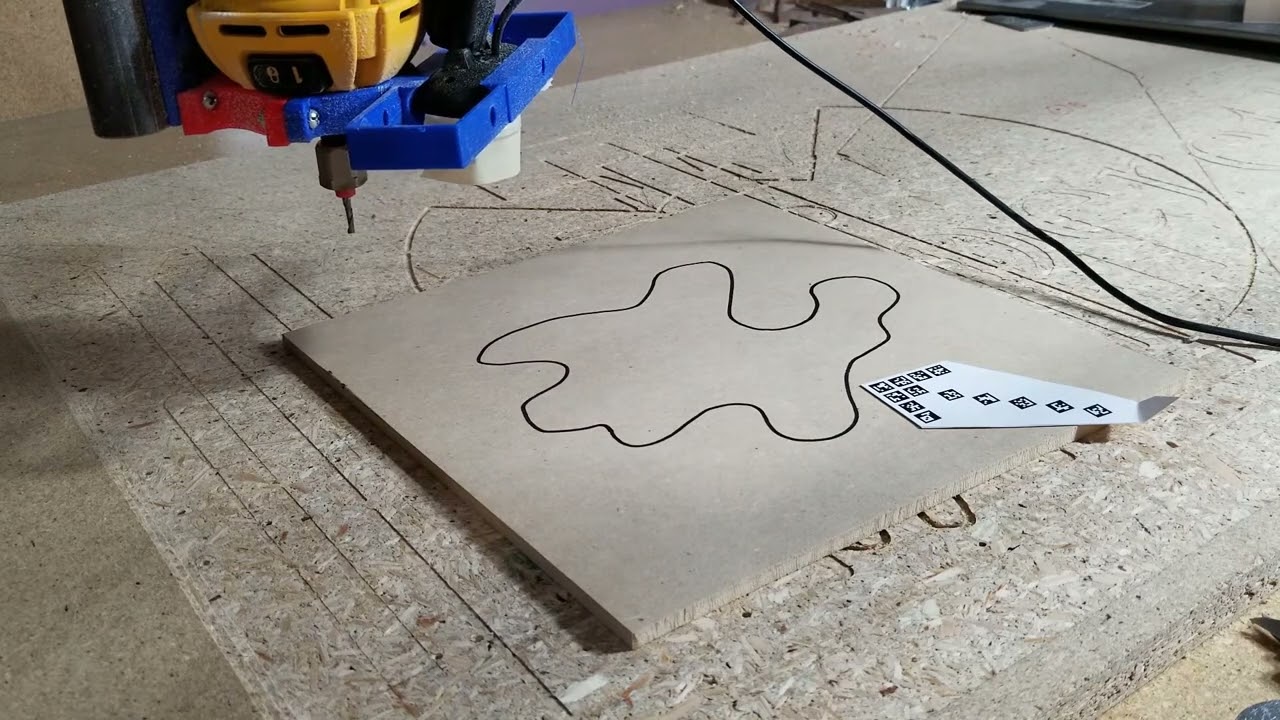
Go direct from physical to toolpath without any CAD or CAM.

This is very much prototype/alpha level of quality, which means the odds of success are nonzero, but beyond that, no guarantees. This hasn’t been published yet; I just got it working for the first time.

I am not sure how much utility I will get out of it but seemed interesting and I hadn’t seen anyone do this before. Not that I had looked really hard but in any case it’s not common. I can definitely imagine scenarios where this would be useful.

The plugin has options for depth, feedrate, size of the tool and an additional offset, and options for cutting ‘hole’ vs. ‘part’ and for climb milling or conventional.

23 Likes

Dude, that is insane!!! Did you develope that???

3 Likes

Yup. With a little help from OpenCV.

I had a lens with 100mm focal length laying around, and printed a mount for the camera & lens, so it’s got a decent focus.

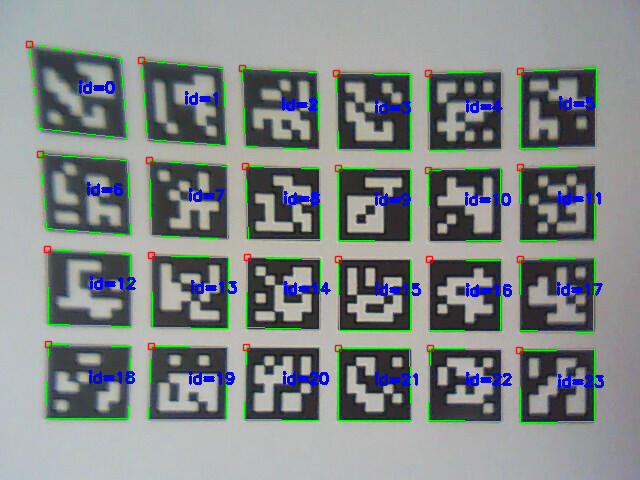
First locate the tags on the little arrow target, and move 10mm in +x and +y to figure out the scale and orientation. Then from the geometry on the tags themselves I know approximately where to start. Follow the line around until I get back to the starting position and stitch all the images together. Then flood fill the image and dilate/erode to account for the radius of the tool and the offset, if any. Then find the contour (OpenCV does this) to get a list of pixel coordinates and convert them to X/Y, then generate gcode and store in the uploads folder.

5 Likes

damn, thats pretty cool!

2 Likes

That’s brilliant. This community has some serious brain power, I’m constantly amazed.

2 Likes

Insane man, just insane!! Jolly good show

3 Likes

Who cares! This is awesome! Nice work dude.

2 Likes

That is awesome. Very fun to make. You’re having the kind of fun I want to have!

What resolution is the stitched image? It looks very precise in the final shape.

Have you tried tracing a shape? To make a copy you would have to dilate by the bit size from the inside edge of the line.

If you had very small features (to small for the bit) you would cut to much by skating the inside shape. But riding the negative would just remove that feature (so the bit wouldn’t go where it wasn’t supposed to.

I am also wondering about the ZenXY… If you could put the camera and a piece of paper under the table, you could make a pattern, and copy it into the sand above. Kids Everyone would love that.

8 Likes

OMG.

My mind is blown how casually make that process sound. I want to learn stuff like this!

How about using it to locate a part mounted to the spoil board. So you can either resume, or add to an existing project. High contrast background and follow the dark edge to locate the “zero” and go from there. So if a square was mounted skewed, or the center of an oval.

This feels like it is going to open a door of really good options.

Upvote this!!!

7 Likes

Dam I am impressed.

3 Likes

Do it again with a cat picture instead of an amoeba so my wife will let me implement it!

6 Likes

The resolution of the camera is about 7 pixels per mm, so not quite 0.1 mm resolution. The webcam is at 640x480 and the webcam (Logitech C170) has 1024x768 available, but there were issues with the video getting laggy, which I didn’t want to have to worry about. On a separate project I had used a Raspberry Pi camera and adjusted the focus by rotating the lens, and it can focus very close for a resolution of roughly 0.004 mm. At higher resolutions the camera will generally be closer to the workpiece and you might have to worry about collisions depending on your depth of cut, unless you have a removable camera mount.

Right now the plugin pulls the image from the OctoPi webcam “/webcam/?action=snapshot” (just like the timelapse), but nothing prevents it from pulling from a different server, so you could mount a separate webcam-only server on the tool head, and then you would have lots of freedom to not have to run long ribbon cables or USB extensions or whatever.

I think there are a lot of possible applications for a camera on the tool head broadly, like optical homing, and maybe with a laser at a shallow angle you can home Z. Finding the edge of the workpiece might not have good contrast in general, and focus might not be great depending on z height, but with a couple laser line generators that should not be an issue and you could precisely identify edges regardless of the workpiece color.

I was thinking it would be funny to have a variety of pens and to automatically color a page from a coloring book. A coloring book is make-work to begin with, so to have a robot do it is twice as pointless, sorta.

Tracing an existing piece is a good thought. It might take a bit of trial and error, but it should be reasonably precise. It could definitely be useful to cut a hole to fit an existing part, or cut a part to fit an existing hole, where going through a workflow from image to Inkscape to CAM process is a headache. And as an additional benefit, the cutout is naturally aligned to the workpiece, whereas with a separate image to Inkscape process, you have to take extra care to align the toolpath to the workpiece, if that matters.

Of course you could just break out the jigsaw, but then some hand-eye skill is required, and anyway that is so much less cool :sunglasses:

8 Likes

This definitely has my head spinning trying to come up with odd ball use cases. The potential seems very very high. I am sure stuff like this exists, just not on an entry level like you just made possible.

2 Likes

Lightburn has a webcam accessory. It uses it to make a stitched image of the work area so you can more easily align a DXF on a workpiece. That would be pretty awesome in octoprint too.

If you had a good image, you can send it through an edge filter (like sobel). Then you can. Send that through a hough filter which will detect strong lines. Those best lines could be used to let the user pick from a few lines to determine the edge of the workpiece. The hardest part about something like that is just letting the user click on a specific line (IMO). And then, some artifacts can slightly smudge the lines, which would make it nearly useless.

1 Like

I knew it had a Webcam feature, but didn’t know it could do that… Looks like I’ll be grabbing a cheap Webcam.

1 Like

Interesting. A full host application would be the standard answer for many functions, like aligning a gcode visualization onto a workpiece scan, or Estlcam surface mapping an engraving onto a non-flat workpiece. I would think between the python backend and a javascript front end, just about anything is possible within an Octoprint plugin. It just might require a lot of implementation work on the javascript side if there is a lot of interactivity.

2 Likes

Just uploaded to here, if anyone is curious: https://github.com/vector76/CameraTracer

This comes with no warranty, and it’s probably positively dangerous, but it’s a starting point that can improve over time.

9 Likes

I can think of a dozen uses for this in just the time it took me to read the article. Very nice!

Careful you may get popular like @jeffeb3 with #software:sandify with this project.

1 Like

This is awesome, you seriously rock !!
They are plenty of use case with Aruco markers and OpenCV !

I was wondering if lens focal /opencv camera calibration could not be deduced thanks to markers with an known fixed size. Would it allow almost any camera to be usable ?

1 Like

Yes! And even in its current form, it has a sort of ‘calibration’ built in, so it does not depend on the exact size that the tags are printed. Even for a particular camera and setup, the size varies as a function of Z height, so the calibration occurs on a per-scan basis and is not pre-configured.

The first step is in the scan to move +10 mm in X, and then +10 mm in Y, and from that it estimates the resolution and orientation of the camera. The camera need not be mounted with the axis parallel to the X and Y axes, and in my case it is 135 degrees from ‘upright’. So there is a lot of flexibility in the choice of camera and how it is mounted.

Right now the software does not account for any barrel or pincushion distortion, which is a problem with some optical setups. When stitching the images together, distortion introduces errors around the edges. In an earlier configuration, I had a lens with 50mm focal length and it was somewhat bad:
image
This could be compensated, but for now I chose a longer lens (with lower resolution) to avoid having to fully calibrate. An alternative is to use only the central portion of the image and take smaller steps, but I think this would be a last resort since it would dramatically increase the scan time.

3 Likes