I have an Ender 5 plus that has been converted to a Zero G core XY printer and overall it works great. But recently I have noticed that the extruder temperature sensor is not working as it should.
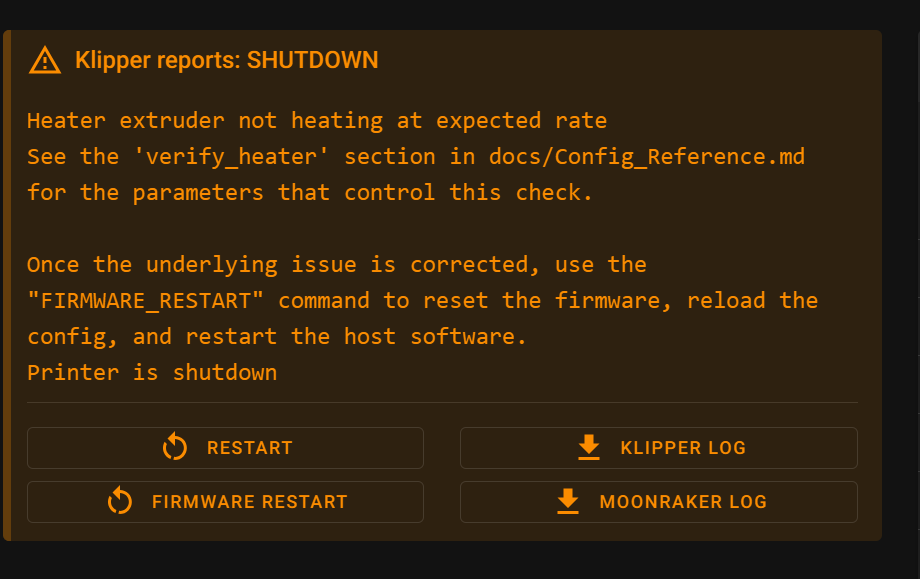
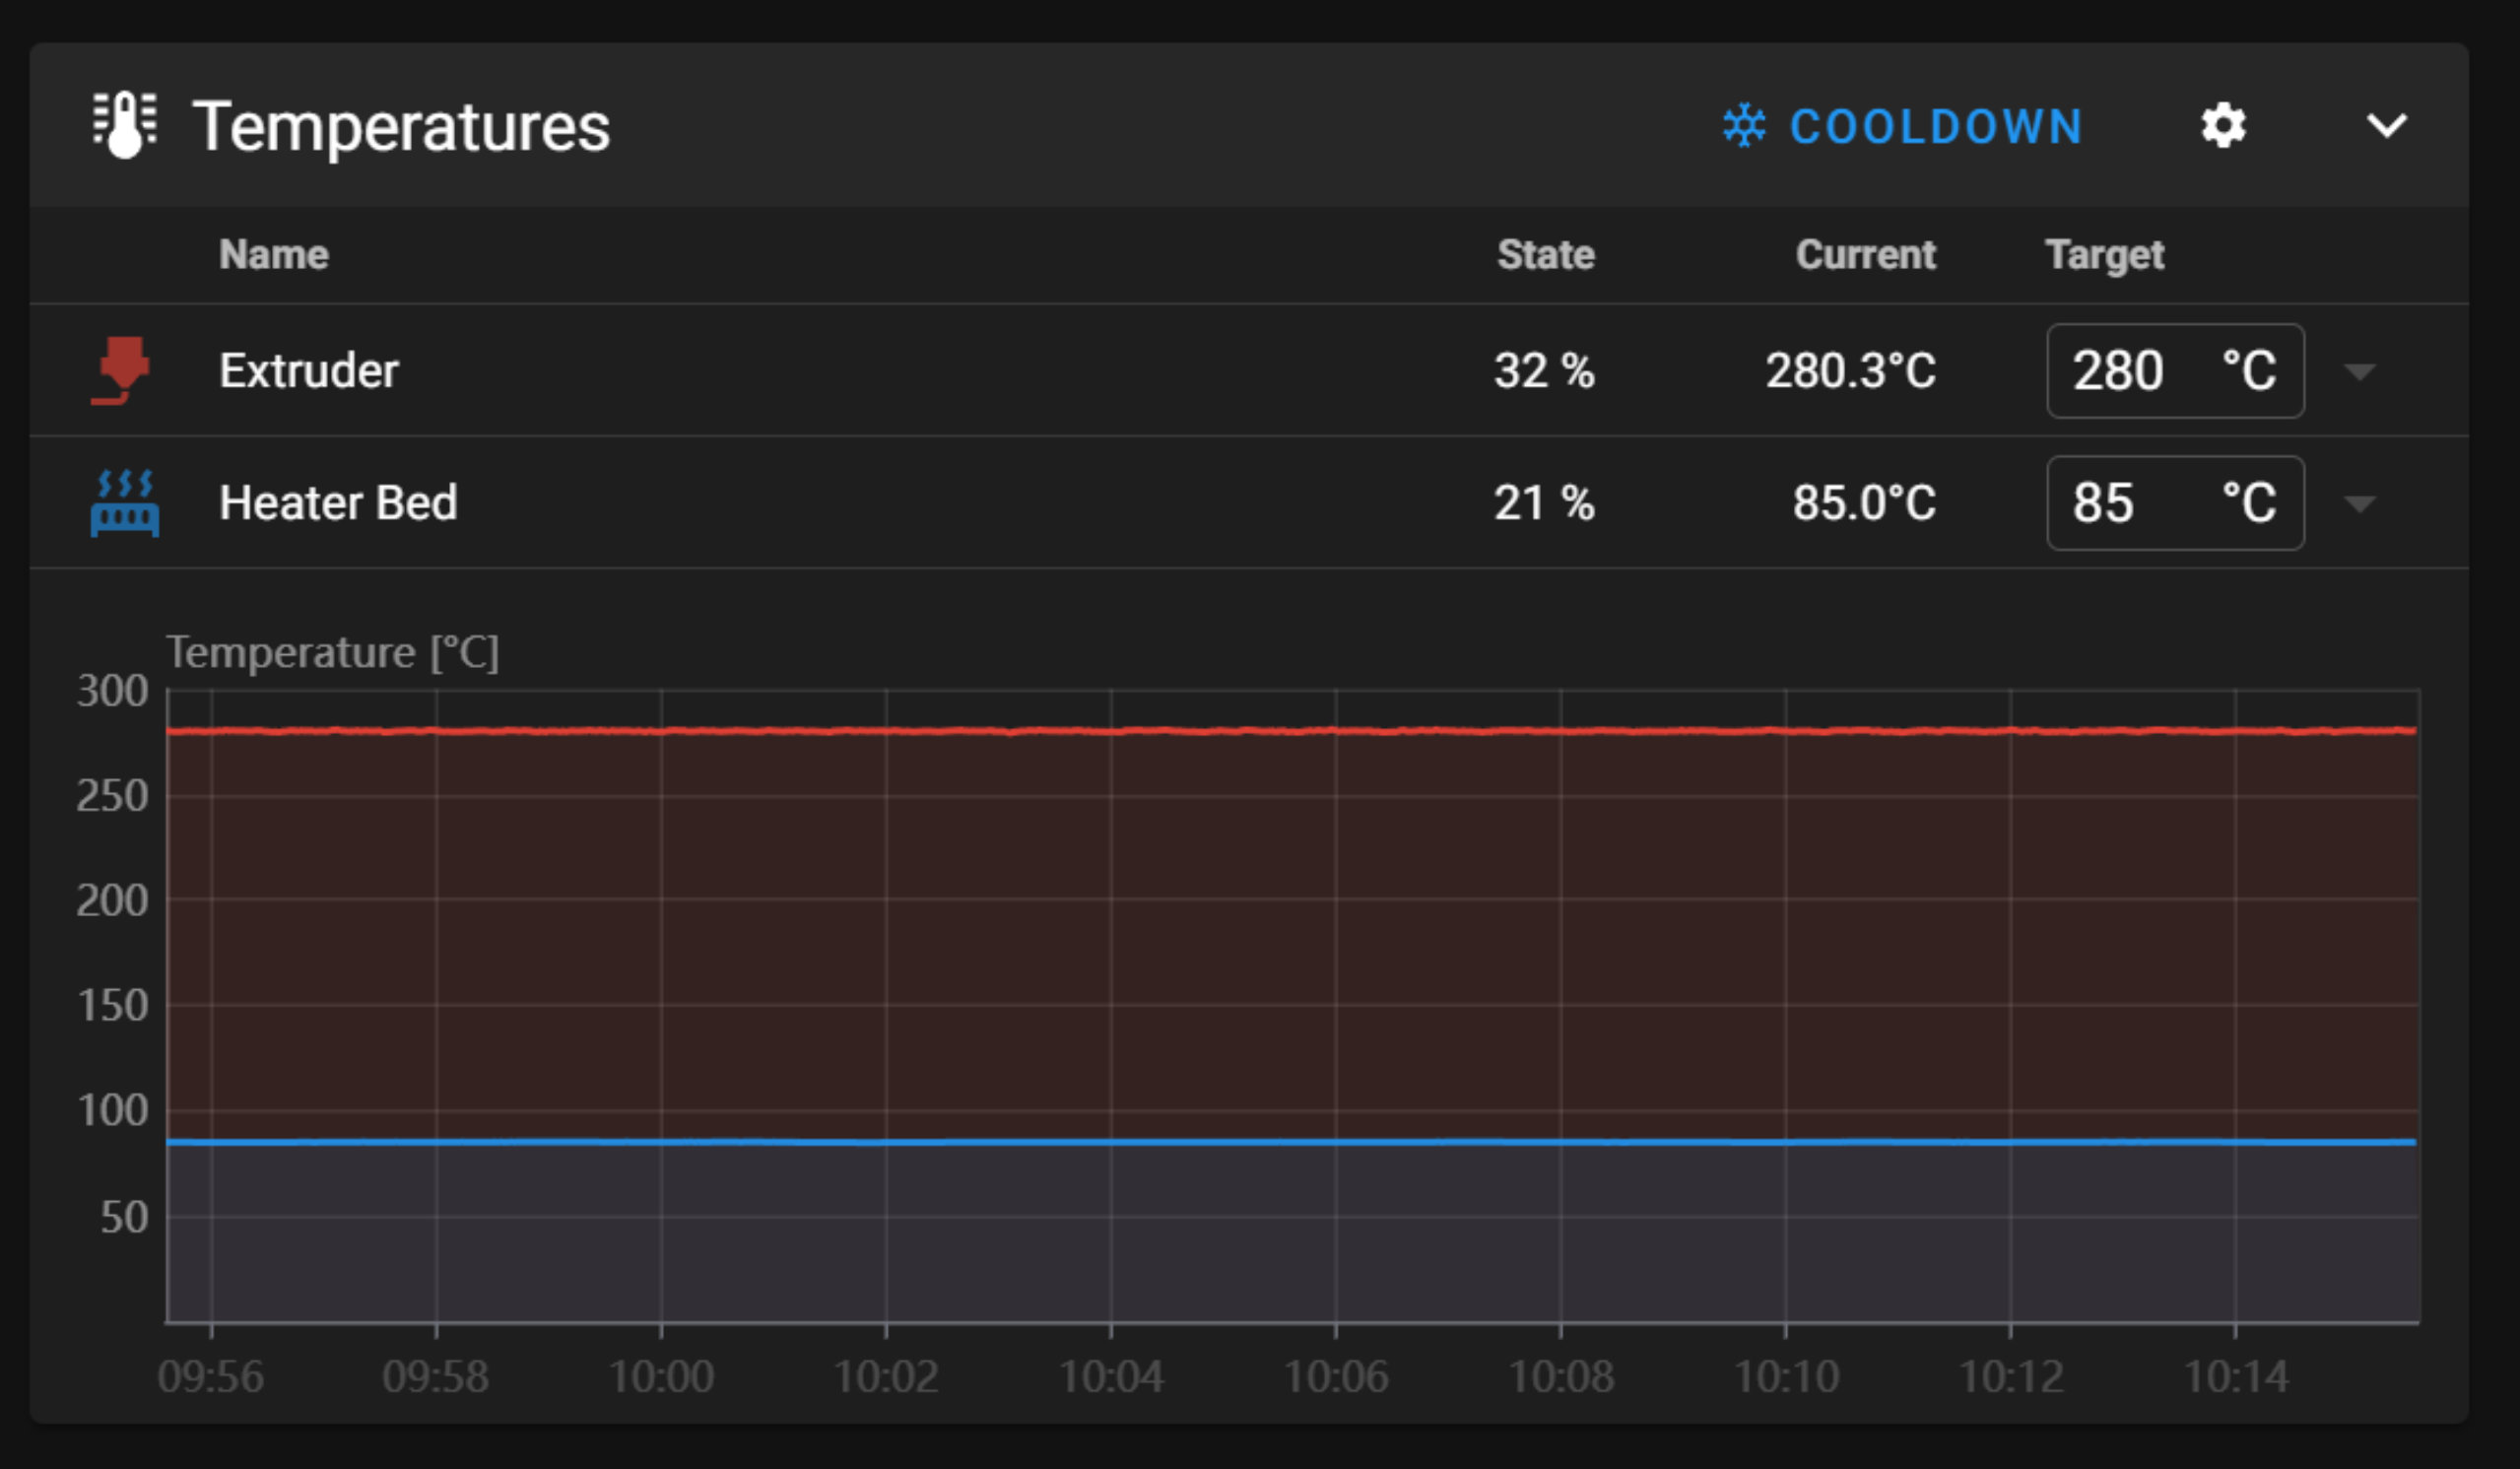
In fact it works and can create good quality prints but from time to time I get the “Extruder not heating at expected rate” error/shutdown and this costs me time and wasted filament. You can see in the attached photo that the heated bed sensor shows up in Mainsail as solid blue line and reports a current reading of 75.4/75.0oC [49%] but the extruder sensor does not show up in the same way. It functions and shows a red zone but not a solid line or current reading. I don’t believe this is a wiring or electrical connection issue as the sensor does function as it should. Has anyone else seen this problem or something similar. I can’t find a solution within the Klipper Documentation.
Have you run a new PID tune since the modifications? Might help. Also it can help to simulate the printing environment like having the build plate close and running part cooling fan at a baseline level.
Is it s mechanical issue with the wire pulling the sensor away at certain locations on the bed? Could be the heater or the sensor shifting in the hot end. Everything is still electrically connected. But thermal contact changes… Something to check.
I have done a new PID tune and the temperatures at the extruder look to be consistent.
I found a quote that suggests “if your Klipper setup isn’t displaying the extruder temperature on the graph, it likely means there’s an issue with the temperature sensor configuration in your Klipper config file, either the sensor type is incorrect, the pin assignment wrong, or the “extruder” section might be missing necessary details for the temperature reading to be properly registered and displayed.”
But I have double checked these configuration settings and still can’t get the extruder temperature to display correctly on the graph. The curious thing is the prints will successfully print about 90% of the time but I doubt it will get through the long LR4 prints without a shutdown.
I wonder if a clean install of Klipper firmware might help?
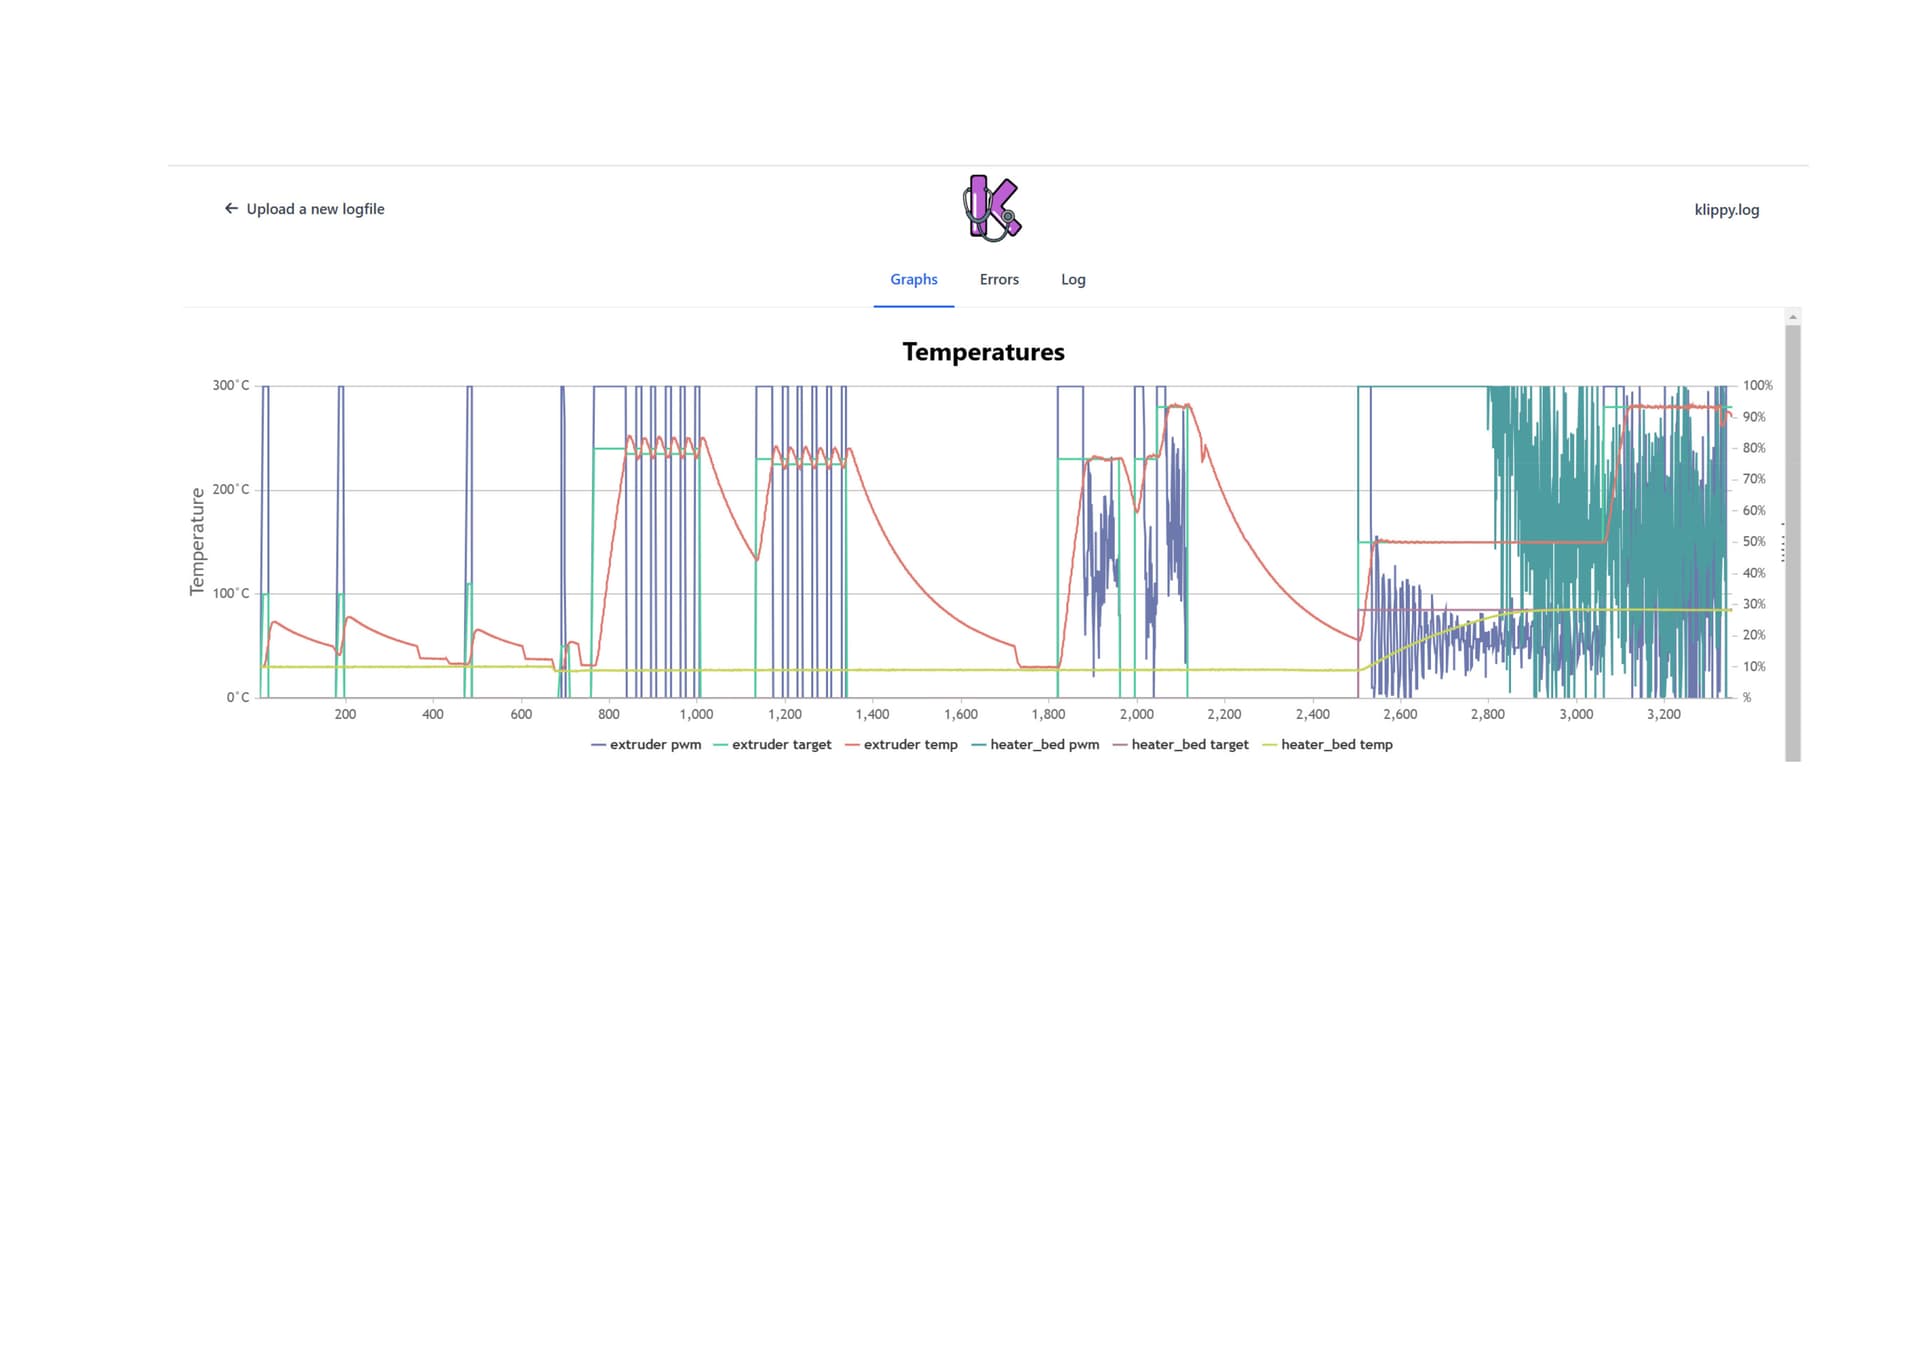
Used the online Doctor-Klipper to read my Klippy.log file and can see there is an extruder temperature fluctuation before the shutdown. Drops to 262C with a set temperature = 280C.
I’m not familiar with your setup/conversion. Are you using a thermistor or a PT1000? On my board there is a little jumper that must be set right for the type of sensor. I bought new heaters and sensors before realizing that the jumper had come off.
Truly not familiar enough to offer anything else helpful. I’ll watch with interest to see what others say. I’m pretty new to Klipper myself.
I agree that if your temp isn’t reading correctly, you probably won’t get through any substantial prints.
Currently I am using what I think is a common HT-NTC100K thermistor but I may swap over to a PT1000 or similar if this could solve the problem. Still head scratching…
I have got my printer working reliably by doing a “soft recovery” of the various programs. i.e. Klipper, Mainsail, Moonraker, etc. As you can see in this image the extruder temperature line is showing as it should and I have managed to print all my X-beam braces from PET-CF.
I am not sure if the PET-CF filament is worth the extra effort, as it is now recommended to anneal the parts in an oven at 130degrees for 6-8hours but the parts do seem very stiff…oops on re-reading this perhaps a discussion about the stiffness of my parts is inappropriate.
Will be printing the core and other parts from standard PLA.
Only issues I have had was a wire that was “breaking” where the thermistor plugs into the canbus board. Other than that I have been printing PET-CF no problem. I have no done any annealing of it either and have not seen any reason where it needs it. I don’t print all of the braces in that, just the one Min and Max brace. Then the 2 YZ Plates, the Core and the tool mounts. Everything else I print in PLA. I have the 36" beta still and its been a workhorse set up this way. I used PET-GF on my full sheet build and I am not 100% sold on that yet. It may get switched out for PET-CF parts at some point.
I had the same thought on the annealing. Doesn’t really look like it needs it but I will try annealing a few of the smaller parts to see if it makes any noticeable difference. As a filament to print with I was having no issues with the PET-CF either, until I posted all was working well. After this I have been getting some nozzle clogs.
Haven’t tried PET-GF but interesting you don’t rate it as highly. I can get the PET-CF at $60/kg here in Australia while standard PLA is around $20-30/kg. A premium for sure but not beyond affordable like PPS-CF…which is $130/kg.
If you do this, be careful to measure before and after. Annealing can lead to part shrinkage, and this may prove very challenging for functional part prints.
From what I was reading 280 is the bottom of the temp range, so you might need to go higher. What diameter nozzle? If .4mm then increasing to .6mm could let the GF escape a little easier…
I annealed a single part overnight. 120C for about 8hours and noticed two things:
The colour of the part has changed. It is now a duller dark grey. The uncooked parts are a matt black. It doesn’t really matter but the colour difference is there.
There is noticeable shrinkage. With some reference measurements I am finding it to be about 0.5% shrinkage.
So now I either re-print the part I cooked or bake the rest of them for consistency. In hindsight I don’t think it is worthwhile annealing these parts. Anyone know what change annealing might have on the stiffness? I expect it is more to enhance interlayer adhesion and perhaps not much or any change in overall stiffness.
Having tried these parts in PET-CF I think standard PLA is still the best option overall. I wanted to experiment with some PET-CF filament but I don’t see it as being significantly better.
I have been using a 0.6mm hardened steel nozzle but will likely try a few prints at 290C.
I agree the annealing makes it difficult to control measurement critical parts.
If it needed to be done perhaps the 3D prints could scaled up 1% and then annealed back to near true size but without experimenting the scale up and subsequent shrinkage is not likely to be perfect.
Thanks for reporting back on this experiment. I’ve wondered a LOT about annealing, but I’ve always ended up “throwing more plastic at the problem” by increasing infill, perimeters, alternating perimeters, printing at a higher temp, using a wider nozzle, and using thicker layer height. Obviously each of those choices have downsides as well, which makes it feel like I’m growing in skill as I make those tradeoffs intentionally.
The videos I’ve watched have annealed parts at 100% solid plastic.The nonuniform shrink that they demonstrate would worry me. One showed less shrink in Z, which is strange for me since I assumed the point was improving layer adhesion, which I’d think would squish the layers together if anything.
I super appreciate that you took the time to do this. I can safely stop wondering if I should try it .