I’ve got a dual end stop SKR pro machine that I have been messing with some signs on. I was losing some steps in the Y, but I saw a post suggesting a power drop while using a shop vac (my entire shop is current run off a single 20amp breaker!) Since I switched over to a Ridgid cordless shop vac, that issue is gone. I am now finding my eye is not very accurate when setting a the origin after homing.
I was thinking of attaching a corner block to keep natural zero even after flipping over my work piece to mill the hanging holes on the back. Is there a way to set “go here” after homing X&Y either in Fusion 360 or to modify Marlin/TFT?
So there are two issues here. The first is having your workpiece remain in the same location and rotation when you flip your stock. The common solution is to author your cutting to include two bore holes in the stock outside of your sign. These holes pass through the stock and into the spoil board. While there are different recipes, the simplest recipe is:
- The bore holes need to match the size of a wooden dowel or other peg or rod.
- The bore holes need to be on the authored vertical or horizontal centerline of your work piece, but outside the portion you want to keep.
- The home/origin location is the center of the top of the stock.
After cutting one side, flip your stock along the centerline you selected for boring the holes and use pegs in the holes drilled to precisely align your stock. Once you have the stock clamped down, the pegs can be removed.
So the second half of the problem is precisely finding the original home/origin you used on the first side. You have some choices. The simplest is to just leave your steppers powered. Coordinates 0,0,0 will be the same home position (center top of the stock) as the the first side. This is true even if you electronically move your router out of the way. As long as you leave the steppers engaged, your home position is preserved.
The second choice would be to home the machine and then navigate to the home position using the electronics. Then you can record that position before you zero the machine to do your cutting. To return to that position, you home the machine again and then navigate to the recorded position.
There are couple of other possibilities I’m going to mention, but since I’ve not tested them personally, I’m not sure of the recipe, and they may need to be enabled in the firmware.
- Marlin’s g-code has a G60 and G61 that saves and restores a position. I believe this feature needs to be enabled in the firmware, and I don’t know if the V1 firmware has it enabled. I’m away from my machine and cannot test it. Note that unlike a paper record, these positions will not survive a reboot of the control board. And like the paper records, you would record this position just before you zero the position to start your cutting.
- Marlin contains the concept of workspaces. It is possible to home your machine in one workspace and do your cutting in another workspace. The relationship between the machine home and your workpiece home is preserved. Workspaces can survive a reboot, but you may have to save it using an M500. The g-codes for workspaces can be found here.
After re-reading this before posting, it is possible you just needed something very simple. As long as the steppers are not turned off, you can use the g-code G0 X0 Y0 Z0 to return to the home position of the front side.
Edit: I just checked a copy of version 508 of the V1 maintained firmware on my laptop. Save positions was not enabled in that version. In configuration_Adv.h, here are the lines:
//
// G60/G61 Position Save and Return
//
//#define SAVED_POSITIONS 1         // Each saved position slot costs 12 bytes
2 Likes
This is true if you don’t reset the home position using gcode. Some cam programs have been set up to auto set home at the start of a program (such as Ryan’s crown test) if that happens it will replace the original home position with the new one.
1 Like
I did this:
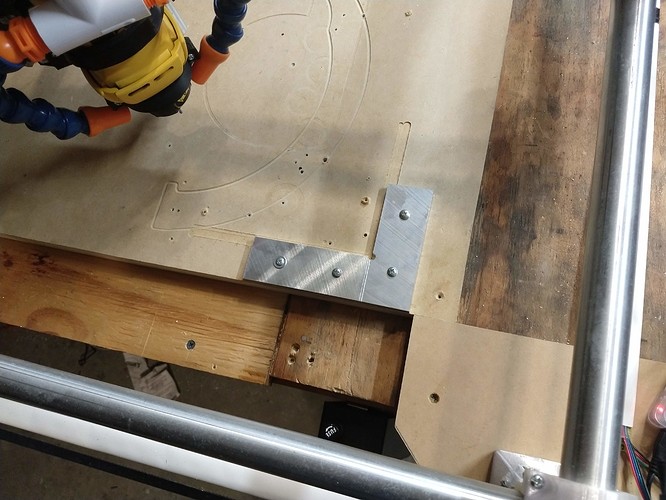
Once installed I milled the blocks WITH the MPCNC to ensure the blocks were square to the machine axes. Now when I start a session I g28 in x and y with the touch probe attached to the spindle and the blocks; same concept as the touch plates, but the offset becomes the tool or pin radius, rather than the plate thickness.
It isnt a perfect system, but for small work it performs well. In hindsight, longer plates would have performed better in terms of alignment of larger objects. Also, it assumes your work is square to begin with. Also, obviously you cant cut the work all the way to the edge, if thats what the particular job requires.
One way to maintain alignment when flipping the work over is to swap the x and y axes in your CAM program for the back side cut. This ensures that you can place the same corner of the piece against the machine origin.
4 Likes
My start code does this reset (G92) of the home position, so I execute a G0 X0 Y0 Z0 to return to the home position of the first side before running the g-code for the second side.
This is brilliant.
1 Like