so the mdf pieces work for the side y rails? This is part of my first cnc build, but they feel awfully floppy for supporting the cnc later. I’ve glued the initial grid together, but I was thinking of picking up some somewhat slim hardwood for those side y rails just to give them some extra strength.
The MDF is being supported along its length by the spars and kept straight by the vertical piece. A single vertical piece of MDF like that is going to be significantly stronger than you need.
You really want to avoid dimensional lumber wherever possible. It’s just not a very good engineering material and will change shape over time, likely causing long term issues and much more variability than the MDF ever would. MDF or plywood are your best options here, really.
If you’re concerned about it sagging, I would build it as-is and then just periodically check it. If it’s sagging then I would add more material under it to support it further or rebuild it then. There are enough people who have built tables this way that any issues would be readily apparent.
1 Like
Thanks! I’ll keep that in mind and follow his example.
I know in the initial post he mentioned he wouldn’t attach the top till later but how would that be done? I’ve built other workbenches where I glued the top down, but since the top here is somewhat sacrificial I assume it would be better to make it more easily removable than have to tear out glue? I’ve also just screwed from below into workbench tops but that doesn’t seem like a good idea with the mdf/particle board either. I was thinking I could do something like glue dowels into the grid, holes in the top secure it to the dowels, and then flush cut the dowels so the top remains flat.
There’s a couple of approaches that I’ve seen and it probably comes down to how you think you’d use the machine.
If you’re using a permanent top sheet which you’re gluing in place then I would add another spoilboard on top that can be removable in future. If I were doing that I’d potentially make the permanent top sheet thinner because you’ll have another layer distributing some of the load downwards. That’s the approach that I took although not with a torsion box style table, mine is just a thick sheet of triboard that sits on an existing table frame.
If you don’t want to bother with a separate spoilboard and top-sheet then you could just screw the top on so that you can replace it in the future. Or, alternatively, if you’re not going to be using the machine ‘that’ much, you could use something reasonably thick and just see how you go. If you get a few too many gouges in the top you can always run a surfacing path, take a little bit off until it’s mostly flat and then add a spoilboard later. Or if it’s completely ragged after a few years of heavy use, maybe it’s a good opportunity to rebuild a new table to different requirements etc.
The main thing is that your top sheet needs to be linked to the frame because the top sheet is one of the things holding the upright parts in place to stop them warping/bowing under load. Being able to transfer any weight from the top into the edges of the upright pieces without them shifting/warping is what gives the torsion box structure its strength. The weight on the top gets transferred into the edges of the frame below which are extremely strong providing they can’t warp/buckle, which is what the top sheet and right-angle connected pieces do.
I don’t know that I’d want to bother with dowels, personally, but I don’t see why you couldn’t. If I were doing that, I’d probably drill through the top into the frame in one go to dowel it to ensure alignment. Any slight misalignment during assembly will likely be unfixable without inducing a warp to the table. I’m not sure what they’d buy you that deeply sunk screws wouldn’t. I don’t think there’s any ‘one true way’ to do it, though. Deeply sunk screws would be my personal choice. Nails would work. Releasable glue could work. Pocket holes from underneath and a removable bottom sheet or no bottom sheet.
I personally prefer the idea of a reasonably stout frame inside for easy of screwing into it but then relatively thin top and bottom surfaces. Then a chunky spoil board over the top. That seems, to me at least, to be the best compromise between all the goals.
Mostly I was thinking of getting fancy with the dowels and mounting the mdf top because my experience was that mdf isn’t great at holding onto screws so I didn’t think just screwing an mdf top onto the mdf frame would work very well but maybe I’m over complicating it.
Since I went with the mdf strips for the grid/frame it doesn’t feel that stout, but perhaps once it’s all glued into place it’ll feel a bit more so. Currently I have a 1/2" particle board bottom, the mdf strips as the grid/frame, and a 1/2" mdf as both top and spoilboard. I do have extra sheets of pretty flat plywood in both 1/2" and 3/4" in my garage and I could instead use one of those as the top and then put the 1/2" mdf sheet on top of that as the spoilboard.
That would presumably be more stable and then I could just attach the plywood to the mdf fame with nails and glue and then screw the mdf spoilboard onto the plywood. That might make a lot more sense.
I’d pilot drill the holes, for sure, but I think you’ll find MDF holds screws plenty well enough for the forces we’re talking about here, especially if the joints end up glued.
That’s the thing with torsion box designs, all the pieces are somewhat light/flimsy but the strength comes from how they constrain each other and transmit force through the structure. The pieces don’t need to be strong in any dimension other than the ‘flat’ dimensions for the sheet. Try turning a square piece of MDF into a parallelogram and you’ll see what I mean. The fasteners are more holding against shear forces than pull-out forces, etc.
Personally, I’d just get it together with the 1/2" MDF glued/screwed and move on to the more interesting bit which is using it! If you’re worried, though, you could try to just screw on the top and see how you like it. If it feels rigid enough to inspire confidence then you could take it back off and glue it down or just leave it as screws only and sink a bunch more in.
I opened the CAD file, and the top sheet is reading 49x98 inches. Is the file scale off, or did I do something wrong?
If you go to the hardware store and measure a full sheet, it’s usually around this size.
1 Like
Sheets of MDF are typically 49x97.
3 Likes
I know this is more of an Onshape question than a table question, but since I’m referring to the design above…does anyone have any tips on actually getting the measurements or a BOM out of this thing? I have modified the table to be 4 ft. x 4 ft. in my copy of the drawing, but I can’t seem to get dimensions anywhere.
What I’ve tried so far:
-
If I do Rclick+show dimensions (or select all and double-Lclick) it only shows some of the broad dimensions for the table, not all. Like overall width and length but not height, for instance. I don’t even care about in. vs. mm, I’d just take “units” or whatever.
-
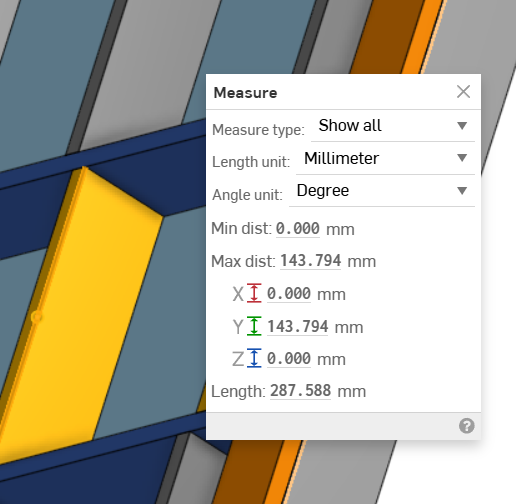
If I click on an individual part and use the measuring tape in the bottom-right I can only see surface area, not dimensions like Length (says “No measurements of this type available for current selection”).
-
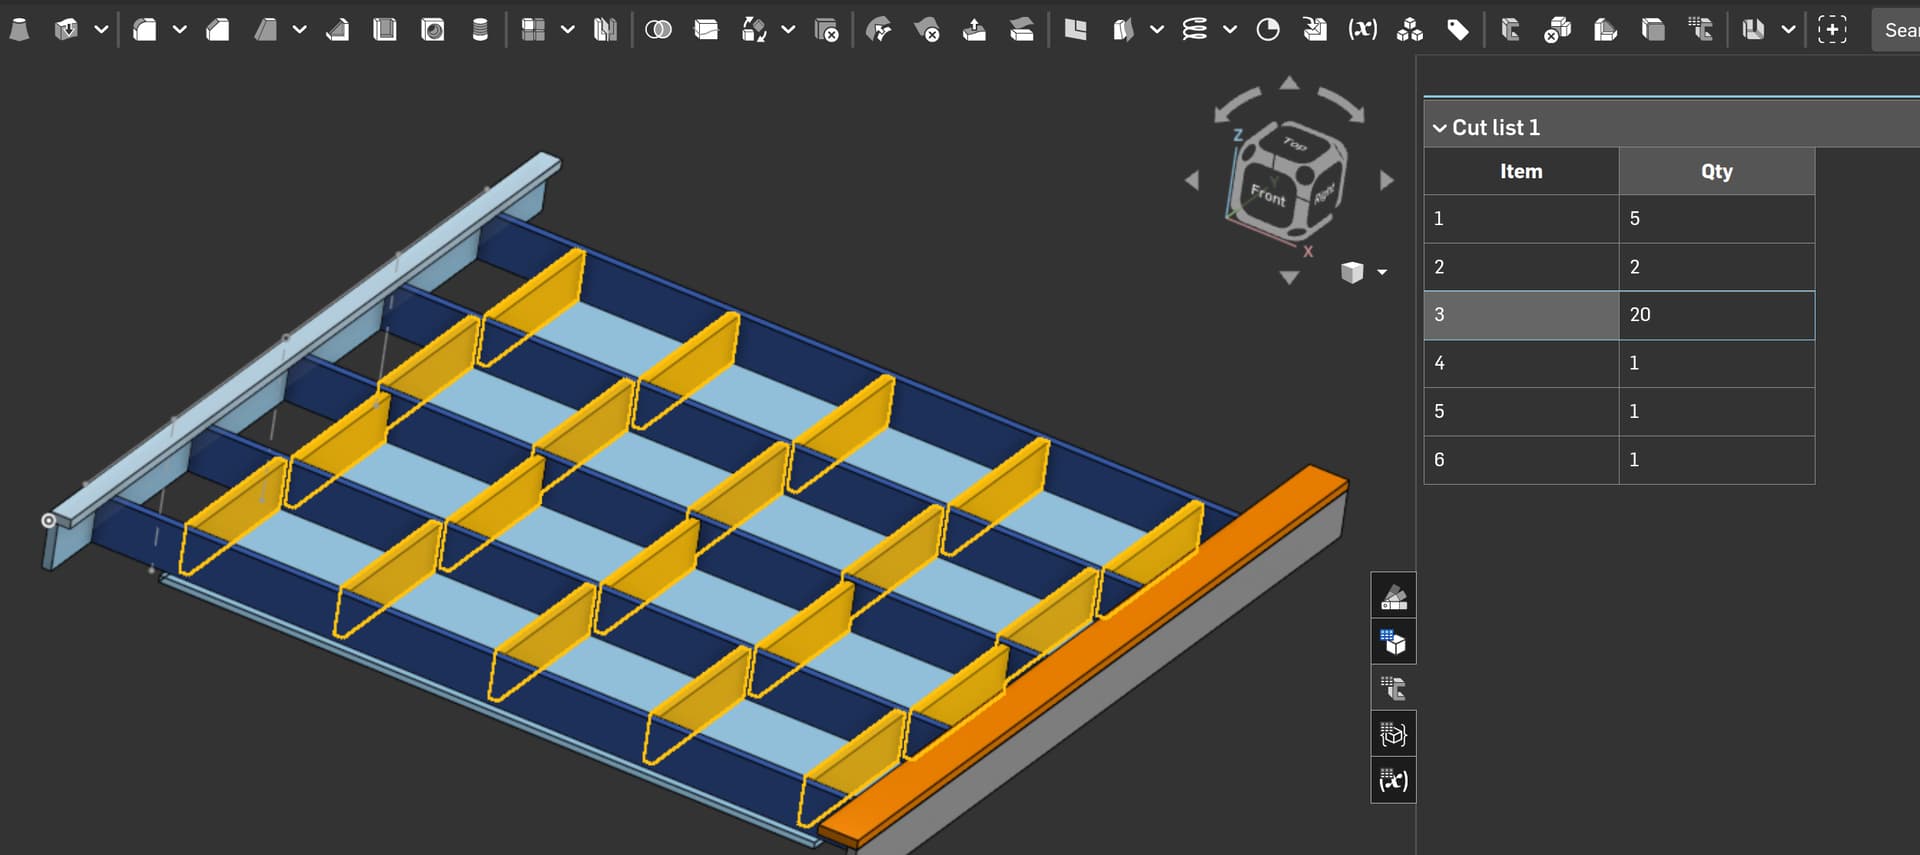
If I use the Cut List tool I get a listing of the repeated parts (i.e. qty. 20 vertical torsion box braces and qty. 5 horizontal braces) but not their dimensions.
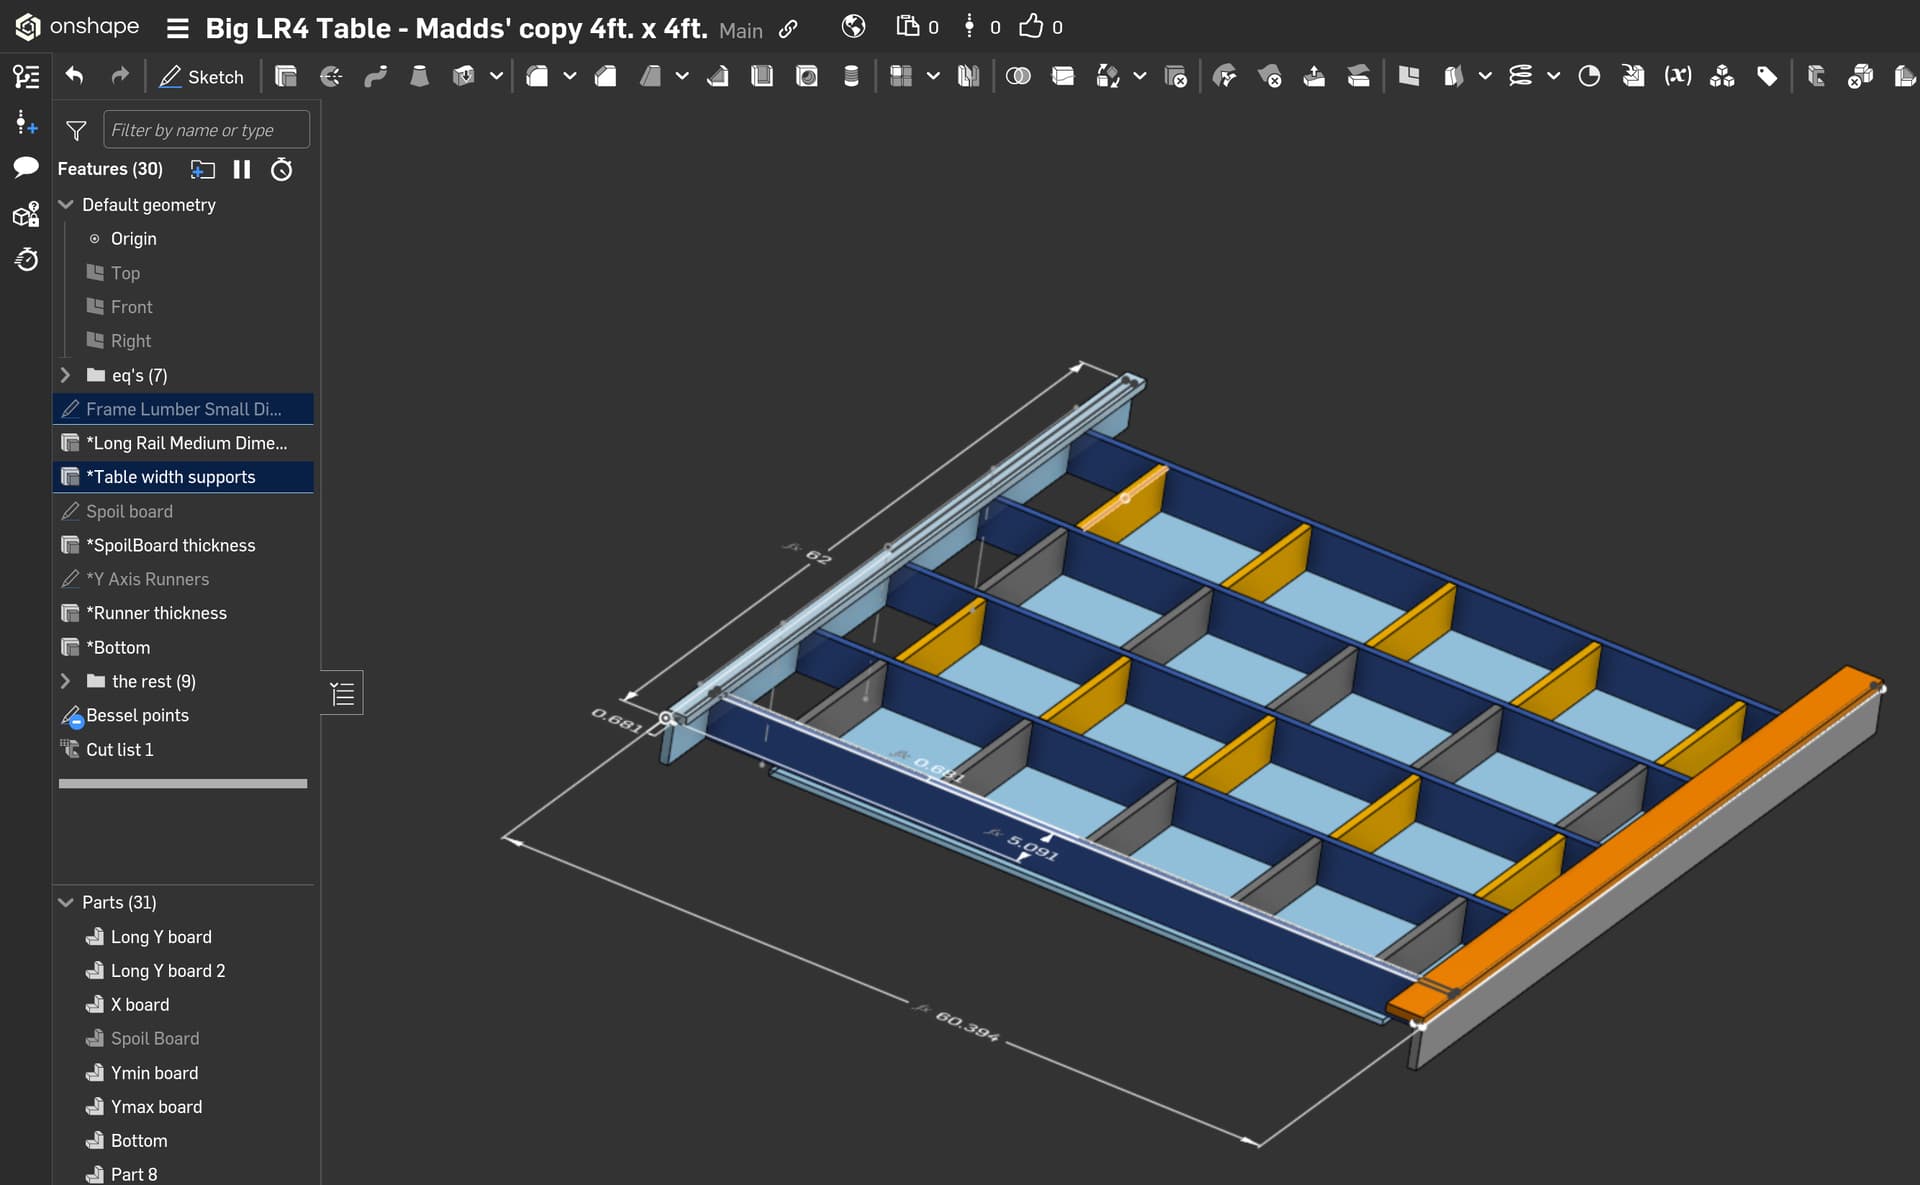

I feel like I must be doing something wrong? Figured here someone might know. Onshape is pretty neat and I imagine this won’t be my last time using it since it makes designs so easy to share.
I had some of the same issues. For me it was the layers. This is the measuring tool I was using on the display,

But when I clicked the item it often got the layer above it. I had to figure out how to Display or Hide some items to get the measurements of others. ‘the rest’ folder had most of the parts I needed to show or hide to get this.
2 Likes
Blockquote
Sheets of MDF are typically 49x97
Dude. This information is key, along the lines of 2x4 not actually 2" x 4"
I would suggest that it depends a lot on where you are in the world.
Here in NZ they’re always either 1200mm x 2400mm (47.25" x 94.5") or 1220 x 2440 (48" x 96") and are true to size within 1mm. Sometimes there are oversized sheets that are ~1800 x 2400 or 1200 x 3000 but I’ve never seen one that would actually measure out to 49 x 97.
2 Likes
To use the cutlist, you have to use the ‘frame’ generator tool in Onshape, which is not super-intuitive.
There are three ways that I know of from here.
- use the measure tool, and make sure you click edges or points.
- Go into your individual components and add a description that lists the material dimensions. You can then insert your entire part studio into an assembly and you can create a BOM that has the description showing. Effective, but this is very manual and if you change anything, it doesn’t update.
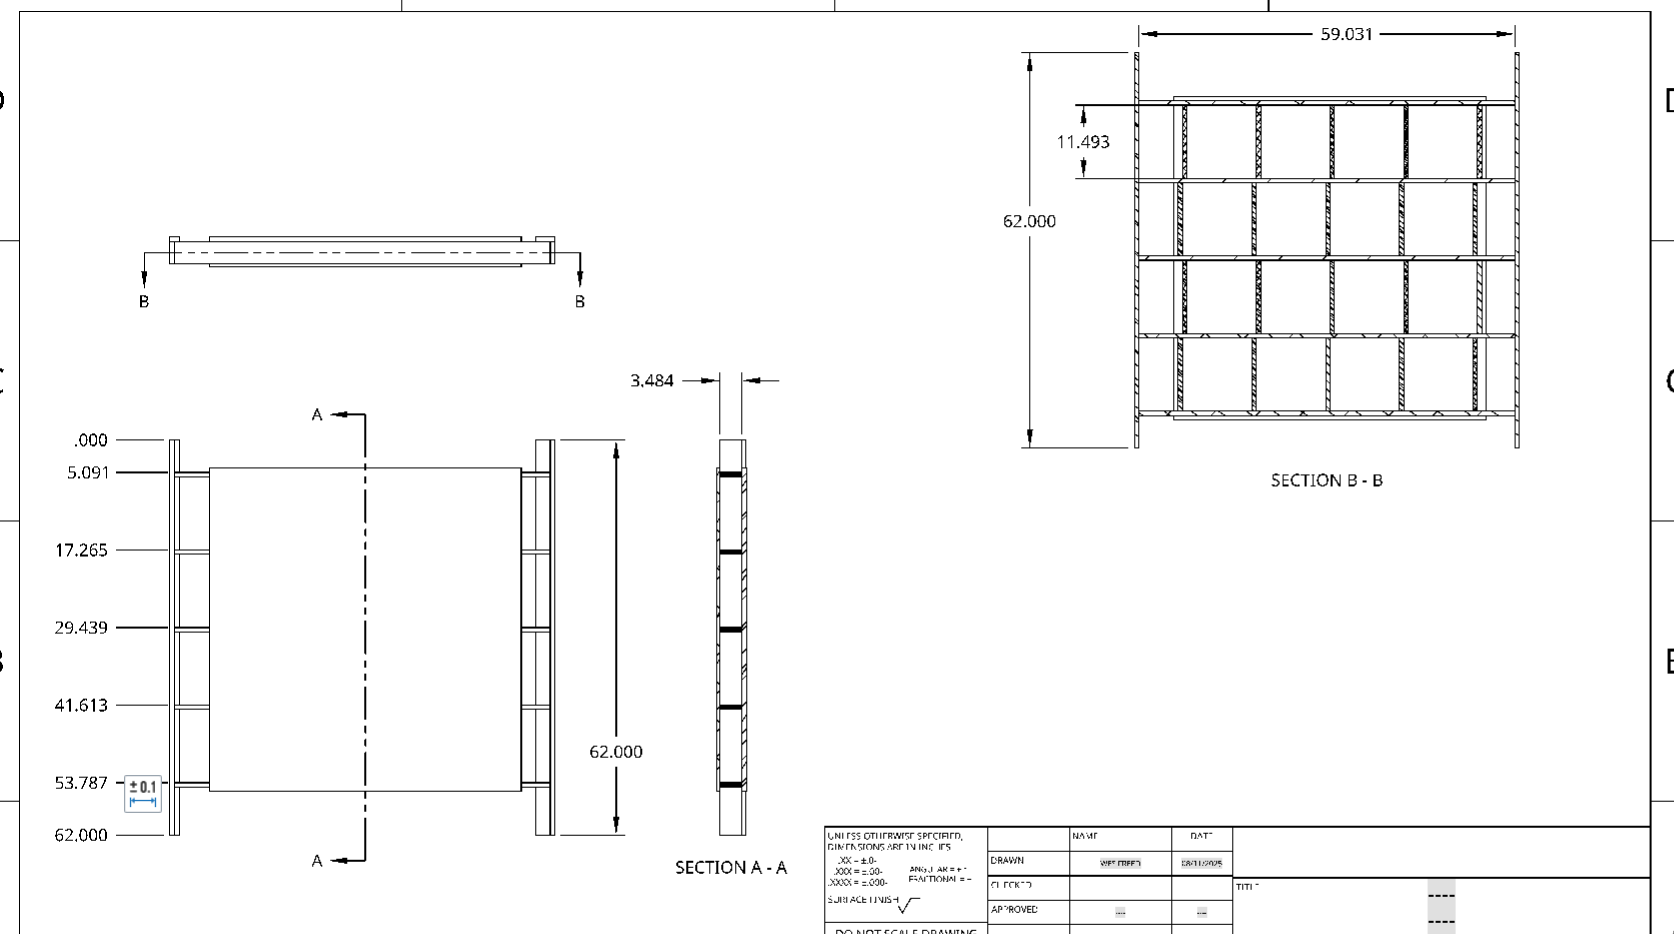
- Make a drawing. This is usually what I will do. Make a top level drawing and pull whatever dimensions you need. See below (this is a terrible drawing which is quick and dirty, but for this purpose it works)
2 Likes
Oh hey thank you for these tips @aggie_wes! I never did figure it out on my own, but I’ve printed this out and will be sure to use them when I get time to work on my table build. Life has been crazy lately so stuff is a bit on hold, but I’m hoping to finish it out come Labor Day weekend. TY TY!
@ anyone who built this design, please share Pic(s) of your ‘final’ setup showing how you routed wiring, vac hose, and your controlling pendant/tablet/PC/etc… ? Cheers!
Thanks for the table design. Just finishing my build in the UK.
I noticed the CAD drawing shows the Y rails are not centrally aligned. The overhang is 129.3mm on one end, and 191.3mm on the other end. Is this important? I thought they looked pretty central in the photos.
Thanks
The cutter isn’t in the middle of the machine so it’s likely to line the cutting area up with the table surface.
1 Like
I’m hoping to purchase a Lowrider V4 soon, and am trying to plan out a table for it. Because my workshop is a garage by day, I need something that can be tucked away, and I was looking into a system that uses a ceiling winch and channel struts to guide it up the wall and store it vertically when not in use. To do this, it seems like I’d need to reinforce the sides to hold the weight of the machine+table, or I’m wondering if there’s an even more down and dirty option where I just set up the machine and then use it to cut out the friction-fit table that I saw Doug Joseph designed which seems like it might distribute the weight enough to do this. Has anyone done anything similar, or have thoughts on a better way to go about this?
You will want to take the machine off each time for sure. That is quick and easy…and built in so have look around there are a few folding tables.
1 Like