VIDEO: CNC-cut light diffusers added to signage - featuring wrong & right way to carve/cut plexiglass!

Was just watching this very nice well presented!

2 Likes

Yep, also watched this last night, Nicely done Doug.

Maybe we could setup one for Peter’s side covers…
everything is better with a bit of light bling…

2 Likes

Let’s get one pair finished first shall we? :rofl: :rofl:

Come on, everything is better with blingy lights.
Esp “subtle” blingy lights…

(yea yeah, i know that make little sense. my brain is broken ok…lol)

Perfect timing as I’m planning some plexiglass cutting and was looking for some hints/tips on where to start with my feed and speeds and things to watch out for (ie keep things as cool as possible :sunglasses:).

1 Like

Please take pics and/or video and post updates!

I will, when I get there. Not ready yet. Got some other life and wife items to tend to. Slowly I’ll get to this. At least now I’ve set up the same feeds/speeds for my bit in Estlcam so I’m preparing for my attempts/tests.

1 Like

Hey @DougJoseph, thanks for creating and sharing your plexiglass experience.

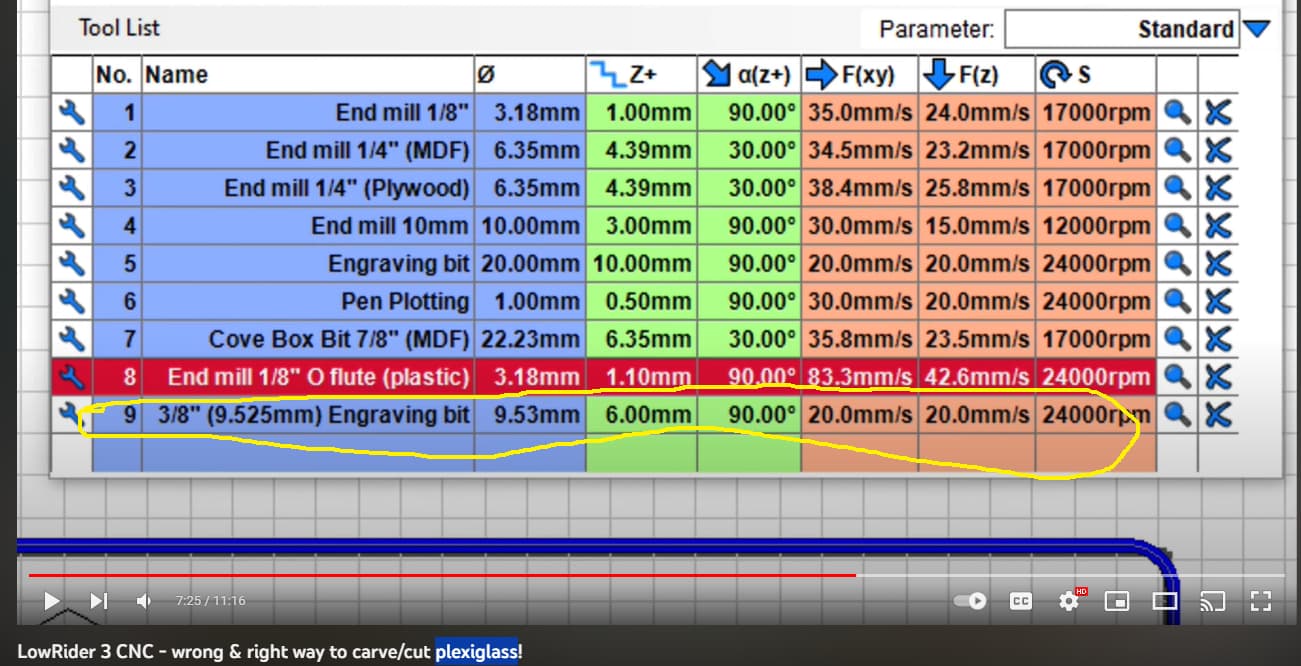
Did the 3/8" Engraving Bit settings below, with IPA cooling, work for your machine setup? Am trying to figure out decent settings for straight cuts with V-Bit that doesn’t require Trochoidal settings ideally (it’s so slow). Do you use Trochoidal stepover for this profile?

Have been getting good results with 1/8" downcut bits, but not so good results with 1/4" 90 degree V-Bit. My LR3 lifts off the left Y bearings and right Y rail if feedrate is too fast ( 20mm/s).

Thoughts IPA on Acrylic causing small cracks?

Have been using a Vac, but will try something else if I see heat build up (e.g. compressed air, water mist?).

This was 25% ipa 75% water.

Hey good catch. That setting did not work. It was the setting that gave the bad results seen in the first part of the video! I did not get that sorted, but my sense is the feed speed was way too slow!

If I ever do get that sorted out, I will need to update my crib, and the video description notes!

No, I just let ESTLcam’s “Carve” based results be my gcode.

Gosh, how deep was the engrave, this was your 1/4" acrylic? Did the cracks appear during the engrave, or later on over time? Damn, these panels aren’t cheap.

2mm

Yes sir.

I heard it pop while it was still cutting. Didn’t even bother trying to clean it up afterwards as you can tell lol.

That one piece was $40 and that is the only one of my panels that is acrylic. the rest are polycarbonate. Not sure how IPA does on those.

Unfortunately for me just about all of my panels need to be redone/replaced. All do to inexperience on my part. Most of them the screw holes didn’t move parametric with the change in size of the printer. And i ended up moving things around after having already done them. I’m in no rush to change them at this point. They will work while I get the printer back up and running and hope that just having everything held square now will fix some of my issues lol.

OK, so the feed speeds that worked for me for acrylic (admittedly for 1/8" end mill, not 90 degree v-bit) were much faster than that. 83.3mm feed, with 24K RPM.

I recently laser engraved some 1/4" acrylic, but I had to “finish” the profile cuts on my bandsaw because my laser settings were not enough. So, I decided to use a heat gun to get cleaner edges. However, I made the mistake of applying the heat while the brown “craft paper” was still on the acrylic. After peeling it off, I noticed some remaining goo, because the adhesive layer on the paper, got melted and was not fully peeling or something. So, I googled how to get adhesive goo off of acrylic. Sadly, my search led to a YouTube video that said WD-40 was a good approach. Bad approach. It caused all the engraved areas to have cracks and splits creep into the acrylic. I wound up having to redo the whole thing.

Yeah, better supposedly, will find out… Used Polycarbonate for all my MP3DP panels after seeing Brent’s post about IPA. Figuring IPA will splash/vapor onto the panels over time when the print bed is IPA cleaned.

1 Like

Your settings seem to work just fine for the bits I used.
There bits are o-flute set I found on Amazon.


I first tried to use the 2 mm one and when I turned the RPMs down by 1/2, the next test I did, the bit broke. So keeping it a smiggin’ higher then ‘4’ (~24,000 RPM) the bit(s) is where I’ll keep it.

I’ll still have to polish the edges, but I’m very happy with the result (nice quick and full depth ~4mm):

Now, this is with some scrapes I had, so I’ll have to re-test with some ‘real’ acrylic once the opportunity presents itself. I’ll have to try to set up some tests to validate that this wasn’t a fluke, but your settings are a good place to start from for me and adjust from there. Thanks for sharing the video and your exprience.

2 Likes

@Mattman looking good!!

My understanding is… believe it or not, it actually works the other way around. The smaller a bit is the higher the rate of rpm you need. I know that seems counterintuitive, but if I understand correctly, that’s what the experts say. So to shrink the bit size from 3.x millimeters down to 2.x millimeters, I think it needs more RPMs rather than less, as crazy as that sounds.

Or vice versa.

The maths makes it more intuitive:

For ease of calculation -

a 100 unit diameter circle has a circumference of 314 units
A 50 unit diameter circle has a diametercircumference <Thanks @SupraGuy for the correction!> of half that (more or less)

Therefore at the same RPM a mark (or flute) at a point on the larger diameter is travelling at twice the speed in order to get back to the same point.

To make the smaller diameter do the same “work” you either have to double the speed it is spinning at, or halve the speed it is moving across the surface.

Hence the variable between feed rate and RPM :wink:

1 Like

Well, the math says exactly half that, if I were being pedantic :rofl:

The other thing to account for is the size of the flute. The smaller bit likely has a smaller clearance and cannot fit the same size chips, therefore must have a lower chip load which means lower speed or higher RPM.

Given my record of impatience, you can guess which way I jump, when I can. :stuck_out_tongue: :rofl:

2 Likes

Thanks for the edit - glad you were paying attention - I’ll fix the original post too.

Well I WAS being pedantic in a very obtuse way, I didn’t want the size of the flute to get in the way of a good story. :rofl: My brain was just ahead of my fingers as I typed! :smiley:

Circumference is indeed a linear equation, however as bit diameter increases the flute size changes (dis)proportionally, which makes for a not quite so precise sum.

Yes boys and girls, never let anyone tell you that size doesn’t matter.

1 Like