If you need a “3D” carve, then it is very difficult with Estlcam. If you can get away with a “2D” carve then it is possible.
The two parts I call the ‘pocket’ cut into the base material and the ‘plug’. Suppose D is the depth of the inlay, and the cutter included angle is A. The bit I use is a 45 degree cutter (1/8" 45 Degree Carbide V-Bit – V1 Engineering Inc), meaning each side is 22.5 degrees from vertical. When cutting at a depth of D, at the upper surface the cutter will effectively have a radius of Dtan(A/2), or an effective diameter of 2D*tan(A/2). For example with a depth of D=3mm and angle of A=45, the cutter diameter will be 1.24mm.
If your pocket has inside corners that are smaller than this, then you can’t do 2D and you have to do 3D. Your plug can have sharper concave corners because when cutting the plug, the tip of the cutter is defining the final shape, but when cutting the pocket, you are up somewhat on the tool so you have a somewhat more blunt tool defining the final shape, which prevents sharp concave corners in the pocket.
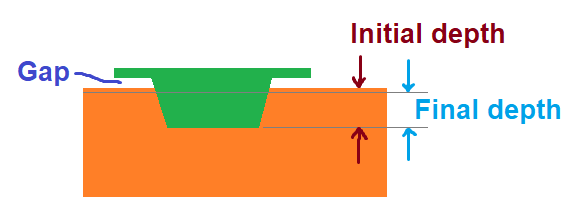
If these constraints are met and you are able to do 2D inlay, the “simplified” procedure is to choose your depth D, and offset the pocket inward by D*tan(A/2). In the example above with D=3mm and A=45 degrees this would have been an inset offset of 0.62. In Estlcam you can leave a finishing allowance and if you do not specify a finishing tool, it will not make a finishing pass, so it will leave the pocket that is undersize at the bottom of the pocket but correctly matches the pattern at the surface. Cut the pocket to the appropriate depth you’ve chosen.
For the plug, cut out a part to the same depth, and no offset is necessary. The outer, lower surface of the plug will match the outer, upper surface of the pocket.

In theory this would work but there are three things that are problematic in my experience.
- The v-bit does not have a perfect point, especially if there is some runout. When the bit is short relative to its width, the pocket ends up shallow relative to its width, and if you cut a bit deeper then it is wide relative to its depth.
- To get good pressure, the plug should be slightly taller than the depth of the pocket, so it bottoms out in the pocket before the outer surfaces meet. This can also help give the glue somewhere to go.
- The upper surface of the pocket often gets dirty and needs a bit of sanding, which changes the appearance of the inlay slightly. Therefore I plan for the final surface to be slightly below the upper surface of the base material.
So instead of the diagram above, I do this:

The upper gray line indicates the final surface that will reveal the inlay after removing a bit of the top surface of the base material.
This is a bit complex but it should be doable if you can do some basic math.
First measure the diameter of the cut that is made by the tip of the v-bit. The way I did this is to take a piece of wood and incline it on the machine at a very slight angle. Then with the bit barely above the wood, I jogged it “uphill” and so that it started to carve a very very shallow groove into the wood. Then with a magnifier I was able to measure the width of this cut. Enter this as the cutter diameter into Estlcam, and it will offset by the appropriate amount (half the tool diameter) so that the dimensions are correct.
For cutting the pocket, the offset (finishing allowance) is the same as before, as final depth * tan(a/2). The bottom of the pocket will be the same dimensions, and there is just a bit of extra material. But when choosing the depth of cut in Estlcam, enter the initial depth, not the final depth. That’s the simple part.
For cutting the plug, you now need an offset because the bottom of the cut is beyond the final plane due to the gap and the difference between initial and final depth. The “plug overcut depth” is the gap + (initial depth - final depth). This is the excess amount beyond the final plug depth that is being removed. The offset for cutting the plug is therefore plug overcut depth * tan(a/2). Use this as a finishing allowance when cutting the “part”, and do not specify a finishing tool, and it will leave the part oversize at the bottom, but proper size for the upper part of the plug that fits into the pocket. Don’t forget to use the tool with the diameter that you measured, so it will also accommodate the effective nonzero diameter of the bit.
The depth of cut for the plug must be the initial depth plus the gap.
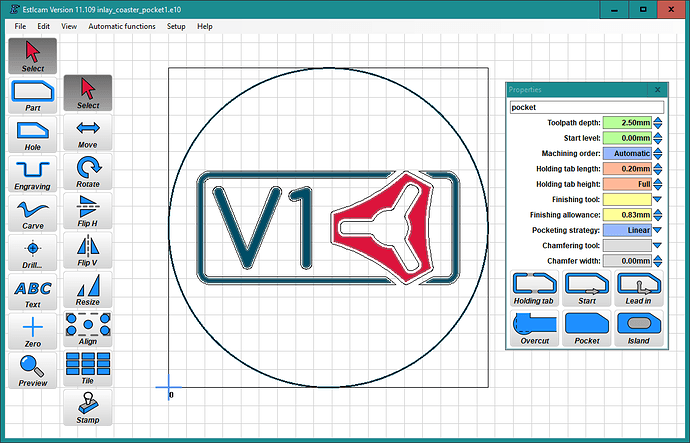
Here is an example where I’m using a 2mm final depth and 2.5 mm initial depth, with the 45 degree v-bit.
The offset (finishing allowance) is 2*tan(22.5), or 0.83mm, and the toolpath depth is 2.5 mm, so the final surface will be 0.5 mm below the upper surface of the base material.
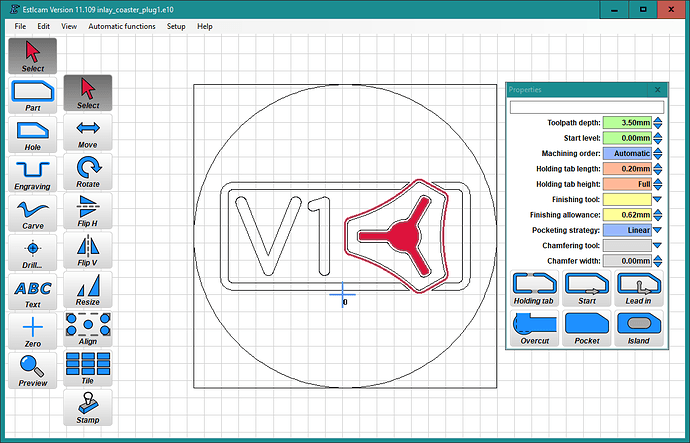
Then for the plug I have this:
The depth of cut is 3.5 mm which implies a 1mm gap since the initial depth was 2.5mm. With a gap of 1mm and 0.5 mm between initial and final depth of the pocket, there is 1.5 mm between the final surface and the full depth when cutting the plug. Therefore the plug requires an offset of 1.5 * tan(22.5) which is 0.62 mm.
In both of these cases I specified a tool diameter of 0.4 mm which is what I measured due to runout or whatever reason.
Hope this helps!

