My plan is to hang aluminum angles from plugs slipped into the ends of the perimeter tubing. This will allow support for the chains, but leave me the option of slipping longer work pieces through the machine.
3 Likes
Just then, tragedy struck!
Well, I should have known better than to place such a large piece of MDF on the table. It overhangs by a foot and today while I was in a work call my cat jumped on the overhung section and caused it to tip and the CNC to fall. Not a big deal really, but two locking corner pieces did snap. I printed replacements out before the end of the work day.
Time to do some tuning though, because the ID of the pieces came out to 25.67 instead of (I assume) 25.4. The OD is also 39.4 instead of 39.6. Smaller holes and exteriors so its under extruding I think. I measured the new filament in several spots all right at 1.72 instead of 1.75 so I’ve adjusted that in the slicer and I’m printing another piece to test. What’s odd Is I also did a calibration cube and was only off by 20 thou or so in the X and Y.
Oh well, time to throw on tonighs episode of BATTLEBOTS and let the test print finish!
Photo to appease the forum gods.

Back on track! I had to reprint the licking corners at 99% otherwise they were just a smidge too big. Squared up the center price and tested squareness of the frame. Before I trim down my MDF I wanted to mock up wiring and realized even with the extensions I bought I run short.
I ordered some 6 pin aviation connections and 22/6 wire so I can get it wired up clean. I decided to reprint my RAMBO box to one that supports the new connectors (MPCNC tall case for RAMBO by merrittgene - Thingiverse), and plan on adding a few things for tidyness sake.
When reassembling everything and going back over it I found some cracks 
Seems to work for testing though. I did the crown test since it was already loaded from the last time I put it together (and got no farther… heh) and ran that. It ran well and was consistent and repeatable. I manually drew a 100mm square and then measured it with the calipers. Looks good. The diagonal was right at 141 (point two… something. who knows with thick pen line) Either way the diagonals looked equivalent with the calipers. I’m curious to do the large rectangle test to check squaring on a larger scale.
Once of the parts that is cracked is in the core… should reprint it or see how it fairs? If I need to reprint, could I go for the Primo core or would I need all of the new pieces?

Either way I’m happy it’s moving and doing it well. That’s a good note to head to bed on 
4 Likes

Use it as is for now, when your printer is sitting idle start the new Primo center parts. They are really a lot better and I am sure most people that have switched have noticed a pretty big difference.
2 Likes
Well, I’ve been busy outside of my shop, but I still managed some progress! I know its basic, but I spent an afternoon learning the basics of Fusion 360 so I could make my own mod for the MPCNC. I intend to learn it anyway for CAD and CAM and TinkerCAD feels awfully limited so the time was right. In addition to extending the clean dual endstops rollerplate (which took me an hour to split and extend… should have just googled it) so my switches with longer than normal terminals can fit, I also made a bracket designed to hold GX16 aircraft connectors and my dragchain>
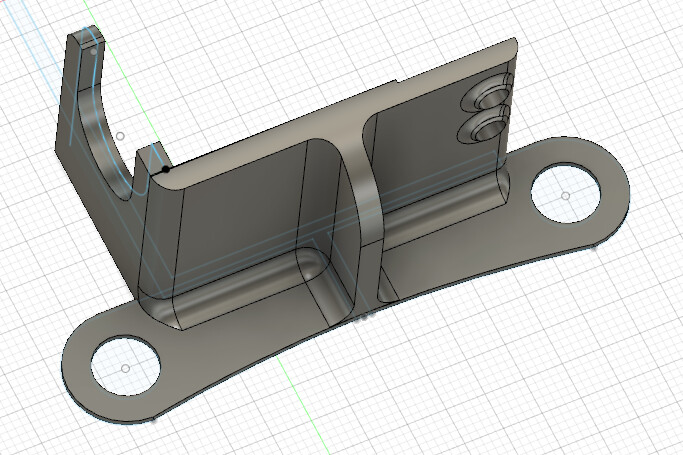 (guess who designed it backwards and had to mirror it in Cura… this guy)
It fits everything beautifully which has me quite pleased. The GX16 is secure but can easily come off. The drag chain mount has some heat inserts that are super satisfying to install.
Now I need to get to soldering cables the correct length and figure out a similar dragchain and connector mount for the z axis. I think I’ll base that part off of the one made by WidgetWiz3D because it mounts to the gantry instead of the Z.

Its slowed me down quite a bit but I know once I’m cutting I’ll not want to mess with the machine more than I have to keep it running so if I want quality of life improvements like this I need to implement them now.
3 Likes
Time well spent. I’m really a beginner in Fusion. I’ve been doing an online course for it. I’ve spent more time on FreeCAD, but I keep hitting walls where I know stuff is possible, but I think I’m going about the basics wrong.
If I had a dollar for every time that I’ve designed a part in mirror image… I’ve even designed the part mirror image, scrapped it, then started over vowing not to do it again… then done it again. ![]()
![]()
![]()
1 Like
Womp womp.
Hopefully I’m just missing something simple.
EDIT Oh I was. It was really, really simple. Expand to see my mistake
I set up the V1Pi on my Pi Zero 2 W and had no issues browsing it over the network. I decided to hook it up to my control box. When I try to connect via Octoprint I get the following:
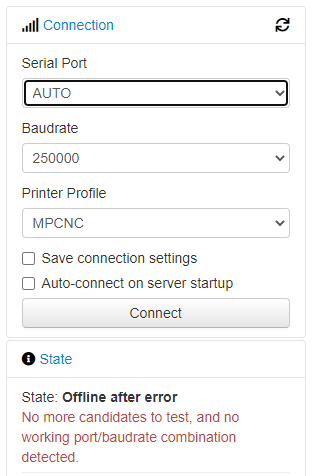
When I try to connect via CNCjs I get
![]()
but it doesn’t seem to actually connect or let me control anything.
For this testing I have only the Z motor wired up. I verified I can control it through the LCD as expected.
In case its relevant, I have wired up a buck converter to the power input in the control box, which is set to 5V and powers the Pi through pins 5v and G in the GPIO using dupont cables. Since it only has micro SD ports I have an adapter to USB B and have tried multiple cables to connect to the RAMBo.
It was plugged into the power input USB on the Pi, instead of the normal USB.
Since I bought this years ago its probably due for a firmware update, but I figured I’d get it all running before adding other variables.
Side note, I’m keen to run the 12v fan in the control box. I know I can just add it to the power input like everything else is, but Ive got an extra 2pin connector for the RAMBo and would like to be able to control it. I’m not currently getting any reading off of the pins for Fan1 or Fan2, is that something I have to set in the configuration first?
Thanks ya’ll.


More progress.

I think I’ve finalized how everything else will be laid out in the control box. It wasn’t designed for this but I found it’s got enough space for the my Pi Zero 2 W and a buck converter. Shame I’ll have to have the usb cable leave the box only to enter it again in order to plug into the RAMBo.
I didn’t want to run the fan from the PSU because it was be so awkward to try and undo if I needed to take off the lid, but luckily I found a matching JST connector with some of my random bits. Now the fan can be unplugged just as easily as the LCD.
Tomorrow I hope to figure out the drag chain mounting for the Z and then wire that up. Then I’ll unbiggen my unnecessarily large MDF board the machine is on and then actually mount the MPCNC and drag chains.
I’m very pleased with how clean everything will be and that it’s all easily removable with the way I’ve handled the cable management. I’m getting very excited and think I can have it running in a finalized sort of mode in a week or two.
2 Likes
I was trying to figure out the best way to attach the cable chain to the gantry without having it hang off of the Z. All the things I’d seen so far are multiple pieces that clamp on with some nuts and screws, or want you to drill into the piece to add threaded inserts, or even reprint a modified version and reassemble it. After some tinkering I think I figured out a way to just have the support snap into place and even centers itself based on the part Ryan designed.
Now I just need to design the rest of the bracket.
I’m ecstatic at how simple this piece is and just how well it works. I also can’t believe at how well it fit on the first try. I’m going to reprint it because I forgot my threaded inserts needed 3mm thick to fully insert so they aren’t as clean as I would like. I’ve already made that change in fusion, but looking at the back of this I can’t help but think it needs a V1 logo going down it.
Maybe I’ll learn how to do that tomorrow before I reprint it.


2 Likes
Love it. Ryan always says not to attach anything to the Z tower, because leverage is a thing. On my Primo, I curved the drag chain downwards to the core clamps, starting higher on the Y axis truck.
This is a nice looking piece, glad that it fit so well, too!
1 Like