Sandify is my next project, very nice job.
I already have a table with a glass top available ![]()
Sandify is my next project, very nice job.
I already have a table with a glass top available ![]()
That looks horribly complicated… -_-
I meant that if you make the pattern in sandify and ecport the gcode, you could add a little starting and ending code to cut that pattern right now on your LR.
I am not so sure. If you had something you were doing over and over, and over.
So, My daughter is doing bazaar’s right now. And I am seeing that as a simple way to set up custom projects very easily!
I am more than curious on this one!
Well, hmm, not so sure how I feel about a monthly charge, but it is minimal. The kit is not badly priced either.
That kit is mostly this webcam.
The workflow doesn’t make sense for me. I’d rather just make gcode.
I would be curious about using it for alignment though. I haven’t researched this yet but if I could find a webcam that I can get the current image or stream from a URL, I would think I could create a WebUI v3 extension for FluidNC. I’m not sure any of that is necessary since you can using probing or tiling for the use cases I can think of.
That would be similar to how Lightburn can use a camera for alignment on a laser right? I know I have tried that in the past and while it works great, the image you get is always extremely grainy even from a high resolution camera. I believe it has something to do with how they make the image “flat” so it matches the layout exactly but that’s all way above my paygrade.
I haven’t used Lightburn but something like that. I’m sure there are some technical challenges.
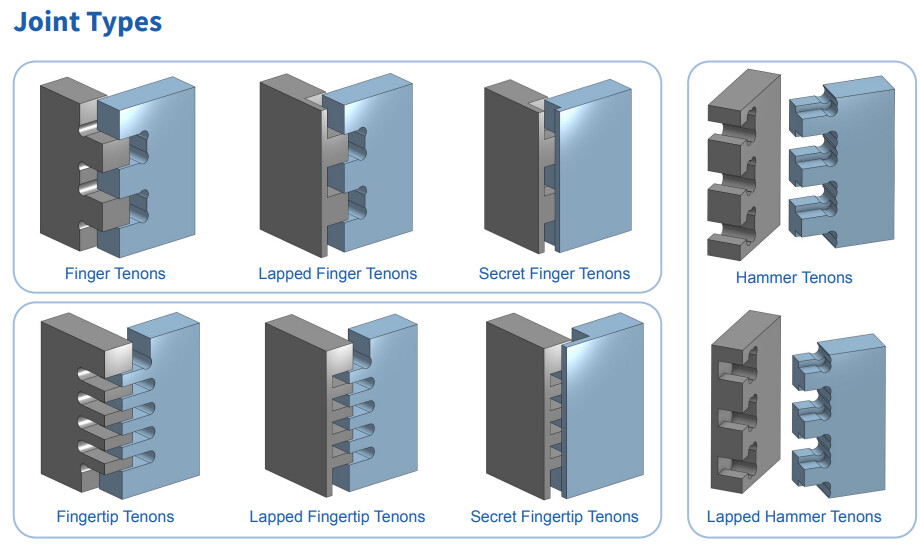
I was considering writing an onshape feature script for some cnc joints but then I looked and someone beat me to it and did a much better job than I would have. You can find it here:
custom feature
Here are a few joints it does:
They probably set it to the lowest latency, which is low dynamic range and low resolution. Just a guess as someone who has done computer vision algorithms in the past.
Ok, so who’s going to do a LR4 mod to rapidly 3D print silicone parts in a fish tank filled with lube?

An expensive kit but cool. A USB PD controller that also powers the NEMA 17 that mounts directly to the stepper. Has an ESP32-S3 and includes an encoder for closed loop.
")
Wow. That is interesting. AliExpress is going to be way cheaper when it reaches them. Hand picked and placed by Josh is not the least expensive way to make anything.
The applications were neat too. The trouble is that most machines I have need more than one motor. If you get into needing 3+, then the usb pd isn’t the best solution for power
Honestly, USB PD is excellent. I just need to see a better implementation of the USB PD power supply. The little (actually pretty big) wall warts are not scalable.
Yea, this mostly makes sense for single stepper applications.
USB PD 3.1 adds up to 48v and 240 watts. I think there are a lot of applications with that. Agreed on the power supplies.
DOH!
I’m starting to warm up to this guy. Something still feels a bit off for me to enjoy the videos, but they are fine.
I think we need more CNC YouTubers

There’s a lot of promotion in his videos, but that’s to be expected these days. His videos are always well produced and include a lot of useful information too. I hope he continues making them.
He is taaaaalking and taaaalking and doesn’t get to the point. Uff.
What would you prefer? A single paragraph summary or “Short” that covers major points, and/or, ability to zoom into more details (if interested)?
Plastic tends to melt and re‑adhere when machined, so instead of down‑cut or standard two‑flute up‑cut bits—which trap and recut chips—use a single‑flute “O‑flute” solid‑carbide up‑cut bit (available in ¼ in and 8 mm diameters) with mirror‑finish flutes to eject chips cleanly and prevent welding. For hard plastics like acrylic, run the ¼ in O‑flute at conservative RPM and chip‑load settings (as shown on‑screen) with multiple hold‑downs to counter the strong upward pull; for soft plastics such as HDPE (knife‑testable), the 8 mm O‑flute can be fed significantly faster. Always use tabs to secure profiles, and clear stray shreds with a nylon brush or fingertip for a crisp, post‑processing‑free edge.
Plastic behaves very differently from wood on the CNC: its chips can remelt and weld back onto the cutter or part, leading to stringy, burned edges. Standard down‑cut bits exacerbate this by trapping chips and re‑cutting them, while even two‑flute up‑cut bits—with less aggressive geometry and rougher surfaces—still allow melted plastic to adhere. The solution is a single‑flute “O‑flute” bit: its sharp shear angle and mirror‑finish flutes eject chips cleanly, prevent adhesion, and produce crisp edges on both hard plastics (like acrylic) and softer materials (like HDPE).
When using O‑flute bits you’ll notice increased upward pull, so more hold‑downs are necessary to keep the workpiece stable. Feeding and RPM should follow manufacturer guidelines—hard plastics require more conservative settings, soft plastics can be machined faster. Tabs, nylon brushing, or even fingertip clearing handle the few stray shreds left behind. Overall, swapping to an O‑flute cutter transforms plastic machining from a messy, post‑processing burden into a clean, efficient process.
Here’s a concise, time‑indexed breakdown of the video, followed by the core takeaways:
0:00 – 0:08
0:08 – 0:43
0:43 – 1:47
1:47 – 2:20
2:20 – 3:02
3:02 – 4:30
4:30 – 5:14
5:14 – 6:02
6:02 – 7:16
7:16 – 8:27
8:27 – 9:13
9:13 – 10:05
10:05 – 10:44
10:44 – 11:19
Following these guidelines and using the right cutter will transform your plastic‑machining results from stringy messes to crisp, clean edges.
Actually that’s better (though it’s AI :P). I don’t need to watch 11 minutes for the two slides and the tip to buy O whatevs.
/edit: 1000! ![]()