So I have seen the CO2 dot size and it is tiny… How do these ones compare?
Compare to what? Tiny? That’s a little subjective but if you’re asking about the Jtech laser, it’s spec is .008 to .010" . A less powerful laser diode is the M140 but it does have a slightly smaller spot size of .006" to .008". The lens that you choose will affect the spot size and power output too.
Hmmm… I will have to look up what the spot size is for the CO2 machines that I saw. It looked like the width of the spot was around the size of a hair, but I will see if I can find out the measurement. Sounds like the Jtech at .008 to .01" is pretty dang small so probably comparable.
Has anyone tried etching anodized aluminum yet? I know Jay has demonstrated this at <2.0W (http://jtechphotonics.com/?p=2687), but I can’t make a mark even at 1.7A (>2.0W).
Perhaps my surface is too reflective. I’ve tried masking it with blue painters tape, did not work.
Next I am spray painting it with flat black and I will try again.
I’m interested to know what ends up working for you, Bryan. I plan to try anodized aluminum at some point, but I don’t have any on hand at the moment. I did order some leather key fobs that I’m going to try. I also just cut my first piece of acrylic (the laser shield for my mount).
Here are the results after it was painted flat black.

The paint was easy to remove with acetone. The etching is black in color - and hard to see unless at an angle. I am unsure if I made it all the way to the bare aluminum.
Settings: 1.7A @ 4000 mm/min speed
I will have to continue testing at slower feedrates to see if it penetrates any further.
@Bryan I have a black Maglite flashlight that I can try but not until I move my laser to the MPCNC.
@Karl, Do the line lasers on your mount really help that much? I think they look really cool but I probably wouldn’t use them much when I can just turn the beam on at really low power for a more precise aiming spot right? I’m just asking because I’m designing my laser mount for my MPCNC and trying to decide what’s most important as far as design intent goes. I think I want an easily removable shroud because my gear is in the garage and there’s lot of unpredictable traffic there so I don’t want anyone being exposed to the laser reflection unexpectedly. I also think I’m shying away from the interchangeable mounts because I have dust collection hooked up and it seems like too much trouble. I might attach to the Z-Axis pipe and have a quick-release mount there so I won’t have to touch my router at all to add/remove the laser. Any thoughts anyone?
Funny you should ask that, Leo. I was actually thinking about removing the line lasers for just that reason - you can get perfect aiming by turning the laser on low. I also think it looks cool, but it’s certainly less wiring and stuff to worry about.
Hanging the laser and other tools off of the router and leaving the router in place is certainly a viable solution. It was what I was considering along with the universal, but when this one came out I decided to give it a try. I haven’t tried actually using my router with it yet. I have dust collection too, but I’ve already incorporated it into my universal setup.
This is kinda where I’m at now. My requirements…hopefully will be fulfilled .
- Dusty environment so needs to be completely and quickly removable for safe storage.
- Light shroud to protect surprise visitors to high traffic area.
- Doesn’t take away from X/Y/Z/ axis travel.
- Electrical connections need to be clean, secure, and easily undone.
I’m gonna print it now and see how it looks and fits. There is very little weight to support and practically zero lateral forces so I’m hoping the tapered dovetail and embedded magnets will be enough to secure it without screws but I really don’t know. The clamp will remain permanently attached to the very end of the Z axis conduit and the laser should sit right next to my router. I’ll let you know after I get it all hooked up and tested but I’m now realizing my USB motion controller/Mach3 setup only has 10V adc output for a VFD spindle setup so I need to see if a simple voltage divider circuit will get it working for me.


I like the way you integrated the connector into the mount. What kind of connector are you using?
I bought some of the laser shield acrylic from JTP and I’m in the process of fashioning a shield to protect eyes without needing the goggles. Mine is not as sophisticated a design as yours. Yours is quite impressive, but I like to be able to see where the laser is hitting when it’s running. My laser shield will probably mount using a binder clip - for now, anyway.
@Karl: I’d really like to put a little viewing window in too.How thick is the material from JTP? I’m afraid it’ll add too much weight to the shroud which I need to be as light as possible to float on the material. I may just buy a cheap pair of ebay laser goggles ,which work very well for me, and butcher them for the window material:)
The connector is a 4 pin chassis mount xlr connector, very common in the DIY CNC community.My printed parts came out pretty good and the tapered dovetail provides a nice fight fit. Hopefully I’ll have time to connect and test later.

As much as I’ve seen the little laser-shield type things, I’m still leery of my kids coming in while the laser is on.
I’m just building a box with 2 cutouts for my 2 sheets of safety material.
Leo, the JTP material is 3mm. A small piece wouldn’t weight very much, but it only comes in 12x12 inch sheets or larger. For a little window, butchering a pair of goggles would probably work fine.
I didn’t realize you had designed the shroud to float. I had thought about a design like that, but was worried about catching on the work surface.
On a whole other subject: has anyone tried laser engraving a ceramic floor tile? The only thing I’ve been able to find on youtube is someone using a 40w C02 laser to etch tile. I might give it a try - probably have to go real slow.
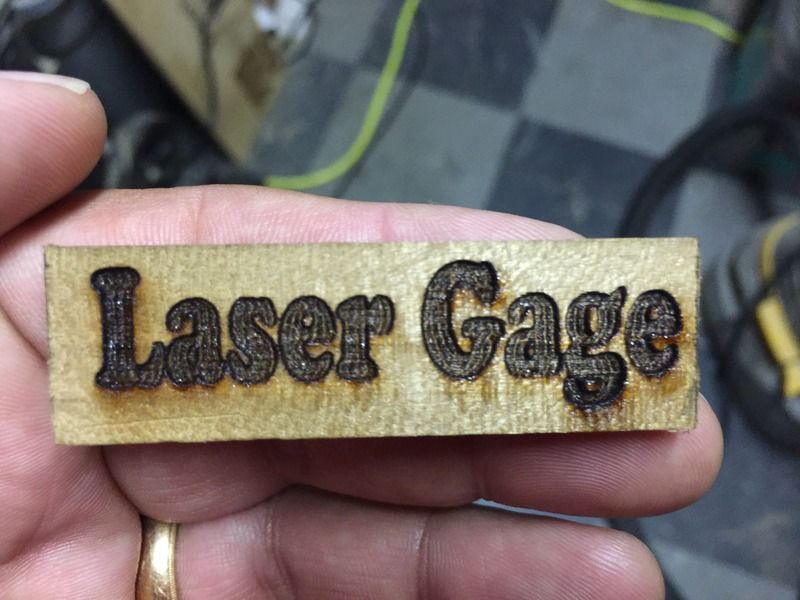
I took Leo’s advice and made a gage for setting my laser height. Since it’s just a piece of wood, I wanted to make sure I didn’t throw it away. Sure, I could use a pencil or a sharpie, but. . .
@Karl Ceramic tile huh? I just googled it and saw some really nice work. Definitely have to give this a try…
@Alan Definitely better safe than sorry if you have curious kids around. A full enclosure sounds like a perfect solution for you.
Hi guys- Looks like you are all doing awesome work on upgrading the mostly printed CNC. I just got informed on the forum here, so I will now be looking at the thread to see if I can be of service on answering questions. It looks like you all have figured out how to get everything working, but here are a few suggestions from some of the earlier responses.
Focusing: We wrote a blog post the has an alternative to using your eyes to find the best focus and rather use a number of lines at different Z heights to engrave into a test piece of wood. Then you look at which is the smallest line. The post is here: http://jtechphotonics.com/?p=2602
We normally recommend anywhere between 1" and 3" for the focus height. Yes, most of our machines in the pictures and videos are set up at about 3". We have found not much of a difference in this range as long as you get your focus small as you can.
Also, as many have noticed, the easiest way to turn your laser down for focusing is to use the PWM command in marlin. You can see when the threshold of the laser is met somewhere around M106 S5 or so. It might be a bit lower (M106 S3) or a bit higher (M106 S10). Just find which is the lowest for your laser and then use the focusing technique from the manual.
The laser gauge is a good idea. Just make sure your lens does not move. We sometimes use PTFE tape to secure the lens in the housing. Never use super glue or anything that will fume as it will destroy the lens coating.
Safety: The shielding is great for making a laser shield, but we also still recommend using your goggles at all times unless you have a full enclosure that is also interlocked. This means that if the enclosure is breached, the laser will turn off. The front green connector is the interlock which you can use to put switches for the openings. If you have kids around, I would suggest taking the key out of the driver and hiding it when not in use. Always make sure everyone in the room has a pair of goggles as well…
Fumes: We use a shop vac to suck the fumes from the work surface and put a charcoal filter on the output of the vacuum. It is even better to put the vacuum outside and vent out of the space completely. When processing any material that is not organic you need to take extra special care. Most of the fumes from non organic materials will be even worse for you to inhale.
Anodized Aluminum engraving: This process is a chemical process (the anodization will bleach white), so it is very material specific. Most of the samples we have tried work, but we have also seen some that don’t from customers. The one from our video is from Brady (https://www.bradyid.com/en-us/products/tags). We have engraved our Mag Lights as well and it works great.
Software: All of the software on the website will work with the marlin firmware. The inkscape plugin is something that developed a long time ago and has been shared on several sites over the years so there are a lot of variants of it. It can be a bit buggy sometimes, but heck, it is free. Most of the issues it has is when you are importing images into inkscape that the plugin has difficulty in figuring out the size and/or units. Most of the time it will work fine when you draw from inkscape itself (text and such). You will use M106 as the laser on command and M107 for the laser off command. The S command is added based on the power level % setting. If you have questions on the software you can post a specific one and I’ll try to answer quickly.
I’ll be checking the forum now and will try and respond to future posts which are relevant to us.
Best Regards,
Jay
1 Like
Jay,
Thanks so much for checking in on us! I haven’t made the jump to laser yet so these guys have done all the heavy lifting on figuring this out. Seems like its almost plug and play at this point.
Your laser seems to be the top dog, congratulations on a great, easy to use product. When I get a chance I’ll pick one up.
Thanks again.
R
Hi Jay, great to have you here! I’ve really enjoyed using my laser so far.
Have you guys tried lasing ceramic tile? I didn’t find anything on the website.
Karl
Hi Karl,
I have not tried ceramic tile yet. I would assume it might be hard to get it to engrave, especially if it has a large amount of coating on it. I need to go to Home Depot soon and try that and glass. We just tried CERMARK with some ok results on stainless steel that we need to get up on the site soon as well. If you get to the ceramic before us, let me know how it goes!
Jay
so I got my 2.8W laser from J Tech and can’t seem to burn anything even after doing the focusing procedure. Right now, I’m only running it out of the box @ 1.4A. Sending M106 255 gives me 1.46A but the laser don’t seem to burn anything (even paper). Talking to Jay about this now right now but just wondering if any of you guys experienced this. Here are some pics of how I setup my laser to my MPCNC

any other things to look at? my plan later tonight is to use all 5 jumpers to see if I can start burning something. here’s a video of a file that I tried to burn in paper (gcode created from Laser Etch) with 200 power and 200 speed