Jeffeb3's build

It’s alive!

I wired everything with removable connections, but I ran out of small heat shrink, so I couldn’t make the extensions that I needed to go the full size of the machine. So I’m working in a small corner, for now. I’ve got a friend coming over with heat shrink this afternoon, so I should probably start making the table for it…


It’s not moving as smooth as I’d like, but I think it might be the texture on the conduit. Hopefully it will get better.

The Z axis is really cool. I couldn’t grab the coupler with pliers, so I did this when I threaded the screw into it, I just used a flathead screwdriver to hold the coupler.

I’m moving things around with the LCD screen, and I’ve had the z axis quit working twice now. It didn’t sound like it was struggling or anything. It just stopped moving. The position on the screen was still changing, so I think the arduino thought it was still stepping, but the axis wasn’t moving at all. I reset the arduino, and that didn’t fix it, but unplugging the whole thing and plugging it back in got it working again. As far as I can tell, it’s moving very smoothly, I can easily rotate it with the Z adjust screw by hand when the steppers are off.

My progress is probably going to slow down a bit, because I need to focus on the stand, and print the feet, etc. I might reprint the X, Y motor holders in PETG too, because I just got some PETG.

I got it working with pronterface, and repetier. This is just with an unlevel surface, and a marker rubber banded to the tool holder.

Now I’m waiting on the feet, and I need to make a stand…

I saw that Z axis freeze again. Not sure what’s causing that.

Are you using estlcam to generate the gcode? Some tighter z axis machines need a bit slower z acceleration. I think we have a way to do it in estlcam but just flashing an updated firmware is pretty easy. Just take the z accel down 5 and see if it goes away.

It only failed when I was moving it around with the LCD or repetier. What is the part that’s quitting? Is it the driver? I’d it over heating?

I just generated the gcode with this webpage:
http://microtechstelladata.com/TextToNCcode.aspx

Which is why it looks distorted. And the retraction was set to 2mm, which isn’t enough to lift the pen, etc.

That is common with the screen, the z speed needs to be adjusted. on my list of things to do. In repetier just slow down you z max speed to under 8.5mm/s.

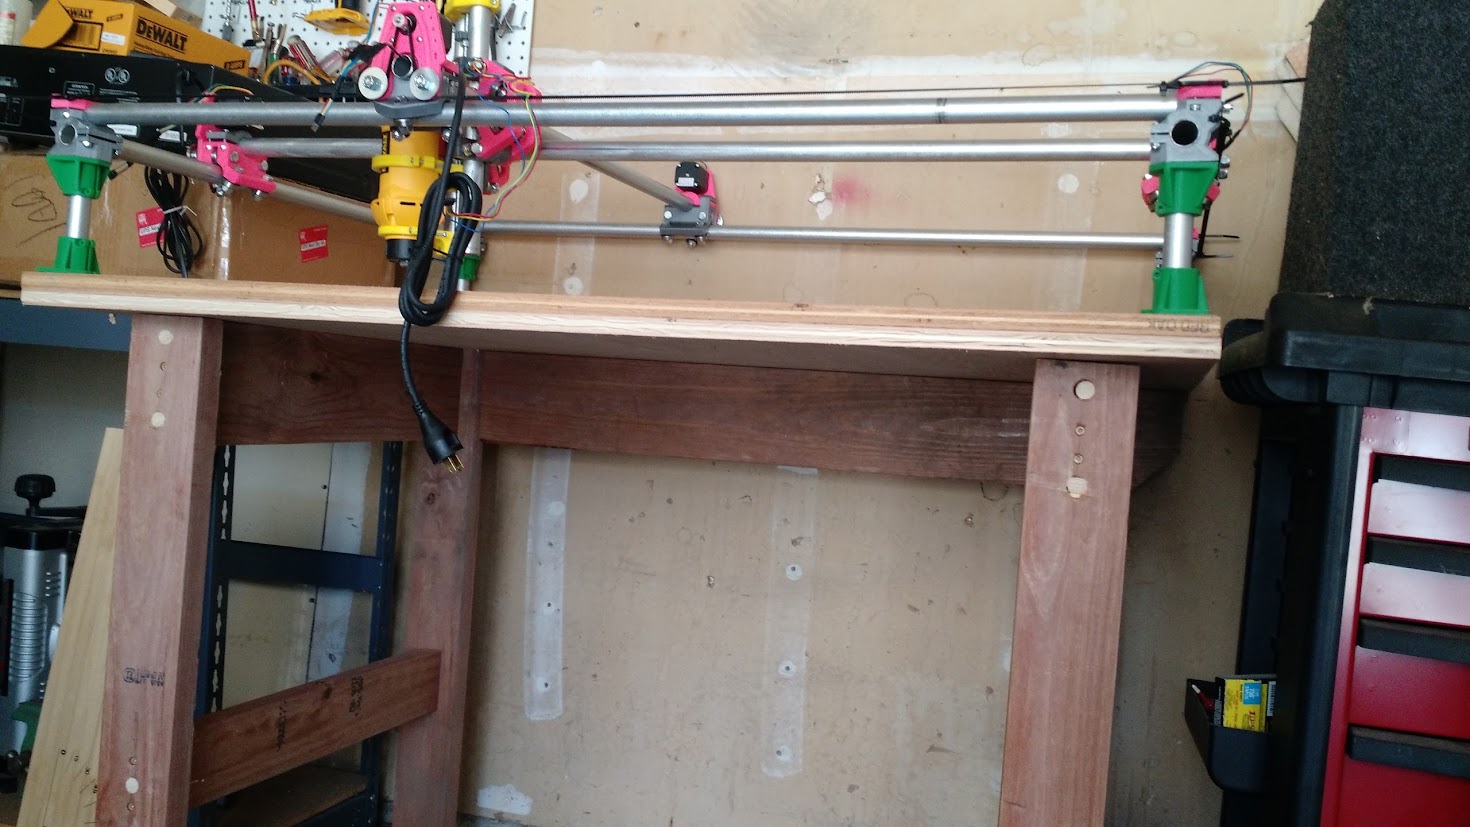
I have made a stand.

I used this video as a guide. (I really like this guy’s videos. He has a great series on this homemade table saw, which seems awesome, and crazy dangerous. He’s always doing something smart with very little equipment.)

I drew it up in sketchup first, which I ended up sharing in thingiverse:

I haven’t attached the front (well, I have it attached with clamps but not in the picture). I hope to use the MPCNC to carve something out of it, so that people will immediately understand what it’s for when they see it (and why not, when you’ve got a CNC?).
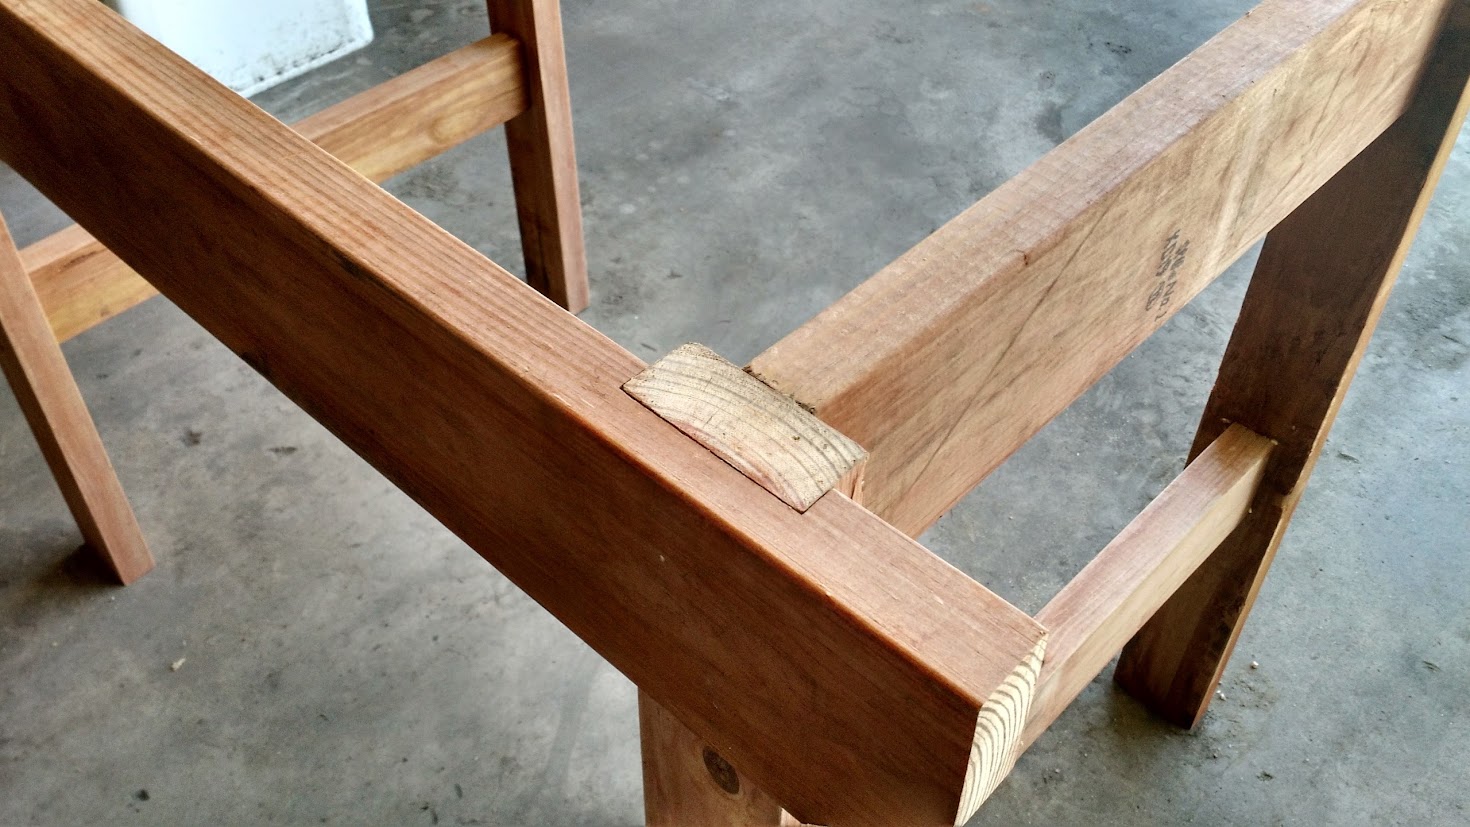
Joint close up:

I have two 3/4" pieces of ply that are 3’x4’ for the top.

Really close now, I just have to glue the feet down, and I can at least cut something with me standing there.

I glued the feet down. I 3D printed a little pattern that helped me mark out the locations of the holes under the feet, and I’m going to just keep them all the way down for a while.

Here’s what I did to layout and install the feet.

  1. I made a really square piece of plywood be the base. This thing is very square because it’s the original 4’x8’ sheet on three sides, and a carefully cut fourth side.
  2. I made sure the parallel sides were the same length.
  3. I made a little block of wood which is as wide as the extra size of the table top. So in the X direction, the sheet is 48" and the printer is 47.07" The gap is 0.93", so that’s the size of the X block. The Y block was 0.838". I’m using these blocks to make the feet be able to be referenced from the edge of the plywood.
  • I want all my extra space on one side, instead of centering the machine. I want that because I want to run cables, and mount stuff on the front and left and I want as much room as possible.
  1. I use the blocks and the foot pattern to make the screw holes for the feet. So on one corner, the pattern was right up against the corner, and on the far corner it had one x block and one y block, the other corners had either an x or a y block. I hope this is making sense.
  2. I screwed down the pattern
  3. I penciled in the hole
  4. I used a 7/8" forstner bit to cut a hole so the edge of the hole farthest from the screw holes was aligned with the pencil mark. Making it off center like that made the feet more snug.
  5. I installed the feet.

After that, I was trusting that my feet were going to be square, and I finally glued my feet onto the MPCNC, aligning them with the holes for the pipe and screws. This is an image of me measuring square. It’s not perfect but 1/8" over 5 feet is pretty good, I hope. I also glued the feet a little bit off to try to make a small difference towards square.

Overall, the feet gave me the most heartburn. They feel solid now that they are completely sunk into holes in 1/5" of plywood though. I was feeling confident, and I will be ready to make some dust as soon as I figure out this Z Nut Lock problem.

Well, I fixed the nut lock. I printed it waaay overkill, with 100% infill and 0.1mm layers. They layer thing was a mistake, but it looks really great now.

So I actually got to the point where I could cut something, and I started with the vicious logo, and some foam. I posted more details about it on the Troubleshooting thread, but basically, the Z axis stopped working, and I think it’s probably the driver. The end result was that all the travel moves made cuts, but I still hit a milestone today, and I’m really excited about this thing working.

That was actually all yesterday. Today, I dug deeper into my Z axis problem(s).

Some things I’ve found out:

  • When it fails, it doesn’t come back even after a power cycle.
    • It has come back eventually, several times.
  • If I swap the X and Z cables, at the RAMPS board (with the power disconnect, obviously), then the Z motors will still move, but the X axis won’t.
  • I swapped out the Mega with one I had on hand, and it does the same thing.
  • I swapped the Y and Z drv8825 boards, adjusted both voltages again, and it does the same thing.
  • I installed bleeding edge Marlin and repetier software, and both of them do the same thing.
  • I’ve seen the failure with the above pattern, which should be 3mm/s z rate. I’ve seen the failure with the Vzmax set to 5mm/s. The Vzmaz has never been above 8.5mm/s

The only part I haven’t swapped is the RAMPS board…

Just for giggles, test your cable to the z motor with a multimeter.

The cable checks out with my meter. I also did swap the X and Z at the ramps board, and the Z moved. So that tested the cable and the motor and any connectors.

Now, if there was an intermittent problem, then maybe the drv8825 shut itself down, and that’s why it’s not working…

I might spend some time thinking about it while re-terminating those cables. I want to do that anyway.

I forgot to mention that the Vref is 0.0 when it’s not moving, and the software thinks it’s moving.

I should check the fault pin, and the sleep, enable, and reset pins… Out of time, I’ll try that tonight. Any other suggestions?

Jeff,

I read above you have removable connectors. I had a similar problem and found a connector loose. Once it’s loose, the stepper will stop working even if I swap with another stepper, it will knock that one out and there will be two dead steppers. I found a power down and restart fixed the steppers. I see you checked your cables, but maybe the problem is in the connector?

Hope this helps, good luck,

Dave

Could it be that the driver is overheating? Too large a vref and/or no fan can cause what you’re seeing.

Drew

It might be. I’m especially inclined to think it’s heat because I can’t quickly unplug/replug it to get it to work, I have to wait several minutes. The driver’s heat sink and the motor don’t feel warm at all, but it’s happening fast, so maybe the heat doesn’t have time to dissipate into the heat sink fast enough.

I also don’t think it should be overheating, because the current limit is pretty low (0.85A), but I’m just learning about that kind of stuff now.

I decided to re-terminate all the wiring. I do think it’s possible that something is occasionally shorting, and the driver is protecting itself, so all I do to debug it points to the driver, but the short is causing the fault.

I can’t get it to work at all now, so something is more broken than before. I can switch the cables, drivers, and motors around and the only thing that consistently doesn’t work is that port on the RAMPS board. I am going to reconfigure the software to use the extruder 1 port for the Z axis and see what that does.

I’ve also got well crimped dupont connectors on the Z axis, and most of the X,Y now. I’m going to tie the connectors together with wax string to make sure there’s no chance it will be my wiring if it takes out another port.

Also, I made a video the other day, and I finally uploaded it. Maybe this will be useful to someone:

Not sure when the color pink became an issue with guys. Pink used to be a very popular color with men and women. Poor pink…now so discriminated against. :slight_smile:

When the saw dust flies…you won’t even notice what color a CNC is anymore. Get it dirty!

You swapped X and Z? Isn’t the voltage setting for X almost twice that of Z because of the parallel setup of X and Y. That is probably why X wouldn’t move and Z did after the swap. Do you have an IR heat gauge that you can point at the Z when it stops working to make sure it didn’t overheat? Also a fan on the ramps is always a good idea if you don’t already have one to keep the stepper drivers cool. Another thing to swap is maybe one of the other stepper motors and see if maybe the one you have on Z is failing.

Very possible that the Z port is dead or almost dead from what all you have posted. Luckily a new ramps is pretty cheap. Being able to swap that out would be a good test. If not, then a spare is good to have anyway. Good luck. Electronics can be frustrating at times.