Infill for a 0.8 Nozzle?

Hi, I started printing the parts for the LR3 while I wait for the parts to come.
I’m printing them on an Ender 3 V2 using a 0.8 Nozzle to shave some time off, I have been using this nozzle size on this printer and another one for several years now.

My question is, as 0.8 prints are way sturdier than 0.4 ones could I get away with using a bit less infill?

I’m a sucker for time optimization, and saving some material wouldn’t hurt either, as the printing time would be way more than what I’m used to. Still, if the mechanical properties are going to be challenged then I guess I’ll just be going with the default, or not more than 5% less.

Happy to hear your answers!

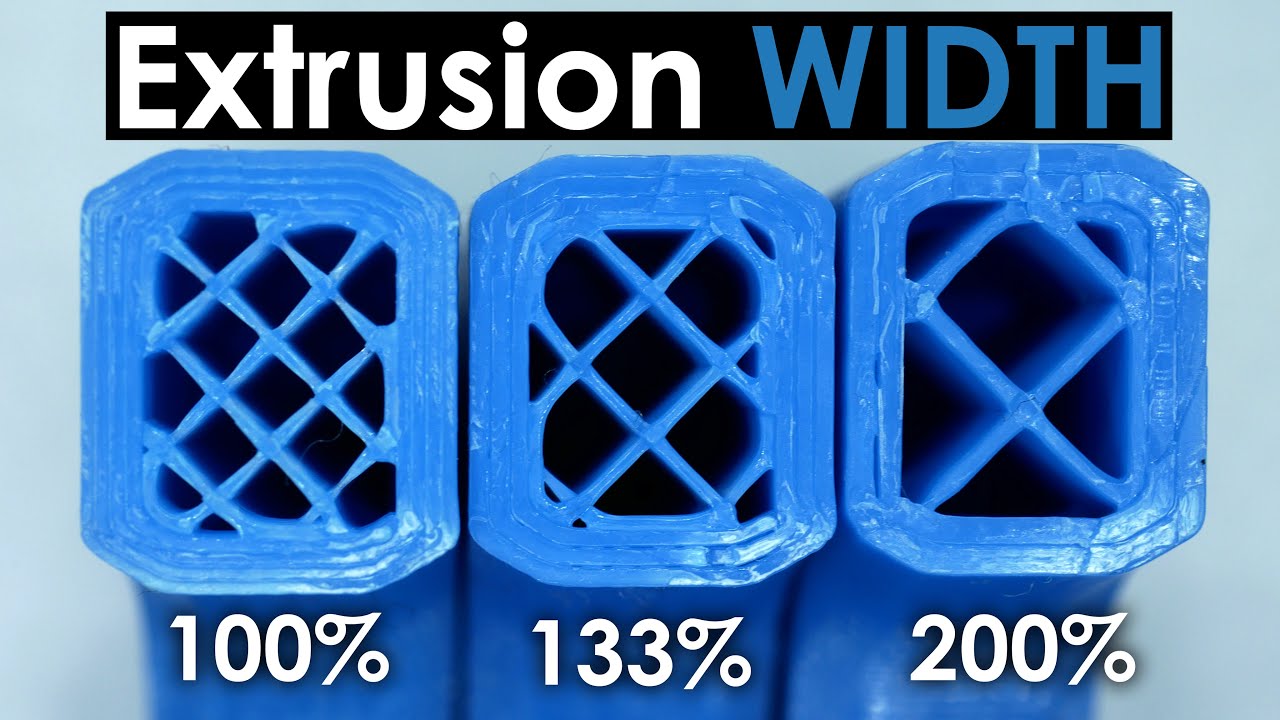
I’m not so sure about the “way sturdier” part, but unless you can somehow prove that to be the case, I would stick with the recommended settings. BIG NOZZLES - HOW DO THEY MAKE YOUR 3D PRINTS STRONGER?

Printing them twice because they aren’t strong enough will always take longer than printing them once at the recommended settings :slight_smile:

Personally, I wouldn’t chance it, and I actually went a bit heavier on the infill for a few of my parts where I had seen instances of people cracking them, etc. as I was researching for my build.

2 Likes

That’s sage advice.
If you want the part strong, don’t use matte filament, use the recommended settings, and if you want to cheat up a bit on strength consider more perimeters.

If you insist on using the .8mm nozzle, convert the perimeters to have at least the same total thickness, and for some slicers you may find infill gets funky with smaller parts and thicker nozzles.

Just swapped out my .4 for a .6 today. I had thought about it for a while before going, but all the threads on the subject are old. With the advancement of slicers, there is a solid argument for .6 taking over for .4, at least for practical prints.

The wider nozzle, by default, gets you thicker walls. I still run 3 lines for outside walls, which gets me a 1.8 mm outside wall with no speed penalty. A .8 will get a 2.4mm outside wall with 3 perimeters. For me, the nozzle change and going from .2 to .24 got my parts printed in half the time, and I was printing at 50% infill VS 45.

1 Like

I did all my parts with .6 mm nozzle, did 4-5 walls and went 5-10% above the recommended infill. I still saved tons of time compared to a .4 mm nozzle. I just increased the infill speed and had the outer walls print a bit slower…worked like magic :smiling_face_with_three_hearts:

1 Like

What youncan do with a larger nozzle is increase layer height.

I think I’d still stick with the recommended for detail, you can combine infill every 2 layers to shave off a lot of time.

Not sure if a wider, thicker extrusion would have a large impact on infill percentage. The infill every 2 layers @SupraGuy mentioned is probably your best bet. But with a 0.8 nozzle?…eh.

The extra thermal mass of a 0.8 nozzle layer may make a part stronger if you can determine the material is being extruded at the same temperature as , say, a standard 0.4 nozzle. The extra thermal mass will assist layer adhesion and fewer layers, in theory, lead to fewer opportunities for delimitation. At 0.8, though, you are going to need to consider “cold core” extrusions where the center of the extrusion is colder than the exterior - not what you want. You’ll have to boost extrusion temps with a hotend that can handle it or slow way down, canceling your print time gains.

Example: Normal print temps are in the 260° range for ABS. I run a 0.6 nozzle at higher than average speeds and have to extrude at 300° or higher so it doesn’t jam from cold core extrusions. To run 0.8 would require a much higher wattage heater block or a significant speed reduction.

Other issues are print resolutions and overhangs. You’ll need a beefy cooling system for proper 0.8 overhangs. Someone more familiar with the geometry with parts could let you know if 0.8 is feasible or not. Perhaps some parts could print at 0.8 but I’m guessing not all.

I know that going from a 0.4 to a 0.6 nozzle, I had to do a lot more tuning due to some of the issues mentioned above as my parts tended to delaminate easier at larger layer heights with a 0.6 nozzle. Some of this was because default extrusion widths on the print profiles were not wide enough, so I think I wasn’t getting enough squish.

While my 0.6 nozzle did decrease my print times, it took some work tuning just to get them “as strong” as my 0.4.

After working through all of my print profiles and tuning, I printed all of my LR3 parts with a 0.6 nozzle and a mix of 0.24 and 0.36 layer heights depending on the type of details involved.

This is just information as a data point for others.

1 Like

What exactly does that do? I’ve never messed around with that setting.

Honestly, I never bothered to google it either, so me asking is really just me being lazy :confused:

Combine Infill every 2 layers?! What does this achieve? (and why haven’t I heard of it before?)

No snarkiness intended, just very interested.

BTW Octimusocti and Big Cheese Dog - WELCOME!

This is a great forum with very helpful people! You’re going to love it!

The combine infill does what it says. I use jt for most of my high detail prints, less than 0.2mm per layer.

Solid fill is still layer by layer.

So your first layer, and the “solid bottom” layers are all normal, but when it starts printing the partial infill, it only prints perimeters, then thicker infill. So, say for my 0.125mm layer profile, it will print 2 perimeters only layers, then 1 layer with infill pattern 0.375mm tall. (Combine every 3.) My 0.166666mm profile combines every 2, so it alternates. When it gets near the top, and needs to print solid infill, that is again layer by layer. From the outside, it looks the same.

I believe the printed parts to be stronger for the nice chunky layers of infill, but that isn’t the main consideration. I don’t print functional parts at those resolutions usually.

3 Likes

I’ll have to give that a test.

A lot of my self-designed prints have big open infills that would speed up quite a bit if they only print every 3rd or every other row.

I use a 0.6 nozzle, and I did increase the layer height for structural components. I also use Arachne methods for the perimeter calculations (3 perimeters min), although I don’t really know how this affects the strength. I do increased the temp slightly for better layer adhesion, but I also use slightly higher infills if I think I can get away with it. For strength, I’m also careful to dry my filament thoroughly before printing.

I’ve been trying to print the core in a particularly snarky PA6-GF from Polymaker. Unsuccessful so far (and frankly now it’s the principle of the thing) I’ve found increasing the infill too much creates curls in the top 3rd of the core above the bolt cavities. These ultimately catch on the nozzle and it’s over.

So now my journey to print this core is forcing me to build a heated enclosure (I’m in Arizona, my garage usually feels like a heated enclosure…) so I can print this core that I covet. All in pursuit of rigidity, strength, and heat resistance. :grin:. Gotta love the journey.

Just for reference, this is what kicked me over the edge to the .6

Ironically, here is how to get a .6 performance out of a .4

Personally don’t recall reading posts by folks using 0.8mm nozzles for LR parts, I don’t recall seeing posts of people being unhappy/happy with resulting fidelity of the prints, or whether tolerances were acceptable on the 0.8mm nozzle printed parts with captured nuts and such?

Me… Cura 5.4+, Ender 3, 0.6mm nozzle, 0.32mm layer height, recommended infill + 10%, 3 walls, regular PLA (not Matte which seems delaminate). Used https://teachingtechyt.github.io/calibration.html, lots of test prints to figure out extrusion esteps, dimension accuracy/skew in X, Y and Z.

Printing LR parts (~15hrs for Core) was a great opportunity to learn and improve my 3D printing skills for parts where accuracy and strength matter. Got to learn bunch of stuff, like filament color/finish and extrusion width (separate from nozzle size) being a factor for part strength for example…

fwiw - My MP3DP klipper/printer.cfg and folder with Cura profile used to print more LR3 Cores (~10.5hrs) for my LR3 IDEX upgrade. Ender3 + LR3 were used to make MP3DP parts. MP3DP will make it’s own improved parts.

None of my machines are highly tuned. They could do more, faster if I invested more time learning, tinkering and tuning.