Ultimate 3D Printing Material Properties Table, Now I need to try it. You said it before, Why didn’t I get it then?
Ohhhhhh, I like that. I really like that.
Ultimate 3D Printing Material Properties Table, Now I need to try it. You said it before, Why didn’t I get it then?
Ohhhhhh, I like that. I really like that.
Cause your brain saw a different shiny before you could order any. ![]()
I was looking at it last night, it says nasty fumes. I will dig around a bit more I got a lot of conflicting info. Some say drying required, some said no drying needed ever.
Well that’s clear as mud! That’s one thing about living in Florida. There is always drying required LOL
Okay, this is working great. I need to pay close attention to mounting orientation to make sure they stick together. I had to custom cut some widths but lesson learned. In the future I will get the magnets first and everything will be drastically easier. (I was in a panic rush and didn’t think it through). So I stick the magnets on the pretty side first and trim the edge flush, magnet the mating strip to it, pull the sticky backing and put the panel in place.
Thank you so much for the suggestion, can’t wait to peel the protective film off and take a look. I will not see the full thing until RMRRF for the first time.
For the poly, I cut little pockets for the magnets and brushed on some black paint. That gives a super clean edge and you do not see sticky tape through the front.
The hold is good, plenty to keep things in place with 10mm width. I think if I had planned ahead and used the premade 12mm width the magnets would line up even better and stick really crazy. So far the paint and magnets are sticking to the poly really well, and surprisingly the magnets are even sticking to the HDPE pretty good.
Fantastic, glad it worked out! Can’t wait to see the final build.
![]()

Oh, shoot, my bad, make the PR and I will merge it right now!
lol… I’m probably the one that wrote that. At the time, I was only aware that @Jonathjon and I had built one, other than Ryan.
I definitely did NOT go through this massive thread for people to add to that list lol
To be fair I didn’t build a v5, yet. Only helped print and test some parts. Mostly just watched and learned, occasionally contributing some back seat opinions from my basement couch.
Frequent posters to this topic:
oh, I’m not saying that was required. I’m definitely not the gate keeper of who is considered “test crew”
I just saw the other “test crew” sections and made one for the printer when I started the docs. I honestly didn’t put more than 10 seconds of thought into that part
Please add yourself, I have some changes to make to that page anyway. With the new contributors icons I can remove that section of the landing page and leave that just for beta teams!
Started the long process of revamping the docs last night.
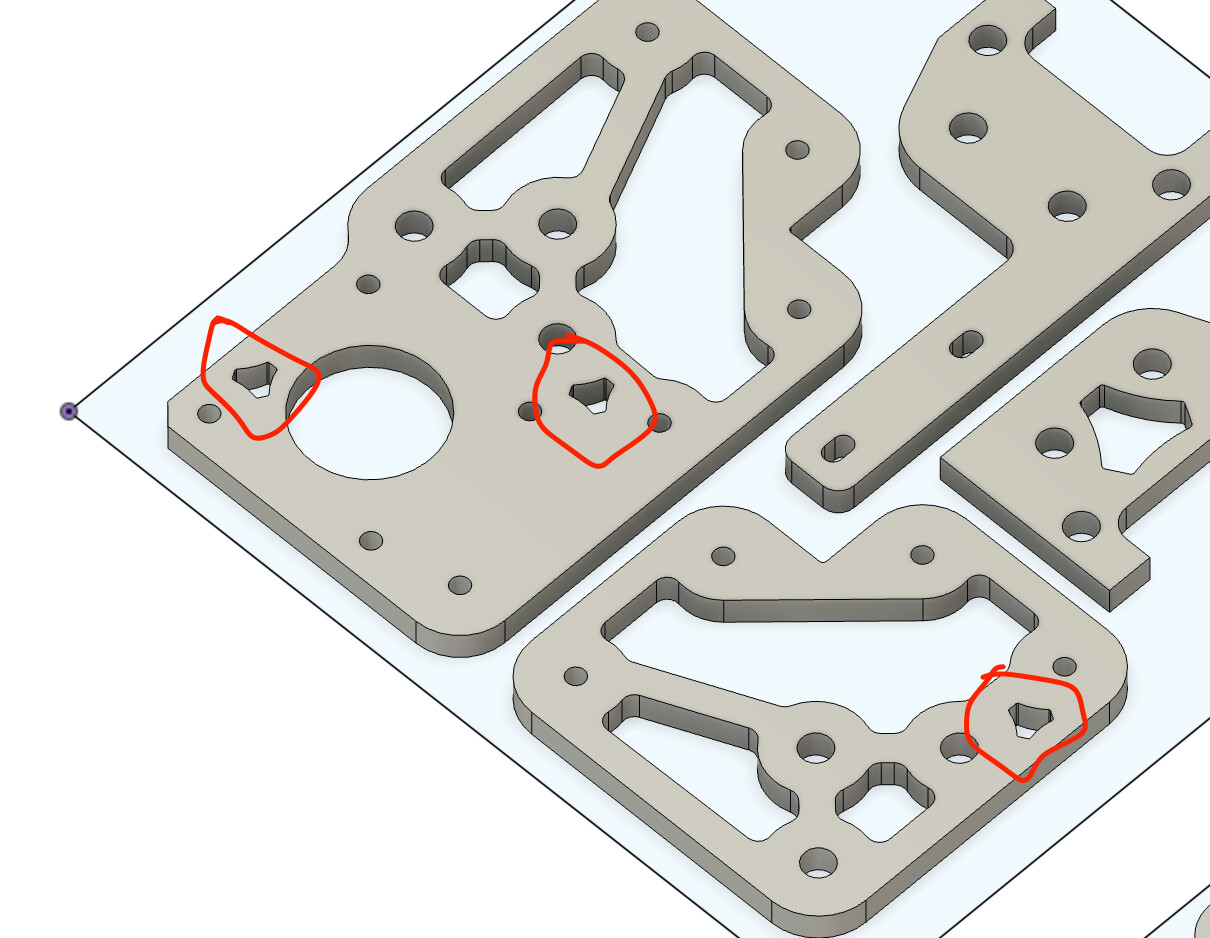
Do the small tri-wing holes in some of the machined parts (see picture) serve any functional purpose? Can they be eliminated? Would need a really small end-mill to cut those out properly.
Those are V1E logos
No
Yes, but it won’t look as cool
1/16" endmill from V1E shop is what I used
I just cut mine with the 1/8th. No tool change and the intent is still there.
Thanks… I’m using a pretty cheap CNC (have yet to build my M3DPCNC, unfortunately) and suspect a 1/16" end mill won’t survive. Fortunately, my wife is crafty and has a vinyl cutter, so I’ll make stickers instead (for the cool factor) ![]()
Makes sense.
I have been looking at the power corners and thinking that we should use the same bottom plate on the top and put a bearing on the top of the motor shaft. Doing so would put the pully into double shear and allow much tighter belts for potentially less belt artifacts. If you tighten a belt too far without the extra support it can snap the motor shaft off (ask me how i know this).
I havent gotten around to cutting new plates to test it out yet… just a theory.
I always worry about the D cut, but a well fitting bearing should be okay. The internal nema17 bearings can actually handle a fairly large load.
At the same time, the belts are not designed to handle more load than the stepper. The belts should be about 7lbs, a little higher for a 10mm belt.
I have tested all the way from super loose too way too tight, there is a huge range of acceptable. Loose really helps hide all sorts of things and nearly no accuracy is sacrificed.
Mike, Jonathan, and I spent a lot of time on belt tension.
I snapped the shaft off of a Nema 23 a few years back on one of my other CNC router designs. I feel like i was reading somewhere that yhe gates belts should be well of 10pounds. But honestly cant remember where right now.