Sorry for lack of a good title. Not sure how to label this.
I’m trying to do a name sign where the letters are raised and I pocket/do an island between the letters.
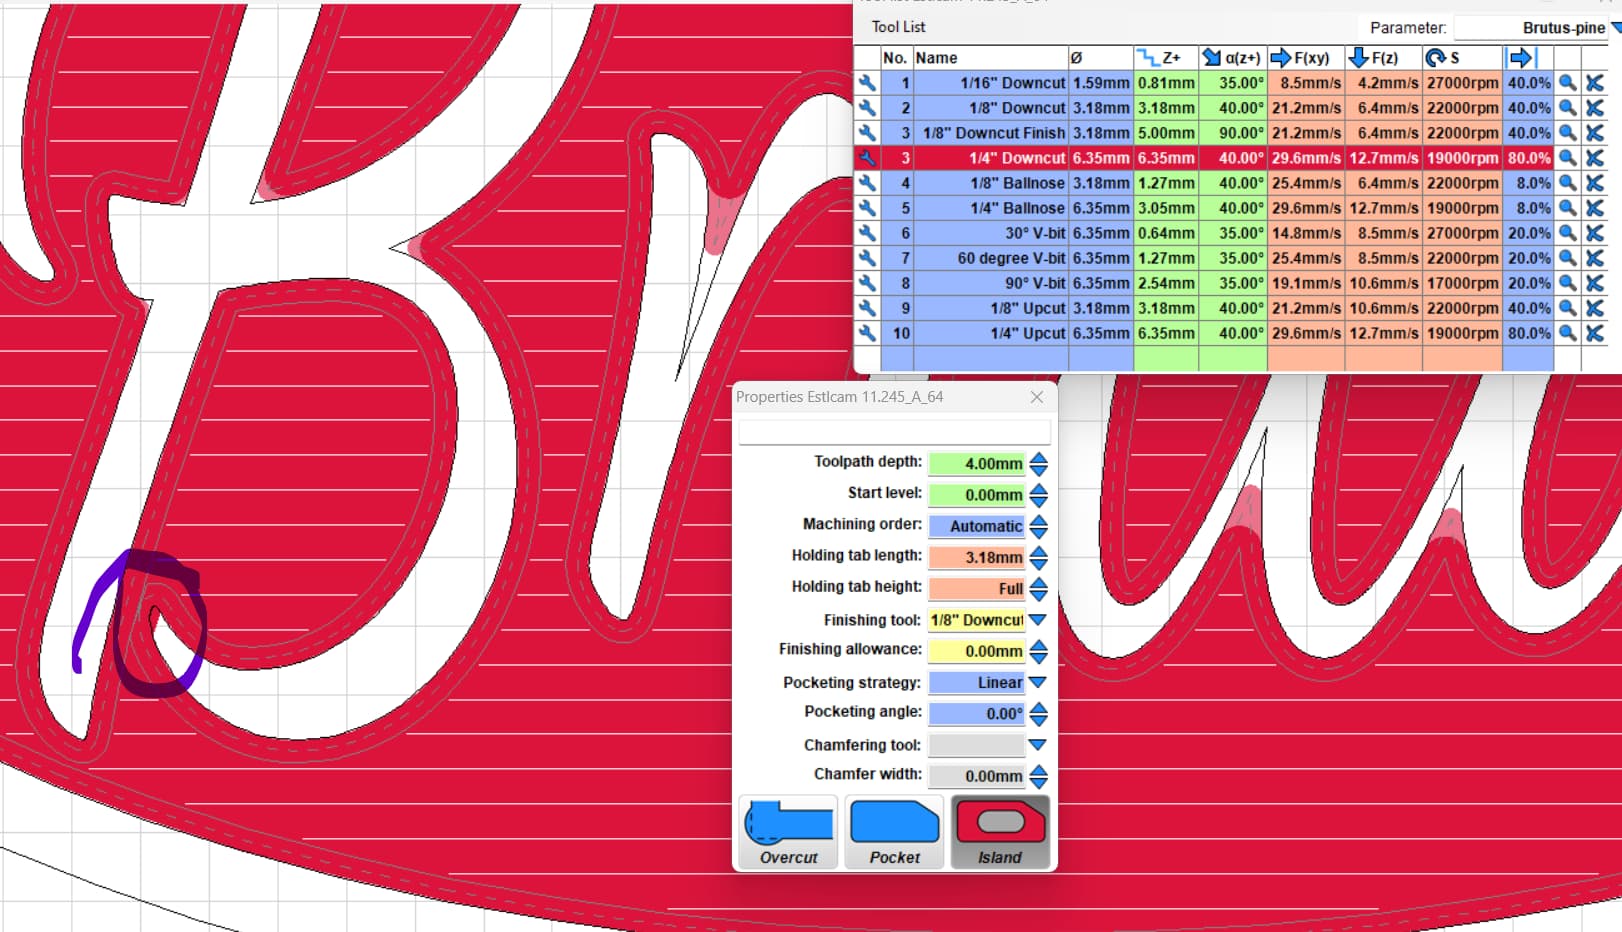
I have set it up correctly with using a 1/4" downcut to clear out the pocket (Island), then I’m coming back with a 1/8" downcut to get into the curves of the letters a bit more to make it look better.
I’m seeing that an area of a letter ‘B’ is going to get clipped because EstlCam has the 1/4" doing a finishing pass before switching to the 1/8" bit for my real finishing pass (you can see in this screen shot).
Anyone else run into this? Is there another setting to not have EstlCam do a finishing pass with the pocket/island tool (1/4" downcut in my case) and just use the selected Finishing tool, or is there some setting to set a clearance threshold for the pocket/island tool? Or do I just have to mess with the font I’ve used to open up that space so it doesn’t get clipped?
I can use the 1/8" bit for the pocket/island job and then use a 1/16" downcut for the finishing tool, but this piece is about 18" x 9" and that would be a verry long timed job. Unless that is my only option.
Where it says “Finish Allowance” set that to .2mm or so. That should bring in what the 1/4" does and leave that .2mm for the 1/8" you could go a little higher but .2-.25mm usually does good for me
Adding a finishing allowance will only make the problem area worse. 1/4" is too big and will not work unless you manually set a point to point path around the B so that the path doesn’t go through that gap. I posted an example of how to do this in some unknown thread within the last year…Estlcam paths overlapping - #4 by dalrun
FWIW, this would look a lot better as a carve pocket. Using a fairly pointy bit (30-45 degrees) its not particularly obvious that the sidewalls aren’t straight and the lettering is so much crisper. See: Dave Lers : Workshop : CNC : Estlcam : Carving
Thanks. I’ll look at that post now and give it a try.
I know it might look better other ways. The client (wife) likes it this way so I’m trying to figure it out.
This is the main point here. Islands are better used for other purposes. You can also do a carve pocket with a straight tool, so basically replace all the islands with a carve outside operation.
Well, I thought I was at the 90% understanding point. Turns out I only understood ‘carve oustide’, ‘straight tool’ and ‘island’
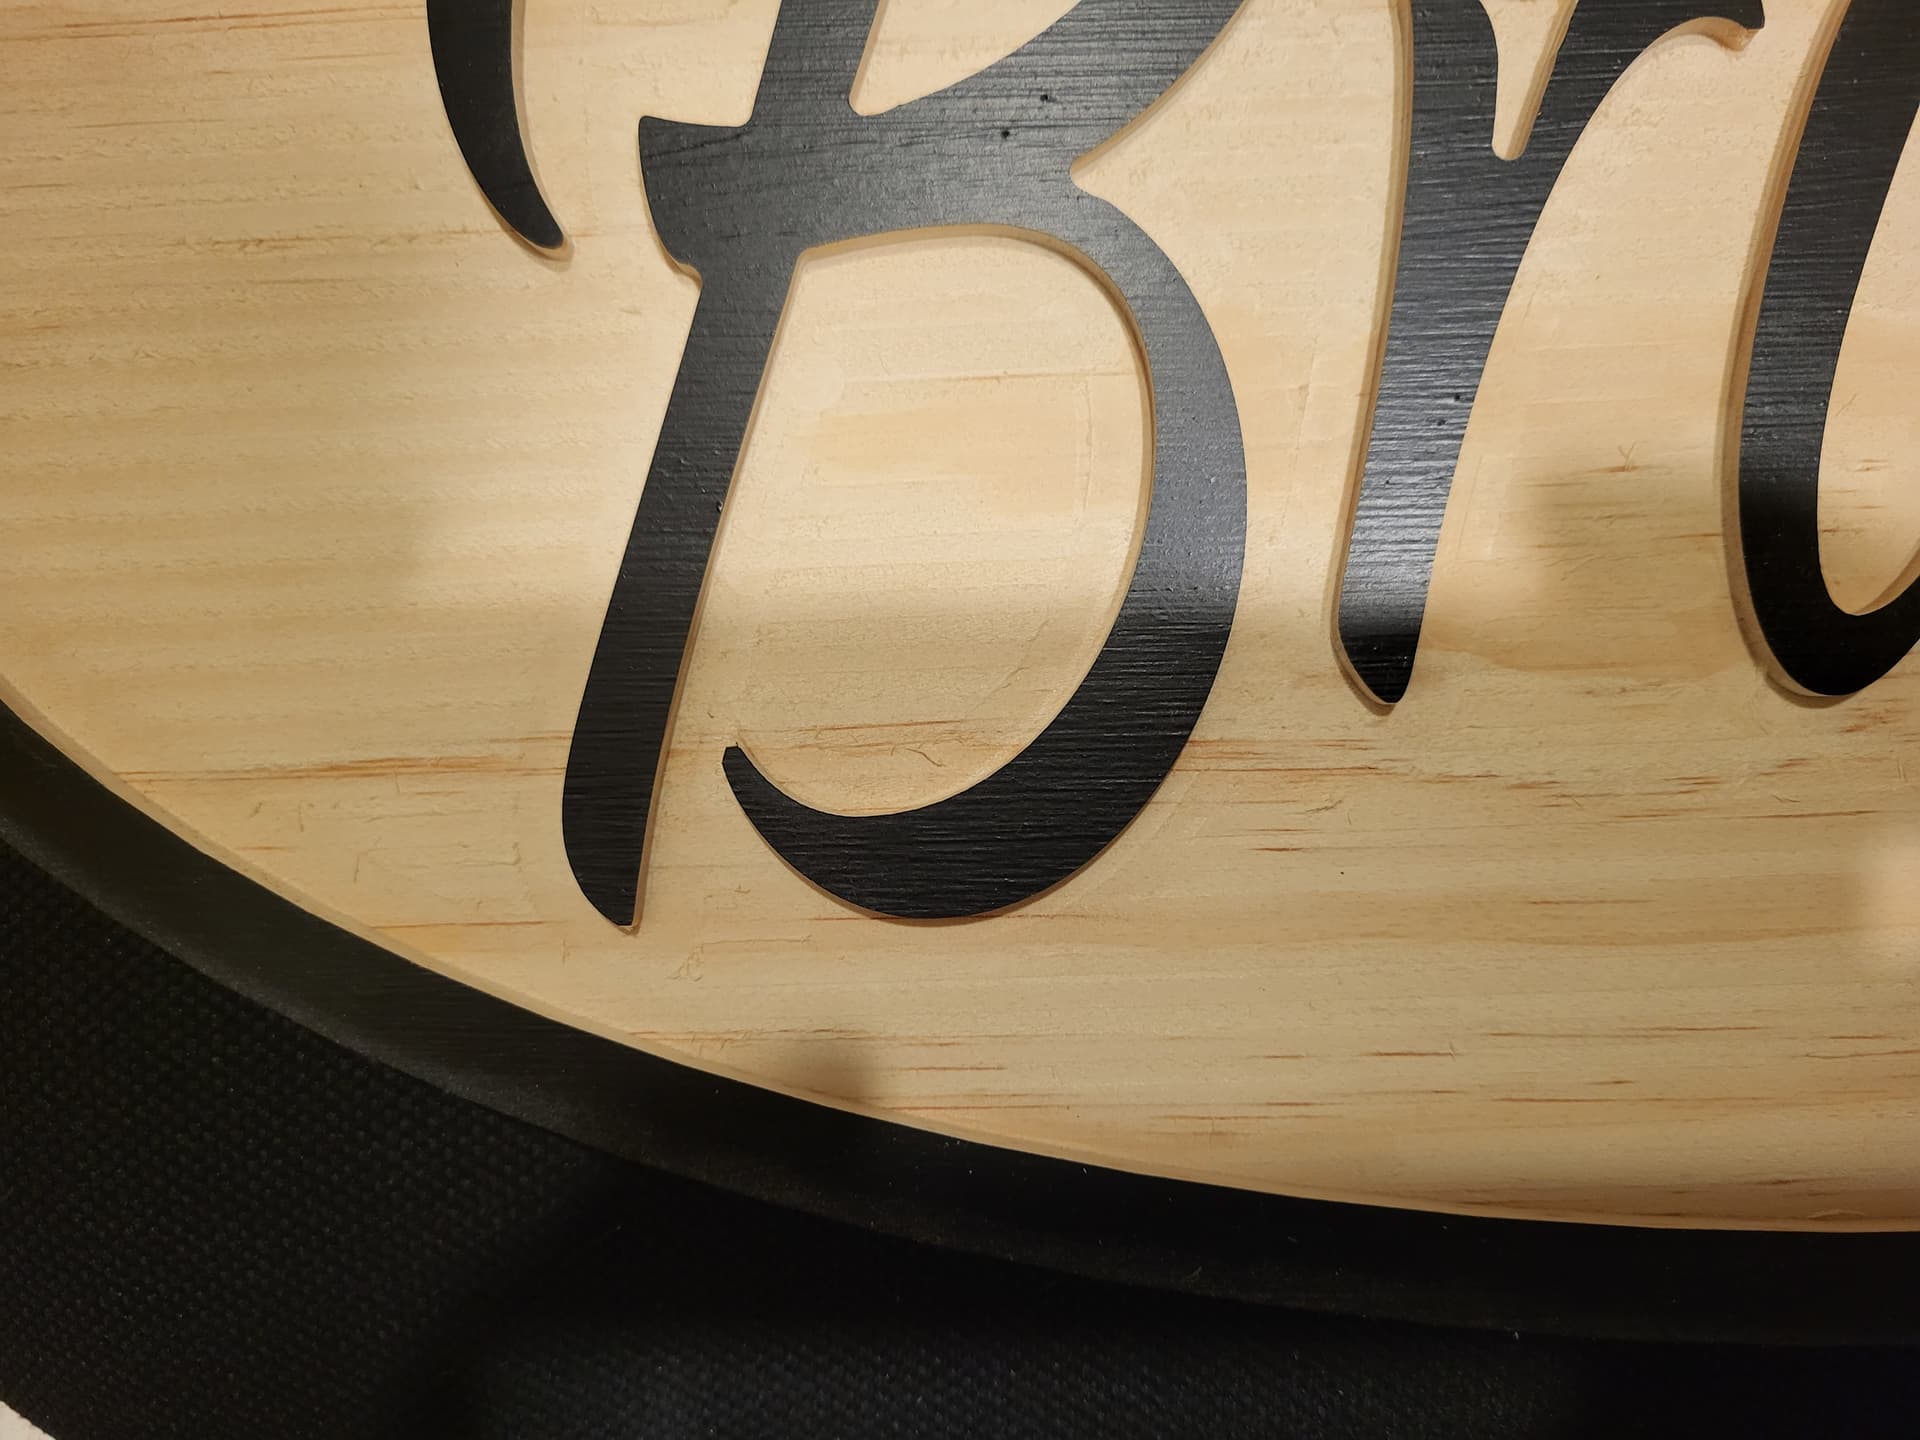
She wanted the letters to be raised and the rest pocketed 4mm. I’m looking at a test cut (in foam) I had done (some mess ups due to bad leveling when changing bits), but it came out ok. So now I’m scratching my head to figure out how I did it. It does seem that there is about a 1/4" gap, so maybe it will cut fine but the tool path view is showing some clipping. I guess, there is one way to find out…cut it (in foam) to see what happens.
Or try to understand what you were talking about.
Select the ‘carve’ button, select a straight tool (1/4" downcut), then select the outline of the ‘B’ and click on the outside of the letter so the arrows point away from the letter? Doing that just seems to cut on the outside (like a ‘part’). Where did I go wrong (outside of doing it this way )?
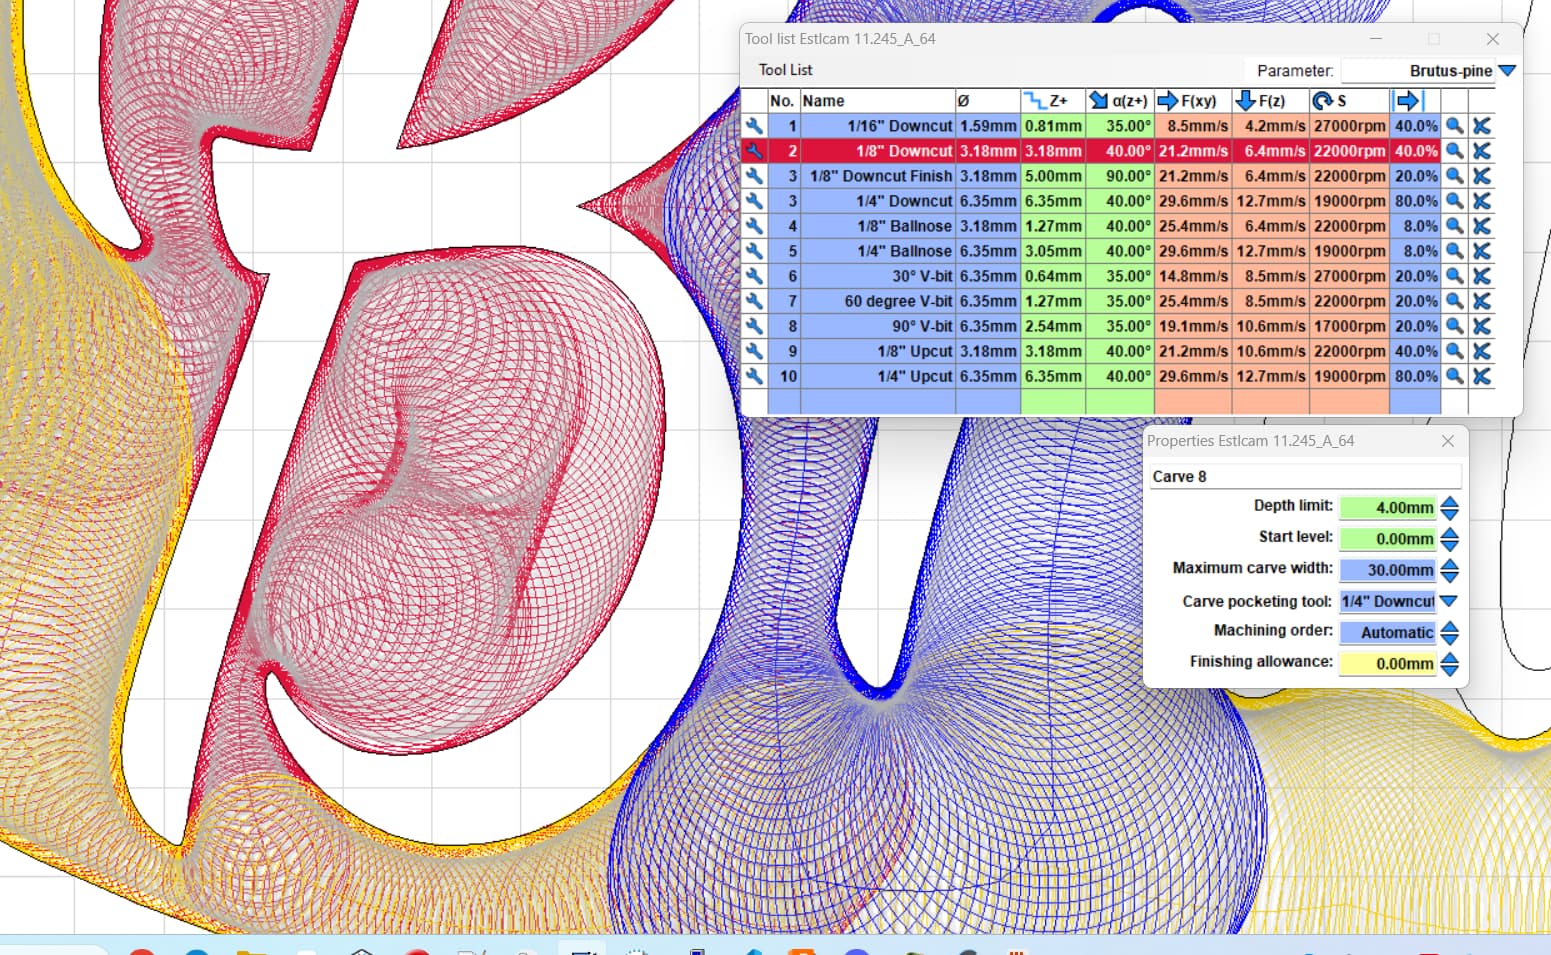
It’s the same process. With the Carve tool and a V-bit selected, set paths around the islands and the perimeter. Add a pocketing tool (e.g. your 1/4"), set a depth limit and increase carve width (100 or so is fine) to create the island pocket. See my earlier link for more details… the letter relief example was done w/ a 90 degree V-bit, using a < 45 degree v-bit will look a lot more like a straight bit relief cut (…sans the rounded inside corners).
Using a straight bit for a Carve makes no sense. Even if it somehow works, you will not gain a thing because the inside corners will be rounded.
To add to my earlier post, once you set the island and perimeter paths select them all and use Edit: Group. Groups allow one click selection and editing of all the paths in the group.
…If you’d read the linked posts you’d know that you need to click Preview to see the actual paths.
Yes, you are right, it does. Why does it do that? It should not do that… -_- Sorry Matt, Dave seems to be right. But you do have V-Bits, why don’t you use them? That would make the letters look even better and sharper.
It does not actually cut those circles but straight lines, you can see it when you look at the simulation in Estlcam.
Dave & Philipp, Thank you for having patience with me. I finally got that light bulb moment.
I see and now understand what you were trying to point out to me . Now if only my brain would retain what my eyes saw and read.
Thanks for offering. Next time I have time, I’ll try it out and compare to show my ‘client’. Maybe tomorrow since today is a nice day to be outdoors here in MD.
I had time today to try out the ‘Carve’ feature using a 30-degree V-bit and then using the 1/4" for the pocket and adjusting the ‘Maximum carve width’. I also tried it with a 1/8" straight endmill as the ‘Carve’ bit and I then set the ‘Depth limit’ to 4mm, but it only cut down 1.59mm (which now I see is 1/2 the diameter and should have realized that before hand). I’m learning bit by bit (pun intended)
Turned out (another good lesson learned) is that I should always look at the ‘Preview’ before judging if I’m going to have something clipped because the tool path didn’t clip the letter at all and I opened this topic for not (well, besides learning a whole lot ).
Thank you again for helping. And thank you Dave. Your tutorial was good (I had to read it about 3-4 times before some of the terminology and concepts sank in. Still a good read and reference).
Thank you all for your inputs and help. From the inputs and tips and me experimenting, the final product was a hit with the wife (she admitted that she didn’t think I’d be able to do it ).